Full Process Presentation on iPhone 12 Teardown
BY kaye | 十月 28th, 2020 | 0 | 0
Tools Required:
Screwdrivers – pentalobe, Phillips, Tri-wing, Standoff
Spudger
Tweezers
Suction cup
Hard plastic plectrum
Hot air gun
1. Tear down the display screen
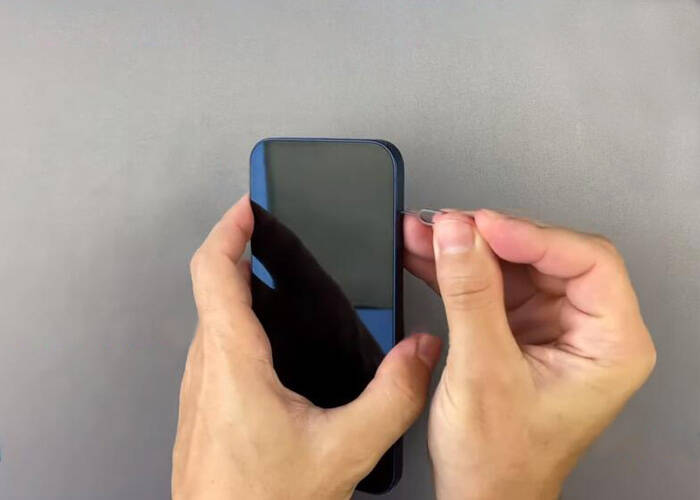
1.1 Turn off the iPhone, Eject and take out the SIM card tray
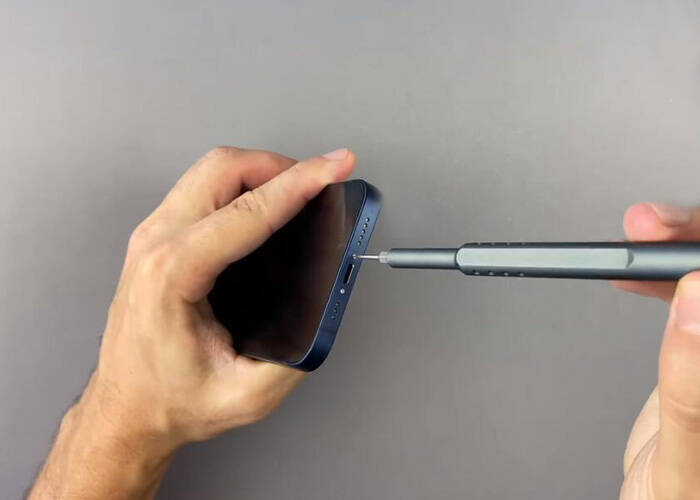
1.2 Unbolt the two pentalobe screws on the bottom, use hot air gun to blow on the display edge and corners
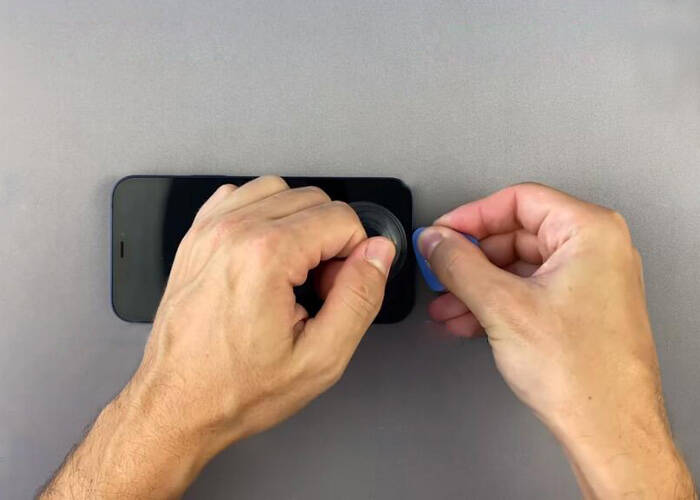
1.3 Use suction cup to pull the display, and use hard plastic plectrum to slice and separate the display screen
1.4 Pry and flip over the display, loosen the Phillips screws and remove the metal shields. Disconnect the battery flex cable and the display flex cables
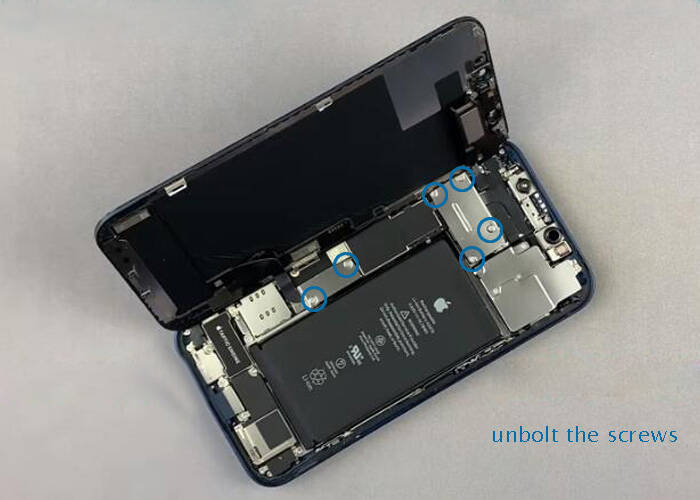
1.5 Separate and take off the display from the iPhone completely.
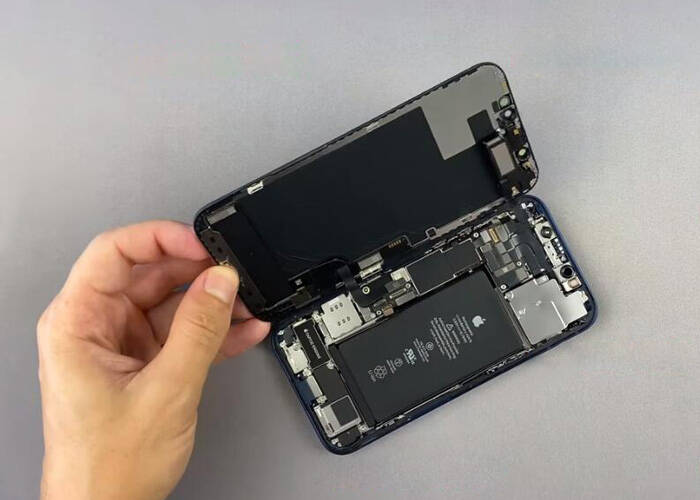
2. Tear down the camera modules and other small inner parts
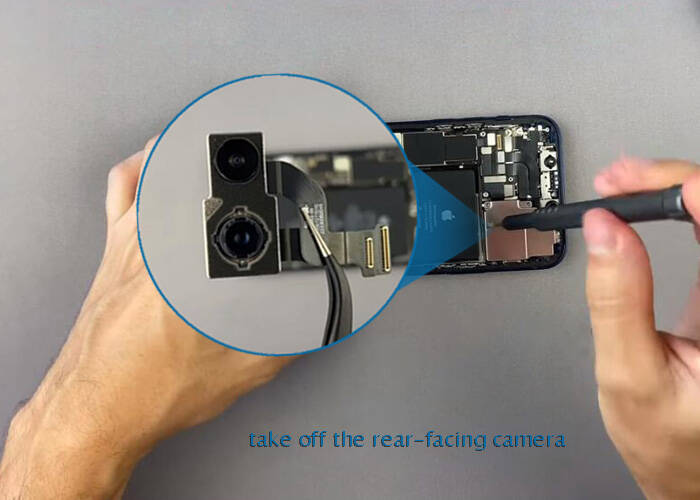
2.1 Unbolt the screws and the metal panel for fixing the rear cameras. Disconnect and take off the rear-facing camera
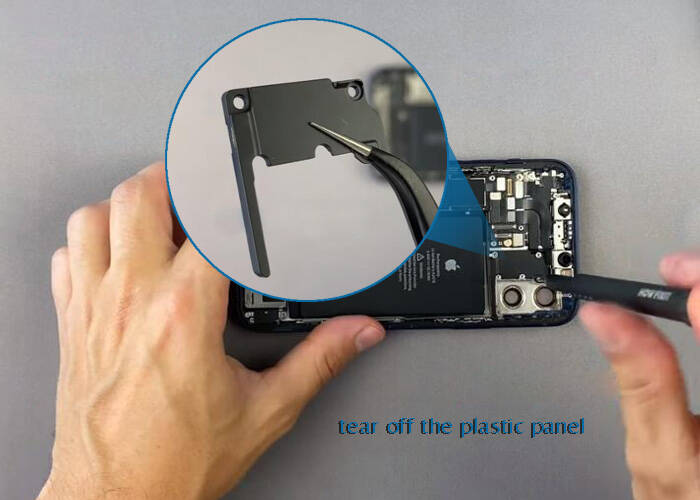
2.2 Use standoff screwdriver to loosen the screws, and take off the plastic panel beside the position of rear cameras’
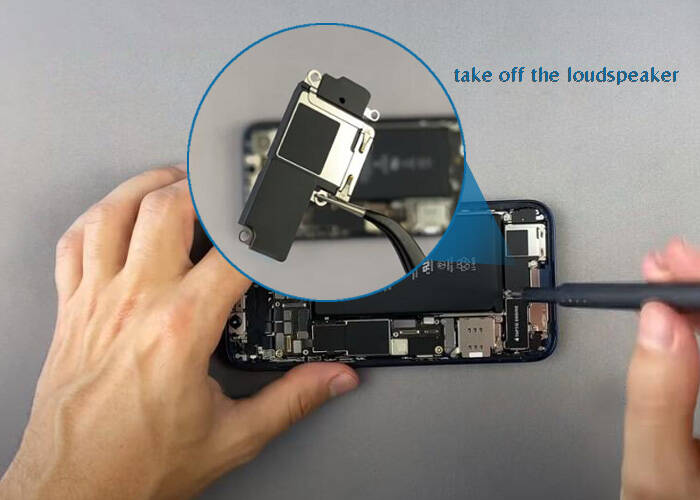
2.3 Unbolt the screws and take off the iPhone loudspeaker module
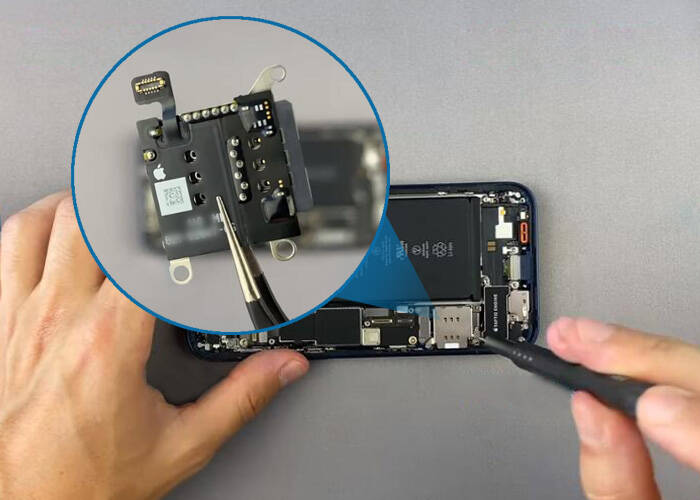
2.4 Unbolt the screws and remove the small metal panel, disconnect and then take off the SIM card reader
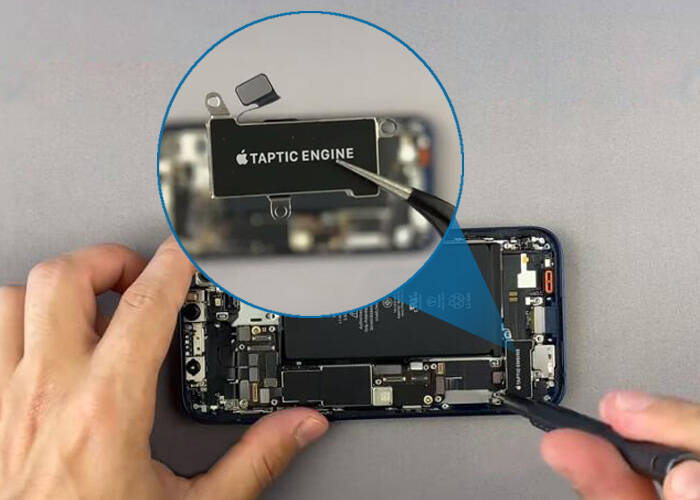
2.5 Screw off and take down the taptic engine
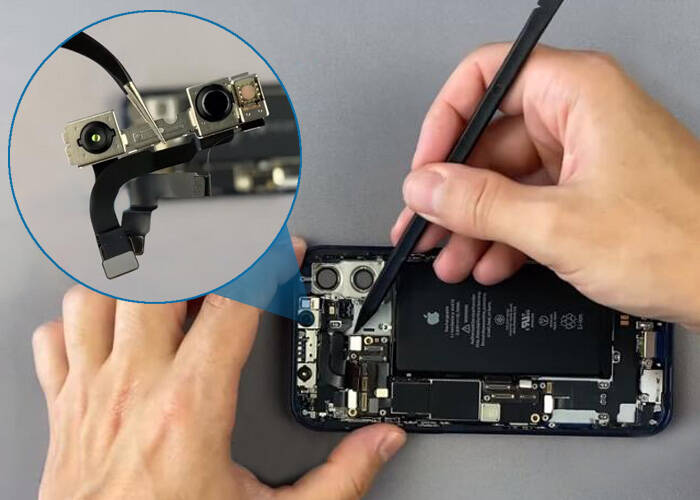
2.6 Disconnect and take off the front-facing camera module
3. Tear down the logic board and the battery from the back housing
3.1 Tear off and pull out the iPhone battery adhesive sticker with tweezers slowly
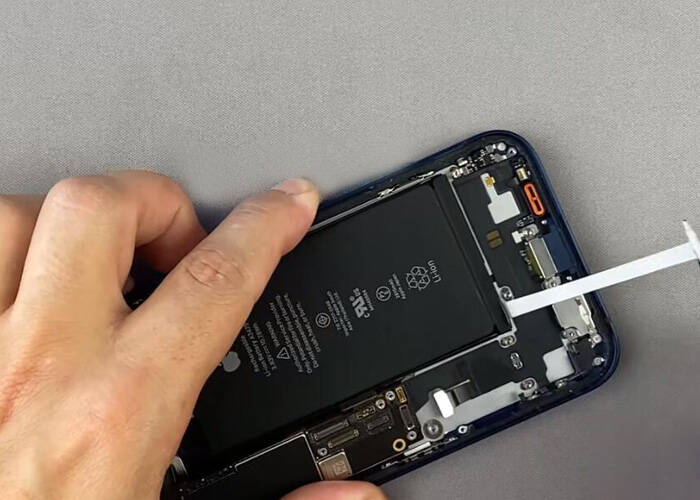
3.2 Pry and take down the battery from the back housing with spduger
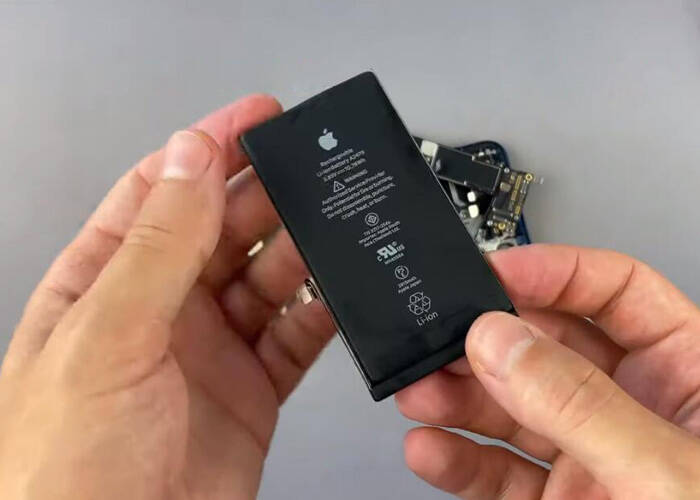
3.3 The logic board has two branches flex cables, which are fixed on the back housing. Loosen the screws and take off the metal panel, disconnect the flex cable, then we are able to take off the logic board
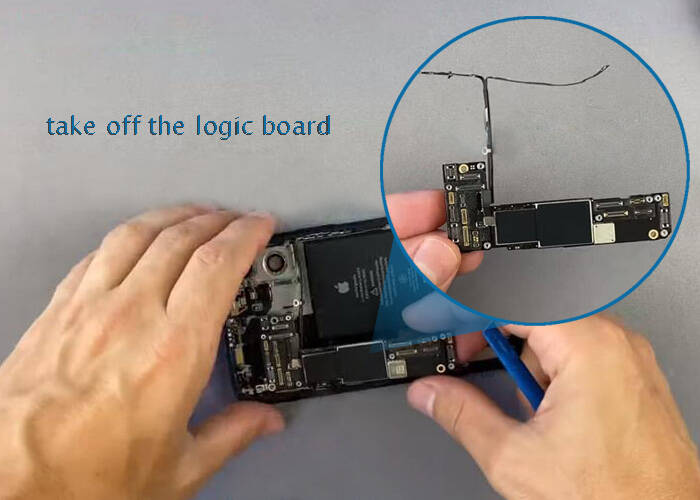
Notice: The logic board flex is beneath the battery, so we need to take down the battery so that we can disassemble the logic board from the back housing. The screws and some of the metal shield are tiny, we need to careful to classify conserve. Don’t mess them up or lose any of them. The iPhone wireless charging coil is closely stick on the back housing with flex connected. It is not necessary to take further teardown process on it.
RECOMMENDED PARTS
POPULAR ARTICLE
- How to Tear Down iPhone SE 2020 for Rear Camera Replacement
- How to Replace the iPhone 11 Pro/Pro Max Rear-facing Camera?
- How to Teardown iPhone 11 for Display Screen Replacement
- iPhone X Tear-down/Disassembling for Screen Replacement
- iPhone X Water Damage Repair Guide (Still Work in 2019)
- How Much Does It Cost To Replace An iPhone XS Display?
- iPhone X Explosion: 7 Small But Important Things To Note
- 7 Ways To Fix Your iPad Not Charging In 2018
- iPhone 7 Screen Replacement | iPhone 7 Repair
- Which Parts of iPhone X and iPhone XS Are Exchangeable?
- iPhone X, XS, XS Max, and XR Battery Comparison
- How To Fix iPhone XS/XS Max, And XR Bluetooth Connection Issue
- Apple Will Fix the iPhone 8/8 Plus/X Auto Brightness Issue in iOS 12
- iPhone got exploded too?! How to protect your phone from battery explosion
- HTC 10 DIY Teardown for screen, charging port, battery replacement
- 6 Quick Tips To Distinguish Between Real And Fake iPhone SE
- Analysis on: Are China made LCDs for iPhone 5S Compatible with iPhone SE?
- How to Replace the Galaxy S7, S7 Edge Battery Replacement
- How to Disassemble the Galaxy S7 LCD Assembly to Replace Screen, Charging Port and Home Button
- How to Repair Samsung Galaxy S7 Edge Cracked Screen
- How to Tear Down/Disassemble the Galaxy S7 for Screen Replacement
- How to Fix Phone Gets Hot and Battery Drains Fast
- Xperia Z5 Premium USB Charging Port Replacement Tutorial
- How to Replace Your Broken Sony Xperia Z5 Premium Screen Step by Step Guide
- 15 Tips to Improve Your Galaxy Note 5’s Battery Life
- How To Replace A Cracked Motorola Droid Turbo 2 Screen
- How To Fix iPhone 6S Auto Shutdown When It Still Has Battery?
- How To Replace A HTC One A9 Cracked Screen
- How to Distinguish the Fake Apple Earpod from the Real One
- How to Replace the LG V10 Screen in 5 Steps
- How To Solder/Replace A Samsung Galaxy or iPhone Charging Port
- The Cost of Repairing a Cracked Galaxy S6, S6 Edge Screen
- How To Fix Cracked Xperia Z5 For Screen Replacement
- What’s Need to Be Prepared As a Startup Cell Phone Repair Shop
- *Update* The Root of Differences among Copy iPhone LCDs: Structure
- Important Info: Pay Attention To Defective Recycled iPhone LCDs
- How to Replace Galaxy Note 5, S6 Edge Plus Battery
- Are The Flood of New High Copy iPhone LCD Screens as Good as The OEM Ones?
- iPhone 6+ and iPhone 6S+ Screen Comparison Report
- How to Recover Photos and Data with Broken Screens
- How To Identify Different LG G4 Model Numbers
- How to Fix Cracked iPhone 6S for Screen Replacement
- Cost of Repairing a Damaged Screen on the LG G4
- How To Fix LG G4 Digitizer Touch Screen Issue
- As a Newbie, What You Should Know About Jailbreaking
- How To Tear Down/Disassemble Galaxy S6 Edge Plus For Screen Replacement
- 90% Of People Don’t Know These Cellphone Battery Information
- Insider Tips to Save Your Water-damaged Device
- How to Set Up ETrade Supply’s Adhesive Dispenser Robot
- Top 10 iPhone 6 Problems and Solutions
- How To Fix Vertical Lines On An iPhone Screen After Replacement
- How to Replace Sony Xperia Z3+ Screen/Screen Replacement Guide
- How To Disassemble/Tear Down Sony Xperia Z3+
- How to Assemble Small Parts on iPhone 6 LCD Screen Assembly
- Reasons Behind & Solutions for iPhone 6 Frame and LCD Separation Issues
- How to Replace The LG G4 Charging Port
- How to Replace the Cracking LG G4 Screen in 10 Minutes
- How To Replace An Oneplus One Cracked Screen
- iPhone 5 LCD Screen Assembly Small Parts List
- How to Replace the HTC One M9 Charging Port
- How to Replace HTC M9 LCD Screen Assembly
- Top 5 Most Common iPhone 6 Issues You May Come Across
- How To Tear Down The Samsung Galaxy S6 In 10 Steps
- The Cost Of Repairing A Cracked Nexus 6 Screen
- How To Repair A Nexus 6 Cracked Screen
- How To Disassemble Nexus 6 In 10 Steps
- The Cost Of Repairing A Broken iPhone 6 Screen
- Five Minutes Work to Replace Your iPhone 6 Plus Broken Screen
- How to Repair a Cracked Samsung Galaxy S5 Screen


 How to Tear Down iPhone SE 2020 for Rear Camera Replacement
  How to Replace the iPhone 11 Pro/Pro Max Rear-facing Camera?
  How to Teardown iPhone 11 for Display Screen Replacement
  iPhone X Tear-down/Disassembling for Screen Replacement
  IOS 17.4 official version pushed to block battery vulnerability
  Is the Chinese-made rear case for the iPhone 15 series going on the market?
  New products coming:USB to MFI Lightning Cable
  Big BUG of iPhone 15
  How Chinese celebrate Christmas?
  Disadvantages of iPhone 15 Standard Edition
  Rumors about the Samsung Galaxy S24 Ultra
  TWS Wireless Bluetooth Headset: Connect Your Wireless World
  iPhone 15 Black Screen Self-Rescue Guide
  Comparison of LCD screens of different mobile phones
  Successfully submitted!