


How to Replace the Galaxy S7, S7 Edge Battery Replacement
BY May | 三月 16th, 2016 | 30 | 25
As the 2016 flagships of Samsung, the Galaxy S7 and S7 Edge feature higher capacity batteries compared with the Galaxy S6 and S6 Edge. The Galaxy S7 and S7 Edge batteries are non-removable, which doesn't it's unable to be replaced. In some cases, the battery has to be replaced in order to cure the device. Here we're going to show you how to replace the Galaxy S7 and Galaxy S7 Edge batteries step by step.
Tools Needed:
- Heat Gun/Hot Plate Machine
- Metal Spudger/iSesamo Tool
- Plastic Spudger/Prying Tool
- Small Phillips Screwdriver
- Guitar Picks/Playing Cards
- Tweezers
How to Disassemble the Galaxy S7 for Battery Replacement?
1. Power off the device and remove the Galaxy S7 SIM card tray.
Once you remove the SIM card tray, you'll find it's wearing a waterproof adhesive.

2. Remove the Galaxy S7 back cover.
Heat up along the sides of Galaxy S7 for 1~2 minutes, the back cover is glued to the rear housing with a waterproof adhesive, which is pretty sticky. Pay your patience on this step and make sure the Galaxy S7 back cover adhesive is nicely warm and loosen.

Pop up the back cover a little bit with the help of a screen separator tool, carefully insert the plastic tip into the back cover and run it along the edges of Galaxy S7 back cover. The adhesive is easily cooled down, you'll need to heat it up back and forth before releasing the back cover. Likewise, be patient.

Now the Galaxy S7 back cover was pulled out from a large portion of strong adhesive as you can see from the below picture, also avoid to hurt the fingerprint sensor in the middle of rear housing while you're heating.

3. Release the Galaxy S7 rear housing set.
Undo the 12 long screws in the rear housing. These screws are in the same size, no worries to mix them up. Use a pair of tweezers to pick up the screws if they're still stuck in the holes.

Remove the Galaxy S7 wireless charging chip and antenna module, be careful not to damage this vulnerable part.

Peel off the yellow tape and then remove the Galaxy S7 loudspeaker assembly.


4. Pry up the connectors shown in below to release the Galaxy S7 motherboard.
The connectors include 3 antenna cable connectors, volume button flex connector, power button flex connector, home button flex connector, front-facing camera connector, rear-facing camera connector, LCD assembly connector, battery flex connector, and ear speaker flex connector.


5. Release the Galaxy S7 battery replacement.
Heat up to soften the Galaxy S7 battery adhesive, wedge the metal spudger under the battery and pry it back and forth, you may also need a plastic playing card and a plastic spudger to help to remove the battery. The battery is glued to the front housing with strong adhesive in square, that's why the battery is stuck so well.


Check below tutorial video for how to tear down the Galaxy S7:
How to Disassemble the Galaxy S7 Edge for Battery Replacement?
Step 1. Shut down the Samsung Galaxy S7 Edge then remove the SIM card tray.

Step 2. Heat up the back the S7 edge(until it’s too hot to touch).

Step 3. Apply the suction cup to the back cover of the S7 edge.

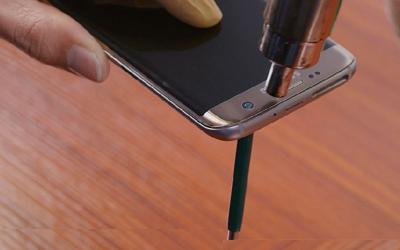
Step 4. Pry the edge of the S7 edge back cover a little bit to insert the thin metal spudger.

Step 5. Slide away the metal spudger a little bit then insert some business cards/playing cards to do the rest.

Step 6. Once the back cover has been released, undo the 12 Phillips screws holding the rear housing.

Step 7. Use the plastic separation tool to separate the top plastic bracket then remove the wireless charging pad.


Step 8. Disconnect the battery cable, power cable, display cable and the volume button cable.

Step 9. Use a pair of tweezers to remove the loudspeaker module.

Step 10. Pop off all the antenna cables and the fingerprint scanner cable.

Step 11. Disconnect the earphone connector, front-facing camera connector and the proximity and light sensor connector.

Step 12. Lift up the motherboard then disconnect the charging port connector.

Step 13. Heat up to the adhesive underneath the battery, then use the metal spudger to lift it up (slowly and carefully).

Check below tutorial video for how to tear down the Galaxy S7 Edge.
Visit our Youtube channel to check how to reassemble Galaxy s7 and S7 Edge
You may also like:
- How to Successfully Tear Down the Samsung Galaxy S7 Edge Screen
- How to Tear Down/Disassemble the Galaxy S7 for Screen Replacement
- How to Replace the Galaxy S7 Screen, Charging Port and Home Button
- Tutorial: How to Repair Samsung Galaxy S7 Edge Cracked Screen
|
|

|
|
|
|
|
|---|


RECOMMENDED PARTS
POPULAR ARTICLE
- How to Successfully Tear Down the Samsung Galaxy S7 Edge Screen
- How to Disassemble the Galaxy S7 LCD Assembly to Replace Screen, Charging Port and Home Button
- How to Repair Samsung Galaxy S7 Edge Cracked Screen
- How to Tear Down/Disassemble the Galaxy S7 for Screen Replacement
- iPhone X Water Damage Repair Guide (Still Work in 2019)
- How Much Does It Cost To Replace An iPhone XS Display?
- iPhone X Explosion: 7 Small But Important Things To Note
- 7 Ways To Fix Your iPad Not Charging In 2018
- iPhone 7 Screen Replacement | iPhone 7 Repair
- Which Parts of iPhone X and iPhone XS Are Exchangeable?
- iPhone X, XS, XS Max, and XR Battery Comparison
- How To Fix iPhone XS/XS Max, And XR Bluetooth Connection Issue
- Apple Will Fix the iPhone 8/8 Plus/X Auto Brightness Issue in iOS 12
- iPhone got exploded too?! How to protect your phone from battery explosion
- HTC 10 DIY Teardown for screen, charging port, battery replacement
- 6 Quick Tips To Distinguish Between Real And Fake iPhone SE
- Analysis on: Are China made LCDs for iPhone 5S Compatible with iPhone SE?
- How to Fix Phone Gets Hot and Battery Drains Fast
- Xperia Z5 Premium USB Charging Port Replacement Tutorial
- How to Replace Your Broken Sony Xperia Z5 Premium Screen Step by Step Guide
- 15 Tips to Improve Your Galaxy Note 5’s Battery Life
- How To Replace A Cracked Motorola Droid Turbo 2 Screen
- How To Fix iPhone 6S Auto Shutdown When It Still Has Battery?
- How To Replace A HTC One A9 Cracked Screen
- How to Distinguish the Fake Apple Earpod from the Real One
- How to Replace the LG V10 Screen in 5 Steps
- How To Solder/Replace A Samsung Galaxy or iPhone Charging Port
- The Cost of Repairing a Cracked Galaxy S6, S6 Edge Screen
- How To Fix Cracked Xperia Z5 For Screen Replacement
- What’s Need to Be Prepared As a Startup Cell Phone Repair Shop
- *Update* The Root of Differences among Copy iPhone LCDs: Structure
- Important Info: Pay Attention To Defective Recycled iPhone LCDs
- How to Replace Galaxy Note 5, S6 Edge Plus Battery
- Are The Flood of New High Copy iPhone LCD Screens as Good as The OEM Ones?
- iPhone 6+ and iPhone 6S+ Screen Comparison Report
- How to Recover Photos and Data with Broken Screens
- How To Identify Different LG G4 Model Numbers
- How to Fix Cracked iPhone 6S for Screen Replacement
- Cost of Repairing a Damaged Screen on the LG G4
- How To Fix LG G4 Digitizer Touch Screen Issue
- As a Newbie, What You Should Know About Jailbreaking
- How To Tear Down/Disassemble Galaxy S6 Edge Plus For Screen Replacement
- 90% Of People Don’t Know These Cellphone Battery Information
- Insider Tips to Save Your Water-damaged Device
- How to Set Up ETrade Supply’s Adhesive Dispenser Robot
- Top 10 iPhone 6 Problems and Solutions
- How To Fix Vertical Lines On An iPhone Screen After Replacement
- How to Replace Sony Xperia Z3+ Screen/Screen Replacement Guide
- How To Disassemble/Tear Down Sony Xperia Z3+
- How to Assemble Small Parts on iPhone 6 LCD Screen Assembly
- Reasons Behind & Solutions for iPhone 6 Frame and LCD Separation Issues
- How to Replace The LG G4 Charging Port
- How to Replace the Cracking LG G4 Screen in 10 Minutes
- How To Replace An Oneplus One Cracked Screen
- iPhone 5 LCD Screen Assembly Small Parts List
- How to Replace the HTC One M9 Charging Port
- How to Replace HTC M9 LCD Screen Assembly
- Top 5 Most Common iPhone 6 Issues You May Come Across
- How To Tear Down The Samsung Galaxy S6 In 10 Steps
- The Cost Of Repairing A Cracked Nexus 6 Screen
- How To Repair A Nexus 6 Cracked Screen
- How To Disassemble Nexus 6 In 10 Steps
- The Cost Of Repairing A Broken iPhone 6 Screen
- Five Minutes Work to Replace Your iPhone 6 Plus Broken Screen
- How to Repair a Cracked Samsung Galaxy S5 Screen
 How to Successfully Tear Down the Samsung Galaxy S7 Edge Screen
 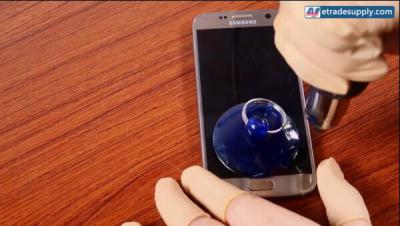 How to Disassemble the Galaxy S7 LCD Assembly to Replace Screen, Charging Port and Home Button
 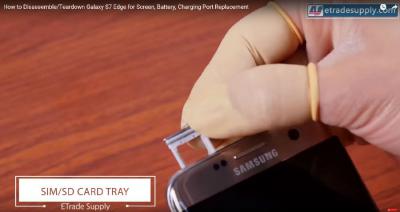 How to Repair Samsung Galaxy S7 Edge Cracked Screen
 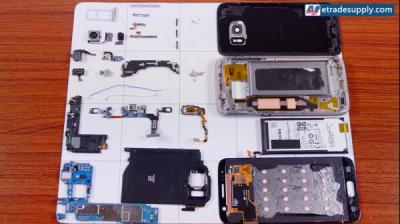 How to Tear Down/Disassemble the Galaxy S7 for Screen Replacement
  IOS 17.4 official version pushed to block battery vulnerability
  Is the Chinese-made rear case for the iPhone 15 series going on the market?
  New products coming:USB to MFI Lightning Cable
  Big BUG of iPhone 15
  How Chinese celebrate Christmas?
  Disadvantages of iPhone 15 Standard Edition
  Rumors about the Samsung Galaxy S24 Ultra
  TWS Wireless Bluetooth Headset: Connect Your Wireless World
  iPhone 15 Black Screen Self-Rescue Guide
  Comparison of LCD screens of different mobile phones
  Successfully submitted!
will replacing the oled screen of samsung galaxy s7 cause the internal memory to be wiped? I currently have a broken and black screen. Alternatively is there a way to transfer my data using
a computer software program?
Of course not. You don’t have to transfer your original data if you want to replace your Samsung screen, but you’d better back up your top-secret file in Samsung cloud for personal privacy sake.
Is battery EB-BG930ABE same with EB-BG930ABA? I have a phone with EB-BG930ABA but it’s so hard to find it in my country. WIll it fit if i change it with EB-BG930ABE ? Thx
I ALSO NEED TO KNOW THAT..
HAVE YOU FOUND THE ANSWER..??
I ALSO NEED TO KNOW THAT..
HAVE YOU FOUND THE ANSWER..??
Is it possible to t and battery from s7 active & install it in the s7 edge?
sorry they can’t share the same battery,the battery size and capacity are different from each other.
I submerge my s7 edge into a pool when I was swimming for only 6 seconds and the power went off.. I thought its a water resistant. Do u know what happened to my phone? What should I do? Please I wanted to send my phone to a Samsung trusted company in Australia where I bought it from to fix… Will u recommend which one somewhere in Sydney and would u please give me their address?
Water resistant is not the same as waterproof. It will resist water to a certain extent, i.e a splash of water or maybe having the occasional drink knocked over it but it wont tolerate a full submersion in water.
Oh shut up, it will “tolerate” submersion asi it is ip68 certified which means submersion into 1,5m deep water for 30mins. The problem is he was swimming with it – moving the phone underwater.
I had problems with mine, get a wireless charger,alternate charging with the plug & wireless. When the battery heats up a few times you will get the moisture out, they are not covered for water damage even if you have insurance, good luck
Do the company change the battery of samsung s7 edge if needed??
yes, if you need
Where do I send or go to get this done?
Hi Anna, send your Samsung Galaxy S7/S7 EDGE to the nearest repair shop. We EtradeSupply don’t repair smartphone but we retail repair parts. If you want to DIY repair it, you can get the repair tools and repair parts here:https://www.etradesupply.com/
Is it possible to use an S7 battery in a Note 7? or are the flex connectors and physical battery size different in both?
Ok i have question. Is it possible to replace the 3000mah battery in my NOTE 5 with the 3600mah from the S7 edge to give it even more power?
NO,they are not compatible, there are some differences in their size and connectors.
Ok i have somewhat of a stupid question. Is it possible to replace the 3000mah battery in my Note 5 with the 3600mah from the S7 edge to give it even more power?
No
Note 5 battery little bit bigger than S7 EDGE
Hai,
After I update software my s7 edge phone having problems by
Battery running very fast and the phone very heat…
What’s the suggestion?
be very careful. mine keep getting really hot and the a few days later the phne blew up. it was only 6 months old.
i know this is a stupid question but what do i use to remove the sim tray
Hi, there comes with the sim card tray eject pin when you buy the new phone, if you lose it, you can use this https://www.etradesupply.com/apple-iphone-3g-sim-card-tray-eject-pin.html
Ok i have somewhat of a stupid question. Is it possible to replace the 3000mah battery in my S7 with the 3600mah from the S7 edge to give it even more power?
Hi, Martin, your idea sounds great, however, there are differences between S7 and S7 Edge battery in body size and the battery flex connectors, so i guess there maybe some difficulties in putting battery to each other’s phone body.
Can i pay someone or a company to do this for me?
maybe you can find a repair shop or send it to the samsung service center.
But why you didnt show how to put all parts together and make the phone functional again?????
Hi,Vicky, sorry to cause you inconvenience, here is the reassembly video of galaxy s7 and s7 edge if you need https://www.youtube.com/watch?v=q4_h88cwV0U
https://www.youtube.com/watch?v=QWjI8sPg7TI