


How to Disassemble the Galaxy S7 LCD Assembly to Replace Screen, Charging Port and Home Button
BY May | 三月 10th, 2016 | 7 | 7
As we all know, for Samsung Galaxy S and Galaxy Note series phones, the front frame is strongly glued to the LCD assembly and hardly being removed for individual users or unexperienced technicians. For those who want to make the replacement work easier and less risky, a Galaxy S7 LCD and digitizer with the frame would be the best screen replacement if unfortunately your Galaxy S7 screen was broken. However, if the Galaxy S7 charging port or home button was damaged and had to be replaced, then the disassembly of Galaxy S7 front housing is a must. Here we’re going to walk you through how to replace an LCD assembly, charger port or home button by disassembling the Galaxy S7 LCD and digitizer assembly with front housing.
Tools Needed:
- Playing Cards
- Gloves
- Spudger
- Screwdriver
1. Samsung Galaxy S7 Screen Replacement.
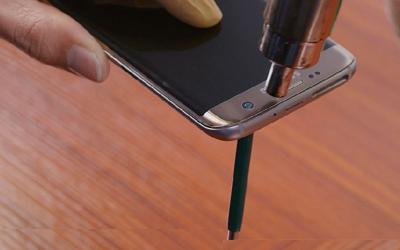
Heat up around the edges of Galaxy S7 LCD assembly back and forth to soften the front housing adhesive underneath. Pay your patience, the Galaxy S7 LCD assembly and frame are bonded by extremely sticky [waterproof adhesive](https://www.etradesupply.com/samsung-galaxy-s7-seires-lcd-adhesive.html) so as to make it IP68 protected. The waterproofness of the Galaxy S7 will be lost once the screen was replaced unless you apply the adhesive as sealed as the original manufacturer made, which is almost impossible to realize.

Wear a pair of gloves to avoid your hands being hurt by the hot display. Carefully insert the tip of the metal spudger into the gap between LCD assembly and frame, run it back and forth to weaken the adhesive.


2. Samsung Galaxy S7 Charging Port Replacement
Heat up to soften the adhesive under the navigator light, then pry it up, turn back to pry up the charging port flex cable ribbon assembly.


3. Samsung Galaxy S7 Home Button Replacement
Like the disassembly of charging port assembly, peel off the sticky waterproof adhesive around the home button. Then pry up the home button and flex cable ribbon.

Read this post to know the teardown process of Galaxy S7: How to Tear Down/Disassemble the Galaxy S7
Or watch below tutorial video to get more details:
You may also like:
- Tutorial: How to Repair Samsung Galaxy S7 Edge Cracked Screen
- How to Successfully Tear Down the Samsung Galaxy S7 Edge Screen
- How to Tear Down/Disassemble the Galaxy S7 for Screen Replacement
- How to Replace the Galaxy S7, S7 Edge Battery Replacement
|
|

|
|
|
|
|
|---|


RECOMMENDED PARTS
POPULAR ARTICLE
- How to Successfully Tear Down the Samsung Galaxy S7 Edge Screen
- How to Replace the Galaxy S7, S7 Edge Battery Replacement
- How to Repair Samsung Galaxy S7 Edge Cracked Screen
- How to Tear Down/Disassemble the Galaxy S7 for Screen Replacement
- iPhone X Water Damage Repair Guide (Still Work in 2019)
- How Much Does It Cost To Replace An iPhone XS Display?
- iPhone X Explosion: 7 Small But Important Things To Note
- 7 Ways To Fix Your iPad Not Charging In 2018
- iPhone 7 Screen Replacement | iPhone 7 Repair
- Which Parts of iPhone X and iPhone XS Are Exchangeable?
- iPhone X, XS, XS Max, and XR Battery Comparison
- How To Fix iPhone XS/XS Max, And XR Bluetooth Connection Issue
- Apple Will Fix the iPhone 8/8 Plus/X Auto Brightness Issue in iOS 12
- iPhone got exploded too?! How to protect your phone from battery explosion
- HTC 10 DIY Teardown for screen, charging port, battery replacement
- 6 Quick Tips To Distinguish Between Real And Fake iPhone SE
- Analysis on: Are China made LCDs for iPhone 5S Compatible with iPhone SE?
- How to Fix Phone Gets Hot and Battery Drains Fast
- Xperia Z5 Premium USB Charging Port Replacement Tutorial
- How to Replace Your Broken Sony Xperia Z5 Premium Screen Step by Step Guide
- 15 Tips to Improve Your Galaxy Note 5’s Battery Life
- How To Replace A Cracked Motorola Droid Turbo 2 Screen
- How To Fix iPhone 6S Auto Shutdown When It Still Has Battery?
- How To Replace A HTC One A9 Cracked Screen
- How to Distinguish the Fake Apple Earpod from the Real One
- How to Replace the LG V10 Screen in 5 Steps
- How To Solder/Replace A Samsung Galaxy or iPhone Charging Port
- The Cost of Repairing a Cracked Galaxy S6, S6 Edge Screen
- How To Fix Cracked Xperia Z5 For Screen Replacement
- What’s Need to Be Prepared As a Startup Cell Phone Repair Shop
- *Update* The Root of Differences among Copy iPhone LCDs: Structure
- Important Info: Pay Attention To Defective Recycled iPhone LCDs
- How to Replace Galaxy Note 5, S6 Edge Plus Battery
- Are The Flood of New High Copy iPhone LCD Screens as Good as The OEM Ones?
- iPhone 6+ and iPhone 6S+ Screen Comparison Report
- How to Recover Photos and Data with Broken Screens
- How To Identify Different LG G4 Model Numbers
- How to Fix Cracked iPhone 6S for Screen Replacement
- Cost of Repairing a Damaged Screen on the LG G4
- How To Fix LG G4 Digitizer Touch Screen Issue
- As a Newbie, What You Should Know About Jailbreaking
- How To Tear Down/Disassemble Galaxy S6 Edge Plus For Screen Replacement
- 90% Of People Don’t Know These Cellphone Battery Information
- Insider Tips to Save Your Water-damaged Device
- How to Set Up ETrade Supply’s Adhesive Dispenser Robot
- Top 10 iPhone 6 Problems and Solutions
- How To Fix Vertical Lines On An iPhone Screen After Replacement
- How to Replace Sony Xperia Z3+ Screen/Screen Replacement Guide
- How To Disassemble/Tear Down Sony Xperia Z3+
- How to Assemble Small Parts on iPhone 6 LCD Screen Assembly
- Reasons Behind & Solutions for iPhone 6 Frame and LCD Separation Issues
- How to Replace The LG G4 Charging Port
- How to Replace the Cracking LG G4 Screen in 10 Minutes
- How To Replace An Oneplus One Cracked Screen
- iPhone 5 LCD Screen Assembly Small Parts List
- How to Replace the HTC One M9 Charging Port
- How to Replace HTC M9 LCD Screen Assembly
- Top 5 Most Common iPhone 6 Issues You May Come Across
- How To Tear Down The Samsung Galaxy S6 In 10 Steps
- The Cost Of Repairing A Cracked Nexus 6 Screen
- How To Repair A Nexus 6 Cracked Screen
- How To Disassemble Nexus 6 In 10 Steps
- The Cost Of Repairing A Broken iPhone 6 Screen
- Five Minutes Work to Replace Your iPhone 6 Plus Broken Screen
- How to Repair a Cracked Samsung Galaxy S5 Screen
 How to Successfully Tear Down the Samsung Galaxy S7 Edge Screen
 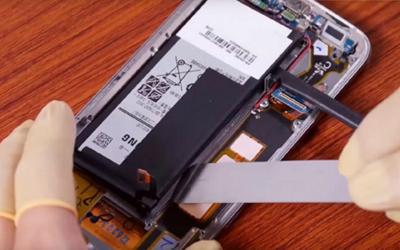 How to Replace the Galaxy S7, S7 Edge Battery Replacement
 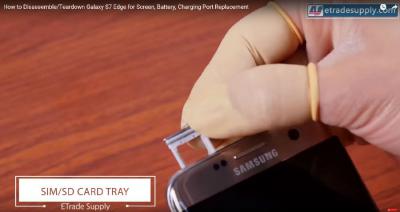 How to Repair Samsung Galaxy S7 Edge Cracked Screen
  How to Tear Down/Disassemble the Galaxy S7 for Screen Replacement
  IOS 17.4 official version pushed to block battery vulnerability
  Is the Chinese-made rear case for the iPhone 15 series going on the market?
  New products coming:USB to MFI Lightning Cable
  Big BUG of iPhone 15
  How Chinese celebrate Christmas?
  Disadvantages of iPhone 15 Standard Edition
  Rumors about the Samsung Galaxy S24 Ultra
  TWS Wireless Bluetooth Headset: Connect Your Wireless World
  iPhone 15 Black Screen Self-Rescue Guide
  Comparison of LCD screens of different mobile phones
  Successfully submitted!
Is there any firmware updating that needs to be done after replacing the charging port assembly? I replaced it fine but the phone is slow and doesn’t recognize the mic/cap touch buttons, and when I plug it in it says the phone is too cold (it isn’t).
Hi, i would like to know if i have to replace the Home Button on the Samsung S7 will the fingerprint continue to work? If yes is there any criteria i must look into when buying the Home Button? Since same is not available in shops here i will need to order from Ebay or Aliexpress. Thanks for your reply.
PS: the paint on my S7 Home Button has been completely peeled, it is appearing black and fingerprint unrecognised.
Hi, after replace the Home Button, the fingerprint will still work.You can buy Samsung S7 Home button in Etrade Supply. May this can help you.
Will this make the phone not waterproof?
Hi, it’s hard to assure its waterproofness after DIY repair work, the phone can be waterproof again when repaired by professional skills.
Hi
can you tell me fi this can be done on the samsung note 5, as my charger has broken in the phone
regards
Deborah
hi, yes,here is the Galaxy Note 5 teardown video hope it can help https://www.youtube.com/watch?v=WQtp8RXEPLw