


How to Fix Broken Galaxy S5 Screen and Other Parts after Teardown
BY yuki | 五月 10th, 2014 | 23 | 4
Although many reports claimed that it's harder to repair Galaxy S5 than S4, it gets 5 out of 10 (10 is the easiest to repair). Therefore, compared with other smartphones, Galaxy S5 is not hard to repair. Here we walk you through detailed steps for replacing a cracked Galaxy S5 screen, damaged GS5 camera, broken S5 loudspeaker, middle frame etc. ETrade Supply is always your prior choice to get Samsung Galaxy S5 replacement parts and components.
Please note the DIY repair will void the warranty of your Galaxy S5 but may save money. Watch the following step-by-step GS5 teardown tutorial to find how to repair your Galaxy S5 screen and other parts and components showed in below.
• Replace a cracked or shattered Galaxy S5 screen
• Fix a damaged Galaxy S5 battery
• Replace broken Samsung Galaxy S5 camera
• Fix malfunctioned Galaxy S5 ear speaker or loudspeaker
• Repair a broken GS5 battery door or problematic rear housing
• Fix a damaged Galaxy S5 earphone jack
• Repair a problematic Galaxy S5 charging port

Tools needed to disassemble Samsung Galaxy S5
Hair Dryer
Small Phillips Screw driver
Plastic Spudger
Suction Cup Tool
Several Case Opening Toll
Tweezers
Step 1: Power off the Samsung Galaxy S5.

Step 2: Remove the GS5 battery door with your thumb.
Note: If your GS5 back cover is broken, you can replace it with a new back panel at this step.

Step 3: Peel the Galaxy S5 battery off.
Note: If you suffer a damaged Galaxy S5 battery, you can buy a new one and fix it by replacing it at this step. However, please take care to check if the Samsung Galaxy S5 battery you buy is genuine, for a fake battery may trigger an explosion. (Here is good tutorial: How to Identify the Original and Fake Cellphone Battery)

Step 4: Remove the cover protecting the connector underneath it.
Note: Do not use sharp tweezers which will damage the plastic cover.

Step 5: Disconnect the Galaxy S5 home button connector.

Step 6: Use a hair dryer to heat up the Galaxy S5 screen.
The Galaxy S5 LCD screen and digitizer touch screen assembly is firmly glued to the rear housing by sticky adhesive, so you have to heat up the screen of Galaxy S5 with a hair dryer or heat gun. Make the screen hot enough until the glue is loose.

Step 7: Use the plastic spudger to pry the Galaxy S5 screen and wedge several case opening tools around the side.
Note: Do not pry the Galaxy S5 screen from the bottom of the phone, because the GS5 home button, back button and menu button locate at the bottom. Also, you have to be aware there is a flex cable connecting the LCD screen and digitizer and mainboard at the upper side of the screen component, so do not push too deeply when you detach the tape with the spudger tool.

Step 8: Disconnect the flex cable of Galaxy S5 screen assembly connecting the LCD screen and digitizer to the mother board.
Note: When there is a gap between the Galaxy S5 LCD screen assembly and the rear housing, you can use a plastic spudger to disconnect the GS5 screen assembly flex cable.

Step 9: Separate the Galaxy S5 screen assembly from the rear housing. You need to detach the Braket Cu tape carefully from the S5 LCD assembly.
Note: you want to replace any of the Galaxy S5 internals, you have to go through the screen removal process at first. After free the display assembly on Galaxy S5, other part replacements are very easy.

Step 10: The Samsung Galaxy S5 LCD screen and digitizer assembly is separated from the rear housing.
Note: At this step, the Galaxy S5 screen is removed. If your Galaxy S5 screen is shattered or broken, you can replace a new one. But please kindly note the Galaxy S5 home button is attached to the screen. You can buy a new GS5 screen with home button, if not, you have to remove the home button from the broken screen and install it to the new one you buy. Also, if your GS5 home button is broken, you can replace it at this step too.

Step 11: The form tape on the back of GS5 LCD assembly must be changed to the new one whenever reassembled.
Note: When the Galaxy S5 is disassembled, the water resistance performance would be affected. Therefore, you should change the form tape or Galaxy S5 front housing adhesive to a new one to better warranty the feature.

Step 12: You need to remove the residue of form tape on the Galaxy S5 rear housing with cary jig & rework tape.
Note: It is necessary to clean the form tape residue which will affect water resistance performance.

Step 13: Remove the Galaxy S5 Bracket Cu tape.
Note: This Bracket Cu tape is helpful for water resistance performance, and it must be replaced to the new one whenever reassembled to provide a better warranty on water resistance.

Step 14: Unscrew 10 screws holding the middle frame and rear frame on the Galaxy S5 front side.
Note: When you disassemble Galaxy S5, these 10 screws should be replaced to the new one, in order to guarantee the water-resistant function.

Step 15: Unscrew 3 screws at the back of the Galaxy S5.
Note: Whenever reassembled Galaxy S5, these 3 screws should be replaced to the new one for water resistance performance.

Step 16: Pull the rear frame out of middle frame on Galaxy S5. You can start the job from the top.

Note: You also can separate out the Galaxy S5 middle frame with the help of case opening tool. The Galaxy S5 motherboard is fixed to the middle plate.
Step 17: The Galaxy S5 rear housing is removed from the middle plate.

Step 18: Peel off the Samsung Galaxy S5 ear phone jack with tweezers.

Step 19: Remove the Galaxy S5 loud speaker with the help of tweezers.

Step 20: Unscrew 2 screws securing the Galaxy S5 mainboard to the frame.

Step 21: Disconnect the antennas on Galaxy S5 connecting the charging port to the mainboard.

Step 22: Separate the Galaxy S5 motherboard from rear housing.

Step 23: Lift up the Samsung Galaxy S5 rear-facing camera which is attached to the mainboard.
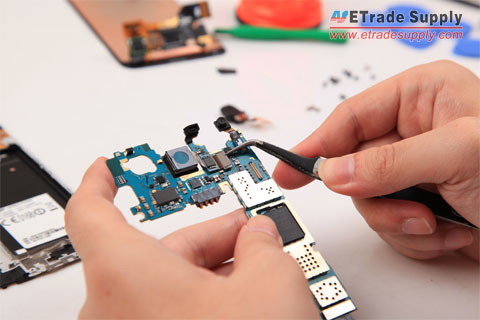
Step 24: Peel off the Samsung Galaxy S5 front-facing camera with spudger.

Step 25: Remove the Galaxy S5 charging port with the menu button, back button, and fingerprint scanner.
Note: You may replace the charging port the most often on the phone besides the cracked screen. So at this step, you can replace a new charging port by follow the instructions.

Step 26: Peel off the Galaxy S5 vibrating motor with tweezers.

Step 27: Step-by-step Samsung Galaxy S5 disassembly job is finished.

Samsung Galaxy S5 comes with the new water resistance performance. However, if your Galaxy S5 suffers breakage and need to be repaired, you have to be aware of some non-reusable parts that must be replaced to the new one when reassemble.
These parts are:
Galaxy S5 front housing adhesive / form tap
Galaxy S5 Bracket Cu tape
10 screws on the middle frame
3 screws on the rear housing.
Does this Galaxy S5 teardown tutorial helpful for your S5 parts repair? What problems have you met when you fix cracked Galaxy S5 screens and parts? Let us know in the comments.
We have worked out the Samsung Galaxy S5 step-by-step disassembly video for your reference.


 IOS 17.4 official version pushed to block battery vulnerability
  Is the Chinese-made rear case for the iPhone 15 series going on the market?
  New products coming:USB to MFI Lightning Cable
  Big BUG of iPhone 15
  Successfully submitted!
Is it possible to get the cable unit attached to the back of an S5 screen separately? In reassembling it after replacing the camera, I think I may have wrecked a pin in the connector. I had a lot of difficulty in reseating the plug into the motherboard socket. If no, is there an alternative fix I could employ? The screen itself is otherwise in perfect order, and I can’t afford to buy a whole new screen pack. Thank you in anticipation.
Hi Adrian, If the pin is still there, you can fix it. If the pin is broken, find a reputable repair shop and ask them to replace it with a new connector.
I seperated the copper foil from the back of the lcd, and wondered if I can simply place it back between the lcd and the bottom chassis of the phone on reassembly. I
cannot find a source for the copper sheet backing alone except in the UK and they will not ship to the US. Please help if you can
I NEED ORIGINAL PANEL FOR SAMSUNG GALAXY E7. IS IT POSSIBLE WITH BUTTONS & CARD SLOTS ///
Hi, you mean you need Galaxy E7 rear panel?if so, maybe you can google it online, and the home button and card slots can be comes with the rear panel together.
FHi. I am a owner of a Samsung galaxy s5 and my problem is the screen is popping out of the body of the phone… It happens at the left bottom of the phone…
I need to know if my phone are still water proof,, I am afraid of that.
guess you need to take care of your phone and better keep it away from water.
Remove the screen again, carefully clear and clean out the old glue from the screen back and chassis thoroughly Buy some double-sided tape c. 3mm (eBay or Wish or elsewhere) to replace the old glue with. Be generous with it. Then reseat the screen back into the chassis. It should also waterproof it. I hope that may be of some help.
Hi. I am a owner of a Samsung galaxy s5 and my problem is the screen is popping out of the body of the phone… It happens at the left bottom of the phone…
I need to know if my phone are still water proof,, I am afraid of that.
I disagree
Add a comment…hi there E trade supply there was no much to say about the toturial as thanks full for the safely and easiest metoth that we had very chiefly thanks very much may ALLAH BLESSE it.
more over about the power on problems for some android phones LYK IT .its umary
After change of the middle frame, half touchscreen is not working. Works only the upper part of the touchscreen
My samsung 5 screen went black and won’t start up for some odd reason,, I was just charging it up when this happened for 1/2 hour,, I bought a new battery but it still doesn’t work,, any idea’s on what could be wrong???
Can you hear the rington when powering on your S5, if so, the LCD display was the cause.
Can you please post the tutorial for the repair of Samsung Galaxy E7 broken screen repair? The first problem I notice is that it just can’t be opened at all.
Thankyou, the most excellent guide for samsung galaxy s5 opening I have found.
I am purchasing the required parts from your website for reassembly, but I can not find “Galaxy S5 Bracket Cu tape”.
Do you sell this? Are you able to post a link to it or its equivalent so I can purchase?
Thankyou
Hell Jules, the Galaxy S5 Bracket Cu Tape is sold together with the housing, please check this part:
http://www.etradesupply.com/samsung-galaxy-s5-sm-g900-middle-plate.html
Just wanted to say thank you for this tutorial. Also a caution when prying at the screen when it is being removed….. like stated before at the bottom where the “HOME” button is located, you also have both “Menu” and “Back” buttons that have two small & thin black ribbons that come from the bottom that are attached to the Charging Port as shown in step #25. Those two black tabs ( which are thin flexible ribbons that hold the LED lights for the buttons ) also have double stick tape on them and are attached to the screen. If one is not very careful one can accidentally cut the ribbons when prying at the ends as the sticky tape is located very close to them. Be very careful prying at the screen and try to avoid sliding anything in that area unless it’s truly needed. Just wanted to give a heads up.
What happens if u cut one of those? *Does ur galaxy s5 not turn on ?
my samsung galaxy s5 is water damaged and has the red indicator inside the back cover. And the samsung service center refused to even open and fix and told me it is a mother board problem. Can I still have a chance to get the photos out of it because they are very important to me than the phone. Please advise
Thank you in advance
awesome tutorial.really useful information.samsung is the best ever mobiles.Ours is the one of the reputed mobile phone repair shop in UK.We deals with all different types of simple and difficult repairs including Touch screen faults, Cracked Phone Screen, broken LCD screen replacements, Microphone and charging problems, speaker, water/liquid damage.For more details check out samsung repairer.co.uk
Hi there !
please note that you have used the same photo for step 23 and 24 ( rare and front camera removal ) !
Can you kindly make corrections !
Khusbu
kathmandu nepal
Hi there,
Thank you so much for your tutorial, it is really going to make my first repair much easier. However, I do have a question and hopefully you’ve got some good news for me. Is it possible to separate the LCD digitizer from the actual glass screen? I barely have a simple hairline crack in my glass from a short drop, but the digi is completely fine. If it can be done, would you please be able to provide some sort of simple instructions as to do so. I am very handy and feel totally confident in the repair/replacement, but would much rather spend around $20 to replace the glass as opposed to the $160 replacement of the LCD digitizer. Thank you very much, I hope to hear from you soon.