


How to Disassemble the iPhone 5C for Screen/Parts Repair
BY alina | 十月 5th, 2013 | 7 | 1
Apple announced the iPhone 5C on September 10, 2013. Different from the iPhone 5, the iPhone 5C is built with brand new plastic rear housing available in five colors: green, pink, blue, yellow and white. However, we found the teardown process and the innards are similar to the iPhone 5 after we took apart the 5C. You can follow our step-by-step disassembly to replace the broken parts on your iPhone 5C, such as the cracked iPhone 5C screen, the useless iPhone 5C battery, the damaged iPhone 5C rear housing or the broken iPhone 5C charging port flex cable. ETrade Supply is always your best choice to get the iPhone 5C replacement parts.

Pentalobe Screwdrivers
Small Phillips Screwdrivers
Flathead Screwdrivers
Tweezers
Step 1
Power off the iPhone 5C and take out the SIM card tray with the eject pin.

Step 2
Use Pentalobe screwdrivers to undo 2 screws at the bottom of the handset.

Step 3
Carefully pry up the iPhone 5C LCD screen assembly with the help of the metal spudger opening tool.

Step 4
Undo 4 Phillips screws to remove the metal plate covering the LCD assembly connectors.

Step 5
Release 3 connectors to separate the LCD display assembly from the iPhone 5C rear housing with the help of spudger opening tool.

NOTE: After the LCD assembly is free, if you need to replace the cracked iPhone 5C screen, now you have to remove the ear speaker assembly and front camera & sensor flex cable at the top of the LCD assembly. And remove the home button at the bottom and the LCD heat shield. Here we didn't tear them down.

Step 6
Undo 2 Phillips screws to remove the retaining bracket that covers the battery connector.

Step 7
Disconnect the battery connector to lift up the battery carefully and remove it using the spudger opening tool.


Step 8
Undo 2 screws on the retaining bracket that holds the iPhone 5C rear facing camera in place at the top right corner. Then release 1 connector on the motherboard to remove the rear camera.


Step 9
Release 2 screws at the top left corner to remove the vibrating motor.

Step 10
Release 1 connector and 7 screws to take out the loud speaker and charging port flex cable.


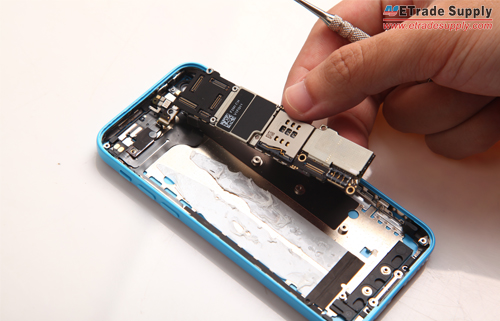
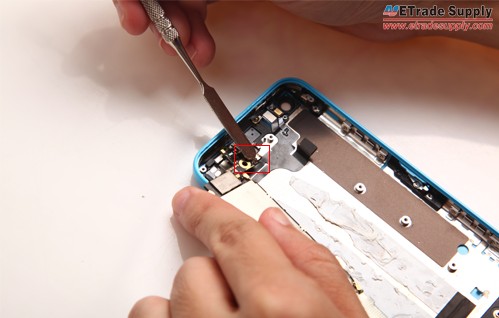
Step 11
Release the last connector to lift up the motherboard cautiously because there is a fragile connector on the top. Disconnect it and then the motherboard is free.

Now we have finished the complete iPhone 5C teardown process.


 IOS 17.4 official version pushed to block battery vulnerability
  Is the Chinese-made rear case for the iPhone 15 series going on the market?
  New products coming:USB to MFI Lightning Cable
  Big BUG of iPhone 15
  Successfully submitted!
Hi my phone suddenly blacked out while I waa watching so I charged it but when I tried to open it. It didnt open.
Hi, I am wandering if anyone knows the name for the connecter on top, I accidently ruined the whole connected im referring to the one highlighted in the picture that appears on Iphone 5c but not on Iphone 5. picture https://www.etradesupply.com/blog/wp-content/uploads/2013/10/111.jpg
Thank You
P.S. how would I fix that part of the phone?
Hi,you mean you broken the connector or just the black small nub on top of the connector, if just the small nub, then it won’t cause much inconveniences.
Hi,
If my Iphone 5C the clock system is not running (Time freeze) upon screen lock.
And also the WiFi setting always lost connection (Always need perform network
reset.
Question is which part i need to order to correction.
<This problem arise during charging, the lighting wire deform.
Regards,
Wilson
That black strip under the motherboad what is it called and where can i buy one at
Hi Kristy, the black strip is the heatsink for motherboard, we sell it with the rear housing, please check on eBay or Amazon to see if you can buy it, good luck.
in the charger bit it isn’t charging bc there is something in it what do I do!