


How to Repair A Cracked Lumia 520 Screen
BY Junior | 十二月 7th, 2013 | 89 | 6
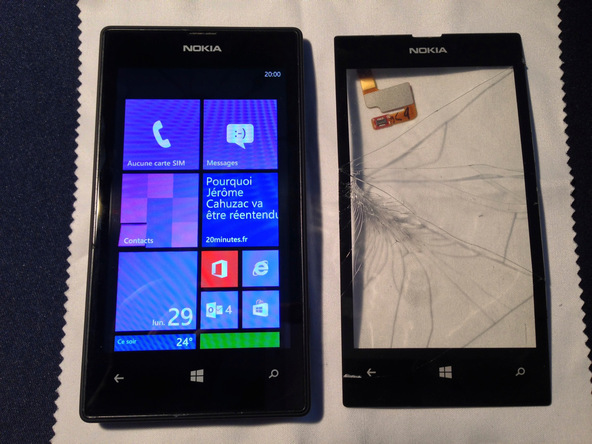
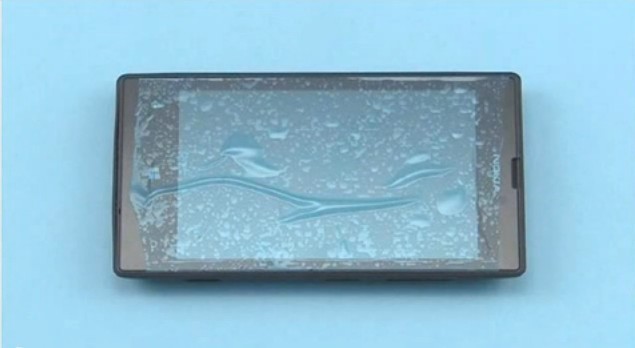
The Nokia's Lumia has been plagued with cracked screen problems since the release of the Lumia 920. We have seen many complaints from lots of people that the Lumia 520 screens cracked or shattered for various causes. In some reports, people said they dropped the phone on the ground, and the touch screen digitizer was broken, but the LCD display functionality still works fine. In several reports, people told us that they just cracked lumia 520 screen assembly (both touch screen digitizer and LCD screen) completely, as the front glass was huge broken and the LCD displayed nothing.
If you've cracked the lumia 520 screen accidentally and you plan to just change it with a brand new one, ETrade Supply is here to help and we can walk you through screen repairs on not only this Nokia Lumia 520 but also other models including Nokia, iPhone, Samsung, HTC, Motorola,etc. In this tutorial article, we will show you how to DIY repair cracked lumia 520 screen and give you links to the parts and tools you need from our online store.
How to Repair the Cracked Screen on Lumia 520
Tools and Parts You Need to DIY Fix the Cracked Screen on Lumia 520:
* Professional smartphone repair tools you need:
1. T4 Screwdriver.
2. Case open tool.
* 100% OEM brand new Lumia 520 replacement parts you need:
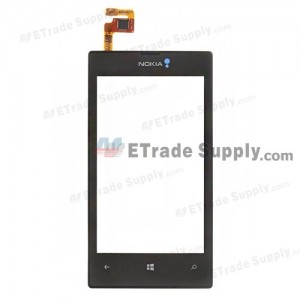
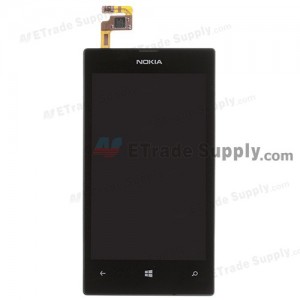
1. Nokia Lumia 520 replacement touch screen digitizer
2. Nokia Lumia 520 replacement LCD display

3. Nokia Lumia 520 replacement screen assembly (including LCD screen and touch screen digitizer)
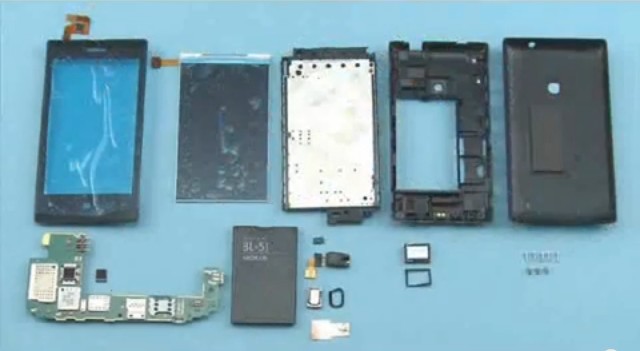
Detailed Steps on How to Disassemble Lumia 520 and Even replace the screen:
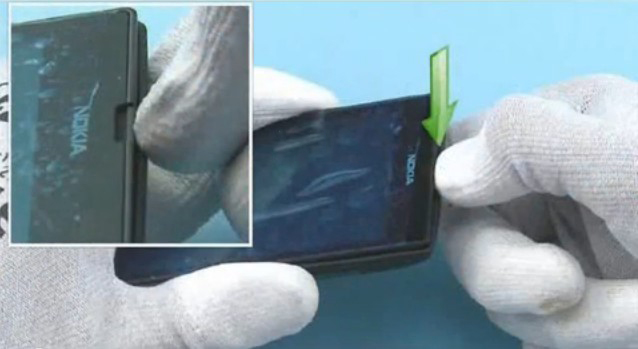
Before the start, you can protect the Lumia 520 screen with a piece of the protective film.
1. Release the back cover by pushing from the top part
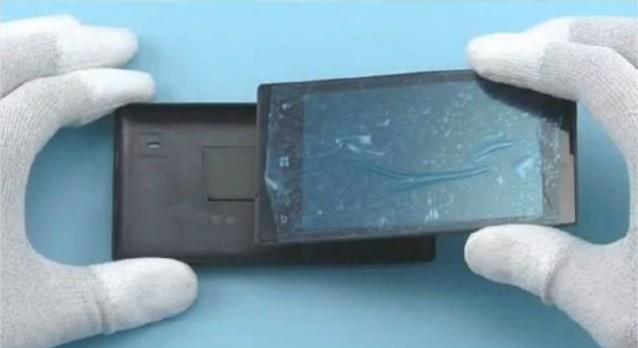
2. Remove the back cover
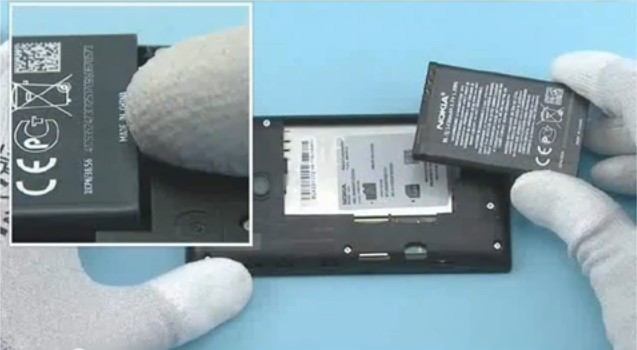
3. Lift up the battery from the bottom and remove it.
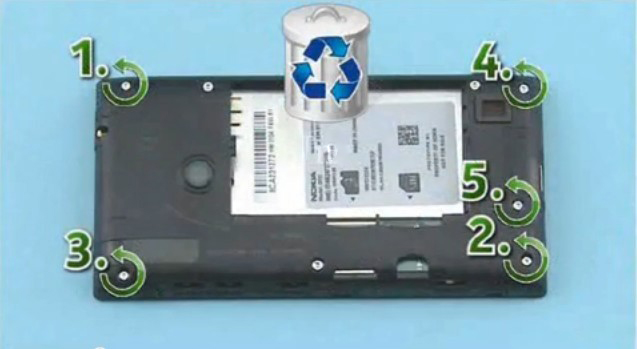
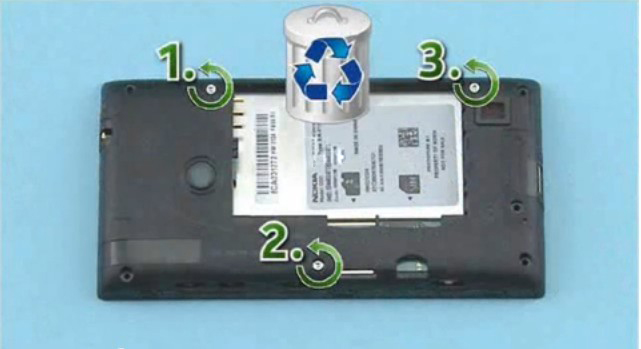
4. Undo the 5 screws in the order shown.
5. Undo the 3 screws in the order shown.
6. Release the 2 clips on the left side, starting from the bottom.
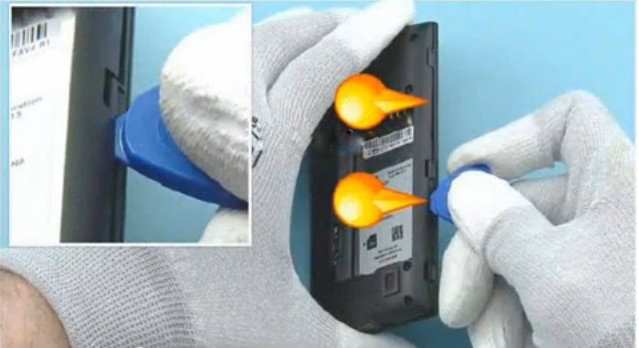
7. Release the 2 clips on the right side, starting from the bottom.
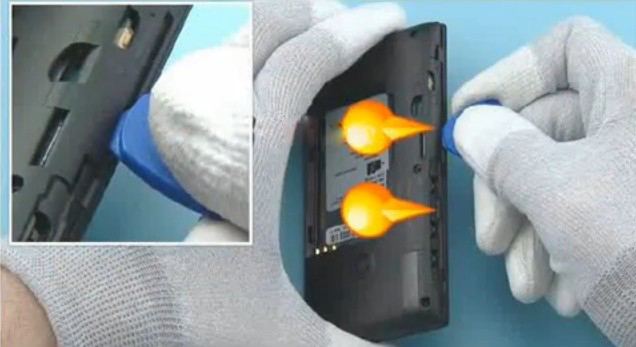
8. Release the top side in the order shown.
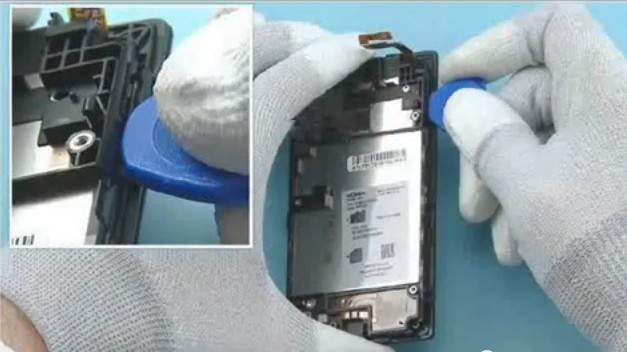
9. Lift up and remove the middle frame in the order shown.
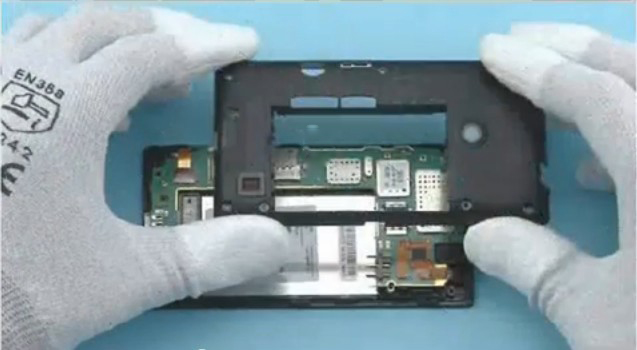
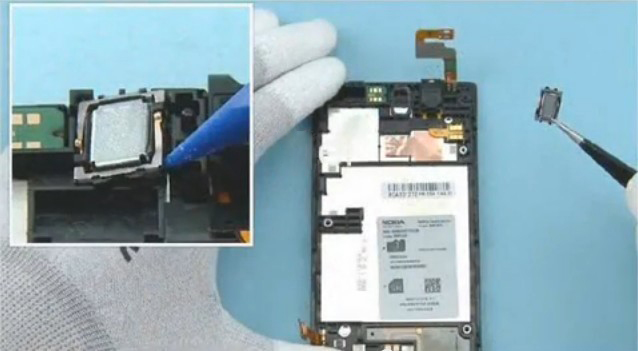
10. Lift up the loudspeaker and then remove it.(pass this step when you just need to replace the LCD screen)
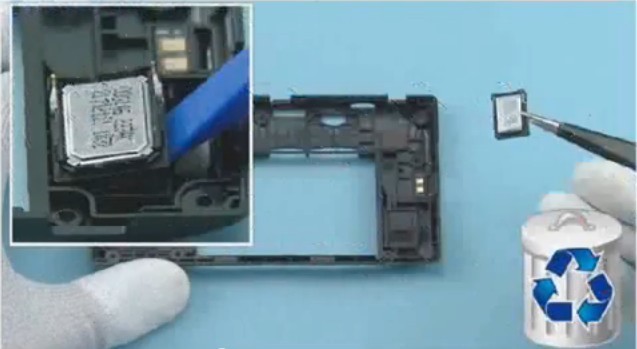
11. Remove the gasket of the speaker.(pass this step when you just need to replace the LCD screen)
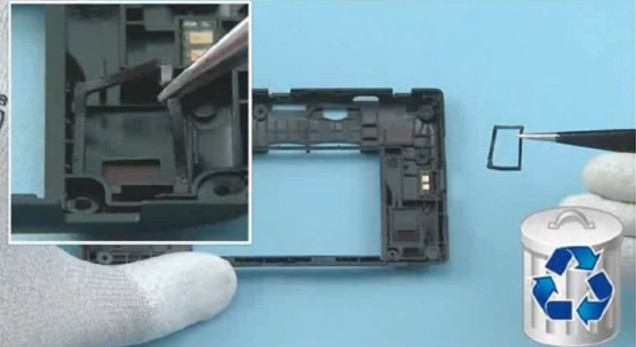
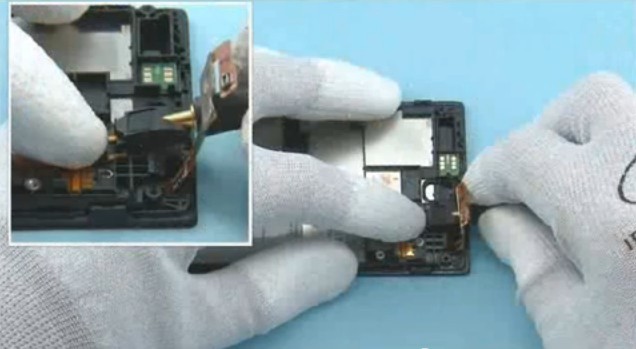
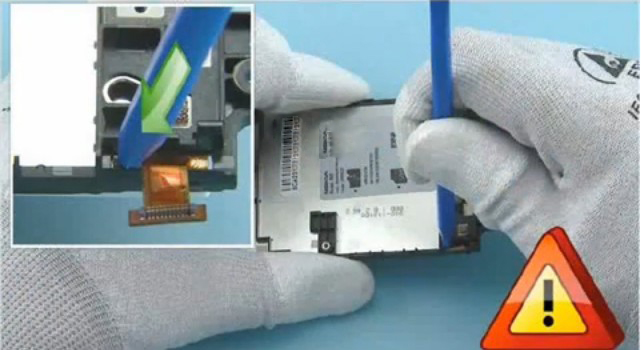
12. Disconnect the connector of the display.

13. Disconnect the connector of the touch screen.
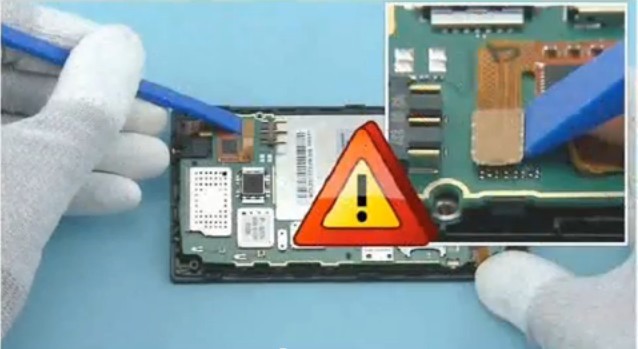
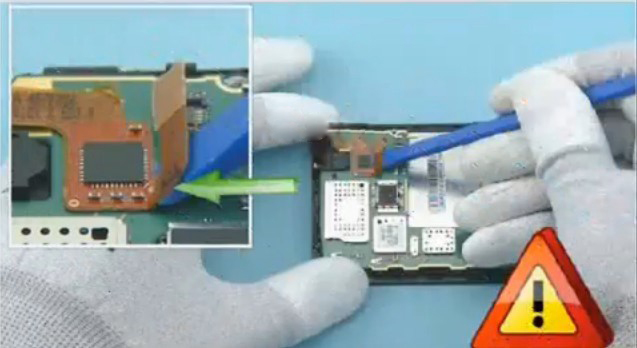
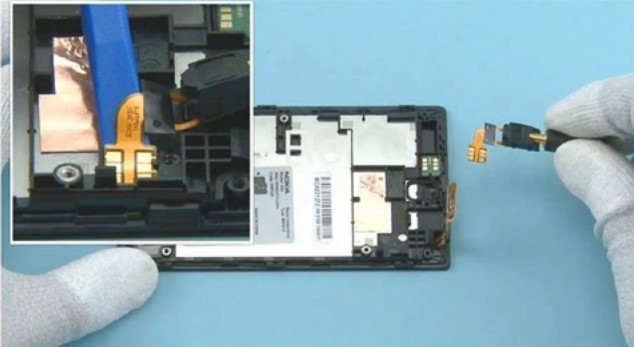
14. Release the touch screen connector from the motherboard.
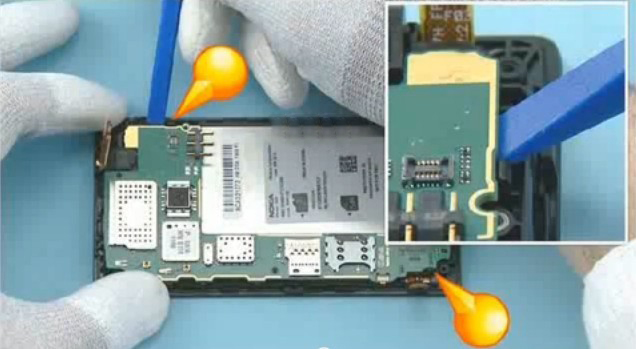
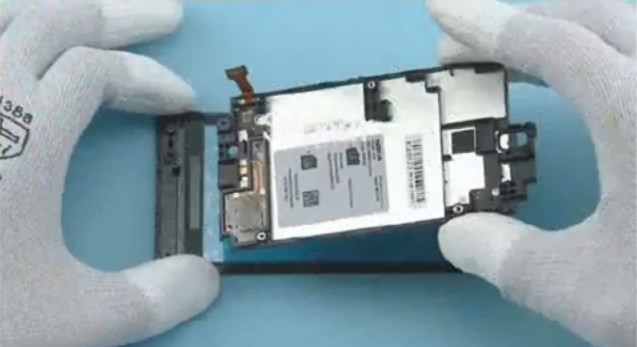
15. Release the two clips which holding the motherboard.
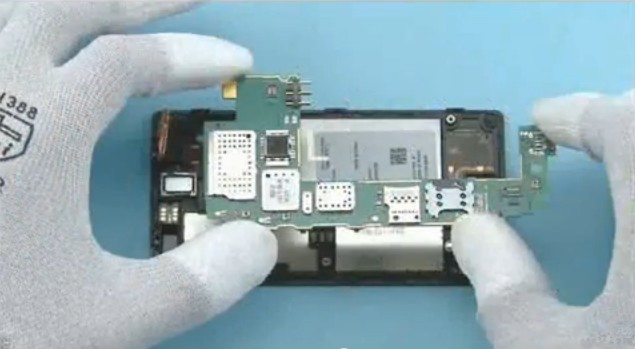
16. Lift up and remove the motherboard.
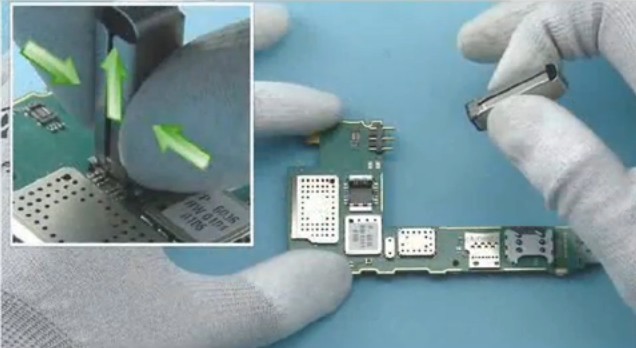
17. Remove the camera.(if you just need to replace the LCD screen and your camera worked fine,you can pass this step)
18. Release the ear speaker and remove it.
19. Remove the gasket of the ear speaker.

20. Lift up and release the earphone jack.
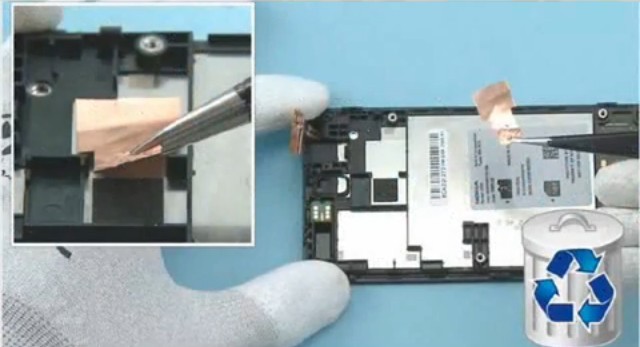
21. Remove the heat spreader.
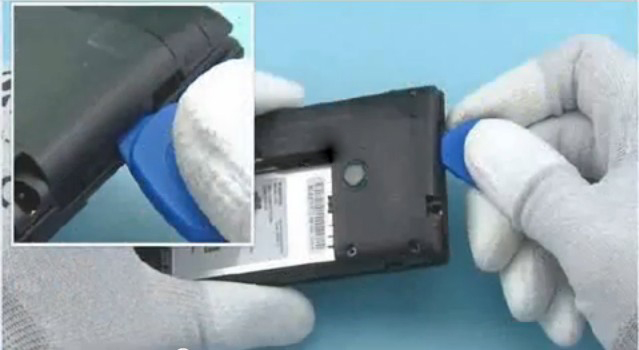
22. Release the display from the shown place.
23. Separate the screen assembly which including the touch screen digitizer and LCD screen from the screen support.
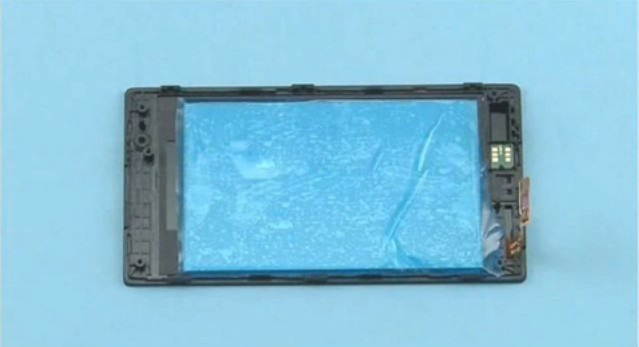
24. Protect the other side of the screen with the protective film.
25. Release and separate the LCD display from the screen assembly.

Finally, disassembly procedure is complete, you can replace the digitizer or screen assembly, and then reassemble the device in reverse order.
Notice:
Welcome to visit our official Twitter, Facebook and YouTube. We will post more DIY repair guide videos and the latest news of upcoming cellphone on these social media platforms.


 IOS 17.4 official version pushed to block battery vulnerability
  Is the Chinese-made rear case for the iPhone 15 series going on the market?
  New products coming:USB to MFI Lightning Cable
  Big BUG of iPhone 15
  Successfully submitted!
Hello, May I ask where are you located? I have a Lumia 735, nabasag yung glass ng phone ko e.
Hi,we’re in China here, if you need Lumia 735 screen replacement, you can check this https://www.etradesupply.com/nokia/nokia-lumia-cellphone-replacement-parts/nokia-lumia-735.html
Hi, my Lumia 520 fell on the ground and has a huge crack on the screen. Though the lock screen shows fine without any disturbance, it does not respond to touch. Which parts do i need to have it repaired? Thank you.
Hi, since your display shows images well,which means the LCD is fine, i guess there is something wrong with the digitizer(https://www.etradesupply.com/oem-nokia-lumia-520-digitizer-touch-screen.html),but if you want to repair it yourself we recommend you to replace the whole LCD screen assembly(https://www.etradesupply.com/oem-nokia-lumia-520-lcd-screen-and-digitizer-assembly-with-front-housing-black-with-nokia-logo.html) cause replacing only the digitizer needs very professional skills
my screen cracked and no more responds to touch. However the image is fine and phone is working when switched on. it is window 525. how much will it cost & from where i can repair it in india
My Nokia 520 is a work phone whose front digitizer cracked when it fell. Initially I located a generic (non OEM) on Amazon, but after reading how many things went wrong, I quickly realized I needed an OEM. Furthermore, I never changed any phone screen before, and no one near here could repair it.
In google, I saw this article and these instructions, and it looked easy as all the tools and parts were listed. In fact, I didn’t even know it was just the digitizer I needed, as the LCD was still working, until I read these instructions.
I’m used to the Amazon checkout process to purchase online, but this website was just as easy, and because I used Paypal I paid in my local currency, which is very convenient. Better yet, was the ability to ship straight to my country, which I received in a very fast 7 calendar days (non-expedited shipping from Hong Kong). So, the payment process was smooth, hassle-free, and convenient.
The package, to my surprise came in a plastic kit, which was inside the shipping box. It was impressively very well padded and packed inside.
And the best part was I sat down, followed these instructions, and got my phone working in 20 minutes. A couple steps weren’t necessary for me, one step has caused my camera to stop working. I don’t mind at all because for a very affordable price, I was able to revive my phone and data, and defer the purchase of a new phone.
In the parts list in this article, I couldn’t figure out what they meant by “Plastic card”, which I can only assume is used in Step 17. I don’t recommend doing this step, as the camera is mounted on the motherboard, and doesn’t affect changing the screen or LCD (for my phone). In fact, in putting it back, my camera refuses to work. Step 10 should read Microphone, and not speaker, but I didn’t do this step, and my phone worked out fine. It’s possible there are slight variations of the phone ? I don’t know.
Overall, I’m extremely impressed and I’ve already started telling friends and family about eTradeSupply.com.
I wouldn’t have shopped here if it weren’t for these instructions. I’m also not easily impressed….need I say more ?
Hi,thank you for your constructive advises and support to our products.you are right about the repair guide in step 17 you’ve mentioned in your comment, there is no need to remove the camera from the motherboard if you’ve got the fine camera, we should have mentioned that before, this is a whole tear down review for lumia 520 and there are some steps you can pass if you just need to replace the LCD screen, we’re sorry to cause you inconvenience and re correct them. And the step 10, that part is the loudspeaker and the microphone is soldered on the motherboard. Thanks again!
my screen cracked and no more responds to touch. However it comes on anytime its switched on. How much is a touch screen now?
Thanx
Diipo
Hello Diipo, the Lumia 520 touchscreen with frame is about $7.63 at present, check it out: http://www.etradesupply.com/oem-nokia-lumia-520-digitizer-touch-screen-with-front-housing.html
Can Nokia Lumia 520 touch works on my Lumia 525
Hello Chetan, the Lumia 520 touchscreen does not work on Lumia 525. Hope it helps.
my lumia 530 broke the screen what is the cost of repair, in kenya my no 0722929872
Hello Mark, different screens have different prices, please check below link for reference:
http://www.etradesupply.com/nokia/nokia-lumia-cellphone-replacement-parts/nokia-lumia-530.html
i have nokia lumia complete panel any one need please contact me 03402046489
how much nokia lumia 520 screen in philippine money
Hi Mark, do you need the digitizer screen only or LCD w/ Digitizer? Check below link for the latest price of Lumia 520 screen replacements: http://www.etradesupply.com/nokia/nokia-lumia-cellphone-replacement-parts/nokia-lumia-520.html
My nokia jst fell out my hand an broke an I bought it last month nw da screen is cracked and not working. how much will I pay for repairing. Pls. give me details in India rupees.
Hello Rajesh, it costs about 525 rupees to get a replacement online, if you’d like to repair yourself, here are the links for your reference:
Screen replacement: http://www.etradesupply.com/oem-nokia-lumia-520-digitizer-touch-screen-with-front-housing.html
Tutorial video: http://www.youtube.com/watch?v=QNQN4HL0tSg
hy.i have a problem.i change my touch of my lumia 520.( by from amazon not original) and is not reconaized by soft.first time worked ,after restart no work.i try soft reset , hard reset, nothing,i try downgrade with ” lumia softer recovery tool” work after downgrade but if i restart the phone…same problem.touch dont work…what to do ???please help me:((
sir, I am using Lumia 525. My touch screen was broken. where can I get the original touch screen at pune & at what price?
Hello Milind, pls check it out here:
http://www.etradesupply.com/oem-nokia-lumia-520-digitizer-touch-screen-with-front-housing.html
my nokia lumia fell from my hand the touch is working fine but the screen is damaged, how much it will cost for the screen
It costs less than $10, you may check the latest price here:
http://www.etradesupply.com/oem-nokia-lumia-520-digitizer-touch-screen-with-front-housing.html
Can you supply the Touch Screen Digitizer of Lumia 520 for repair in Delhi. What will be the cost and payment process?
Yes, the replacement link is: http://www.etradesupply.com/oem-nokia-lumia-520-digitizer-touch-screen-with-front-housing.html
my nokia 520 was slipped my hand and the screen was minor cracked from coner side.very very minor.but its touch screen is not working.plz advise me am i change my screen or not?only touch system or screen or both.and what expenses are require in pakistan ?plz help me.
Yep, you need to replace the digitizer touch screen. It is very easy to handle this issue.
you can check the Nokia 520 digitizer touch screen and find the estimate expense including shipping fee.
http://www.etradesupply.com/oem-nokia-lumia-520-digitizer-touch-screen-with-front-housing
also, we have video tutorial you can follow to repair it:
Disassembly video: youtube.com/watch?v=QNQN4HL0tSg&ab_channel=ETradeSupply
Reassembly video: youtube.com/watch?v=ulCiYsgWiMk&ab_channel=ETradeSupply
My screen to my Nokia lumia 820 crack and touch screen not working but it display works/shows fine, can someone tell me what need to re repair, if it is the screen,digitizer etc
Hi Paula, yup, your digitizer touch screen needs to be replaced, here is the part
http://www.etradesupply.com/oem-nokia-lumia-820-digitizer-touch-screen-with-front-housing.html
The referential tutorial guide is here:
http://www.etradesupply.com/blog/repair-cracked-nokia-lumia-820-screen/
Good luck.
i have crashed lcd of nukia lumia and than change it. but after it’s not working accurately, when i plugged it touch not responds, and displaying contenousily plbs, plz guide me what i have to do?????????????
I have a working Nokia Lumina 520 with a cracked glass. I also have a Nokia Lumina 520 that quit working. How difficult is it to swap out the working unit to the case of the non-working unit? Will I have to do much dis-assembling to do this are can I remove the good unit in one piece and re-install into the good case? Appreciate it.
Hi Ray Boy, you need to disassemble the phone and swap the screen. Please refer to this video for reference:
http://www.youtube.com/watch?v=D6MQEuoZPTE
i bought lumia 520 4 days ago it slipped from my hand and fell on the ground the sceen is broken half of the screen is not working what can i do to fix this?
Hi Lucia, your Lumia 520 digitizer was damaged, this is the product link you may need.
http://www.etradesupply.com/oem-nokia-lumia-520-digitizer-touch-screen.html
Hi, well about 3 weeks ago, i boug a brand new nokia lumia 520, my friend and i were playing and i forgot my phone was i my back pocket and when i lightly sat into my desk at school, and the screen broke, it turns on and off but thr touch isn’t working anf it won’t let mr unlock it. HELP PLEASE?!”
Hi Makayla, your Lumia 520 touch screen was damaged. The only way is to replace it with a new one. This is the product link for your reference:
http://www.etradesupply.com/oem-nokia-lumia-520-digitizer-touch-screen.html
does my phone screen cracking and not functioning mean it is unrepairable?
Not really, you can replace a new touch screen replacement. If you don’t have any repair skills or experience, we’d suggest you to replace the whole LCD assembly, that’s much easier and lower risk.
Lumia 520 Touch Screen:
http://www.etradesupply.com/oem-nokia-lumia-520-digitizer-touch-screen.html
Lumia 520 LCD Assembly:
http://www.etradesupply.com/oem-nokia-lumia-520-lcd-screen-and-digitizer-assembly-with-front-housing-black-with-nokia-logo.html
how much would it cost to replace an L C D of samsung g 900
Less than $200 if you replace it by yourself. This is the product link for your reference:
http://www.etradesupply.com/samsung-galaxy-s5-sm-g900-lcd-screen-and-digitizer-assembly.html
Iam given 500rs they repair it
Love it, i hope lumia 520 screen crean how much it cost
Hi
Does somebody knows if I can replace my LCD screen on a lumia 525 by on from the 520?
I find a lot of replacement screen for 520 but none for 525 or they cist a fortune…
Thanks guys
Screens compatible, frequencies different. 520 ATT, 525 T-Mobile (in USA)
Hi Everyone,
Even my phone felt down and got cracks.. I guess I can sought it out under 1500.. If this is not the case do advise..
Regards,
LA
My Lumia 520 screen has cracked middle of the screen and 2 vertical lines have appeared, there is no problem in display but half the touch screen is not working.
so what should i change LCD or Touch Screen or Both.
help me guys……..
In your case, you’ll need to replace the Touch Screen only, please visit below link for more product detals. http://www.etradesupply.com/oem-nokia-lumia-520-digitizer-touch-screen.html
I encountered this also, my lumia 520 had the screen cracked, the display wasnt damaged yet the touch didnt worked.
If you broke your screen and touch doesn’t work but the display is fine, you need a new Touch Screen Digitizer and tools. It doesnt cost much actually, look for one in ebay.
In some instance, both the touch and the display wouln’t work, you new to replace it with a new LED digitizer and Touch Screen digitizer.
I have a Nokia Lumia 520 with broken touched screen. Display appears with day and date after powered up but screen will not change pages. Can I just replace the touch screen only without changing the LCD?
Your reply will be appreciated.
Thank you
its has a hair-line crack and now I cant slide it or answer calls inspite of it being in perfect working order.
Joke !!
what is actually price of screen nokia lumia 520
Guys I need some serious help eish my touch digitizer has cracked so I need 2 replace it so I dnt knw where in SA I could find some help!!
Horrible phone, the screen craked on my back pocket just from sitting on it and I’m not even heavy
My nokia lumia 525 fell out of my hand and didn’t start at all. Nokia care is saying it’s motherboard is damaged and can’t be repaired. So wanted to know what is the actual cost and how can I buy a motherboard for lumia 525
The glass cracked as i took it (Lumia 520) out from my jeans pocket. Very much shocking. Just lying inside a pocket how can a glass crack itself. Display is working fine but the touch isn’t working. I also d n’t know what is the actual cost of the repair. Can anyone suggest ? Your suggestions shall be highly appreciated.
Thank you.
my nokia Lumia 520 mobile screen just crack in last night, touch is not working but display is working and also Camera is working. Can anyone help me to buy a new screen. Thank you
the phone screen itself costs about £10 on ebay, look around and you may be able to get it for less
plz tell me ,the cost of lumia 520screen
how to restart phone with a broken unresponsieve screen and a broken lock button. please help
connect to pc… it will switch on..
I broke my windows phone Lumia 520 screen and lock button. I want to restart but I can’t, Plus my phone wont open because the phone touch doesn’t work. Can anyone help without me needing to buy a new screen. Thank you
I broke my windows phone Lumia 520 screen and lock button. I want to restart but I can’t, Plus my phone wont open because the phone touch doesn’t work. Anyone had the same problem please help me. Thank you
how much would it cost…………me to replace the LCD
It costs less than $20 to buy a replacement Lumia 520 LCD.
http://www.etradesupply.com/oem-nokia-lumia-520-lcd-screen.html
allgoods got what I needed
My lock button broke, then a few months later the screen cracked a little, the size of a string not a biggy, I don’t want to buy a new screen. How can I reset my phone. Plus the phone wont open.
I have a Nokia Lumia 520 with broken touched screen. Display appears with day and date after powered up but screen will not change pages. Can I just replace the touch screen only without changing the LCD?
Your reply will be appreciated.
Thank you
my lumia 525 screen cracked yesterday and i went to nokia care.they said the screen glass is seperatly given, the display has to be changed even thought only my screen glass is broken. which they said would cost rs3200
My screen cracked while in my pocket . This is second Nokia i’veI bought and I even bought hard case to put the phone in .
my screen was broken, i went to nokia care they say 3500 rs for changing the display i was shocked. one screen is worth for one phone price how they cheat me, nokia care is always worst caring for the customer
Nokia520 want to change whole,screen how much it will cost for me
can you tell me the cost of nokia luma screen of 520
yesterday my phone screen was cracked of nokia lumia 520 .Can you tell me the actual cost of screen . please convey
Same prblm my screen glas brokend soo hw much price say wid me dear
Hi
I have a nokia 928 which I bought from USA. Its not available in India. I broke the screen; however the display works fine. Where can I get this fixed? Coz the display screen is not available in India.
In last week my phone screen was cracked. Display is working smoothly but touch doesn’t worked. can you tell the actual price to replace the screen. every one have different opinion some one say it worth Rs.2800, 2200, 1500. I am totally confused it. Pls give me the actual price.
Thats my centiment phone. . Actually i touched little bit top of the display left corner.. fraction of second, I heard small sound from my phone, digitizer is not working.. what i will do.. please reply.. Went nokia care, but they told the cost Rs.3700. Even didnt get proper response…getting irritating from their responses….
this happened to me too…
My son dropped his phone on cracked the screen, but also the touch screen ain’t working does this mean there is more then just the screen to fix or is the touch screen not working coz it’s cracked… Can anyone help?? Thank you
No it just means the screen is broken. This happened to me but it doesn’t mean other things need to be repaired. If you can turn on your phone and it shows up with lock screen then you just need to screen fixed
This happened to me too
This happened to me as well
This happened to me as well this sucks ass
My nokia jst fell out my hand an broke an I bought it last month nw da screen is cracked how much will I pay
8 $ from amazon
Hi Irisha,
It depends on which part you need to repair. A new digitizer is about $30, a new LCD is about $20, a new entire screen is about $55.
my screen just cracked last night , and i was told to day it will cost £65
how much it will cost to replace display of nokia lumia 520
Sir mere Nokia lumiya ka pf part short hai .o mujhe nahi mil raha hai aap mujhe call karo merA no .7775847981