How to Replace The iPhone 11 Pro Speaker?
BY kaye | February 26th, 2020 | 0 | 0
Tools Needed:
Screwdriver kit – Pentalobe, Phillips, Y-type, Standoff
Suction cup
Hard plastic plectrum
Tweezers
Spudger
Hot air gun
New iPhone 11 Pro frame adhesive tape
Step 1: Tear down the iPhone 11 Pro and remove the display screen
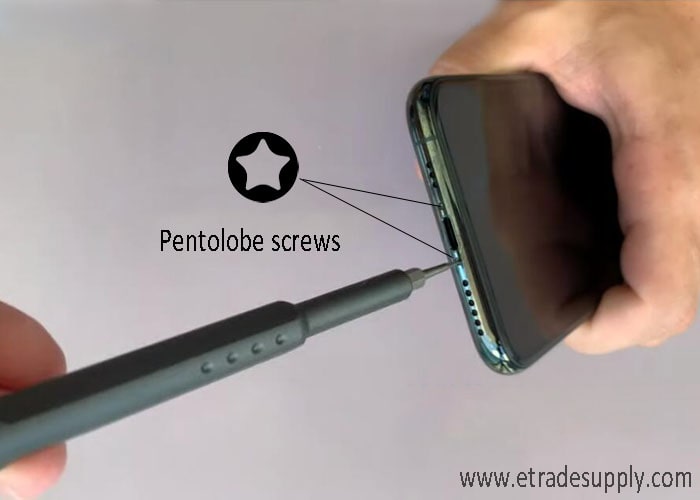
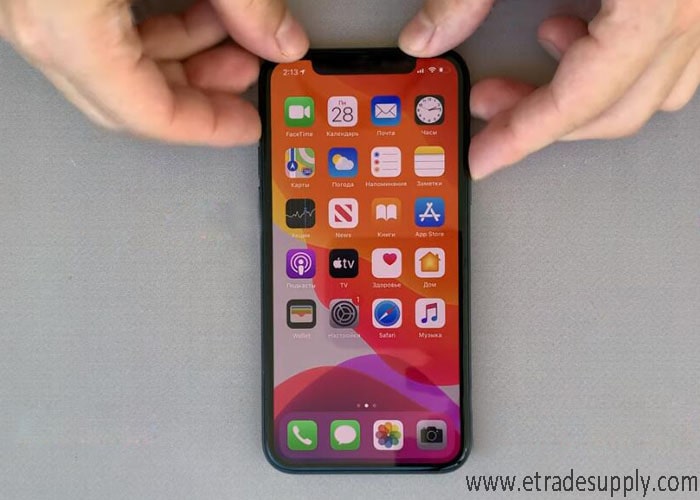
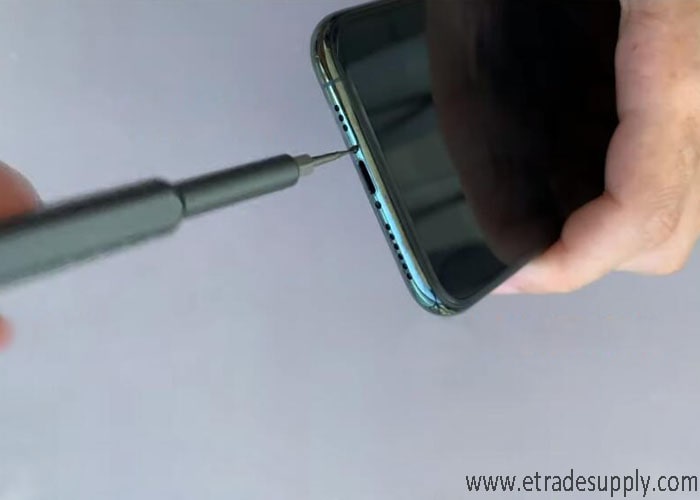
1.1 Turn off the iPhone and loosen the two pentalobe screws on the bottom.
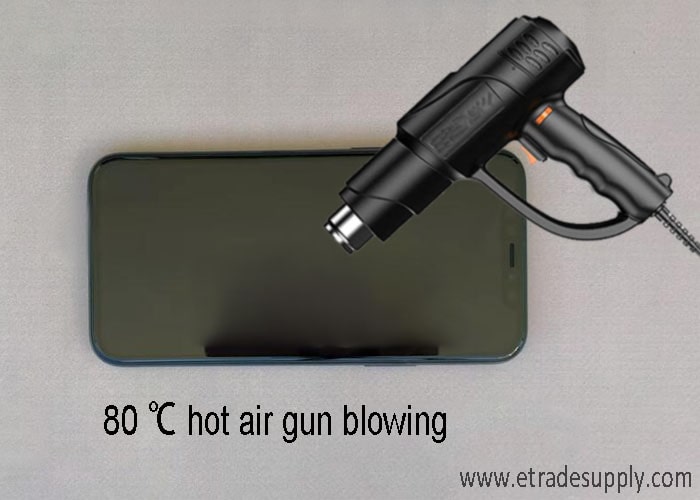
1.2 Heat the back cover edge in 80 ℃ hot air gun blowing for 2 minutes.
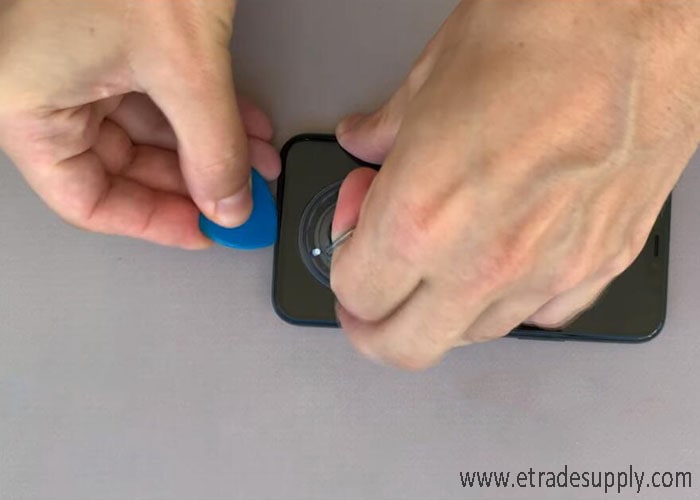
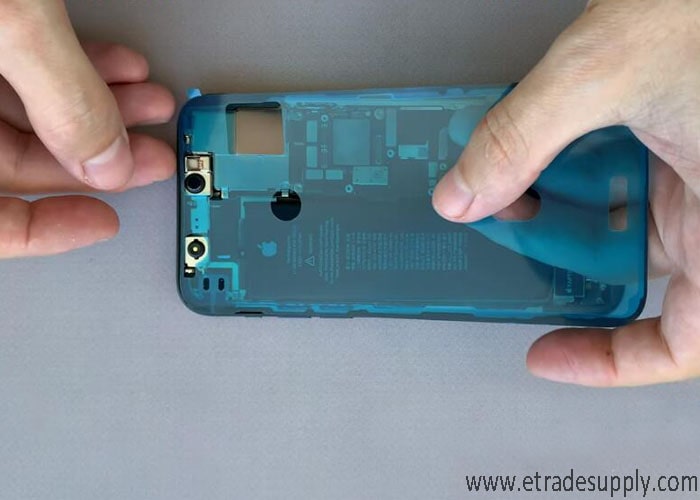
1.3 Use a suction cup to pull the display screen and make a small gap. Use Hard plastic plectrum to insert the gap and slice around. Separate the iPhone 11 Pro display screen from the phone slowly by prying up. Clear out the black adhesive glue.
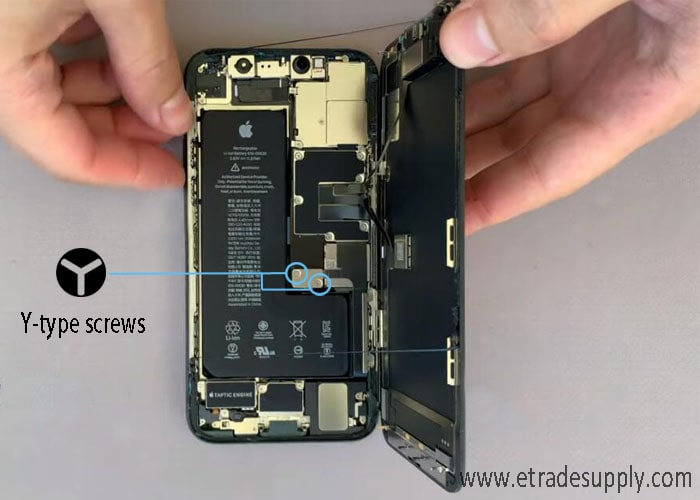
1.4 Hold the iPhone 11 Pro display screen and digitizer assembly with frame on a box or something, remove the two Y-type screws and remove the small metal panel with tweezers
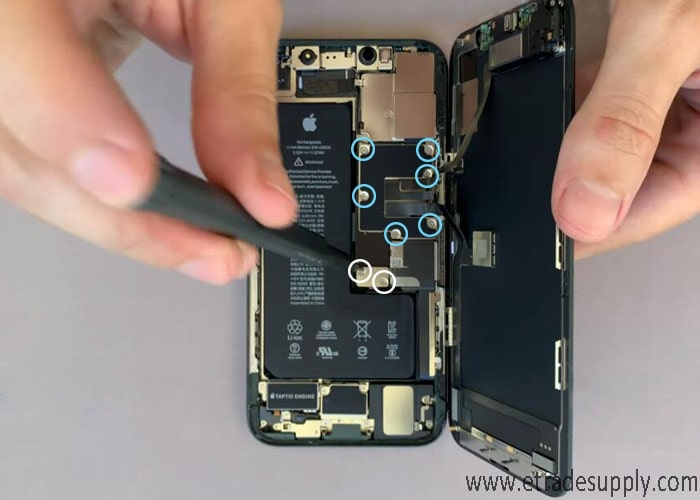
1.5 Loosen the six Y-type screws and take out the large metal panel
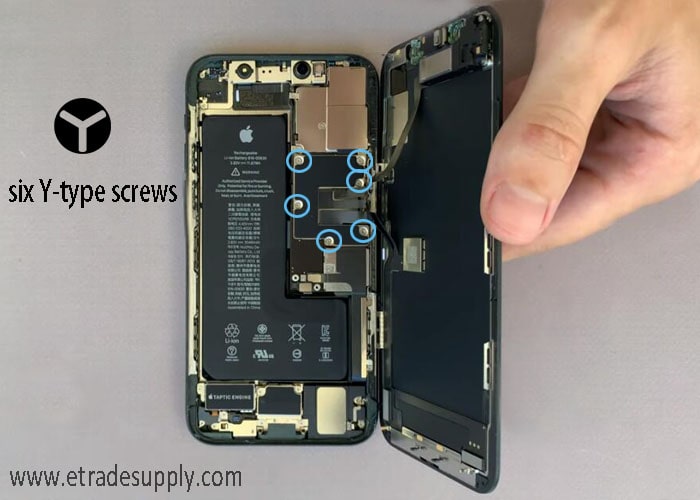
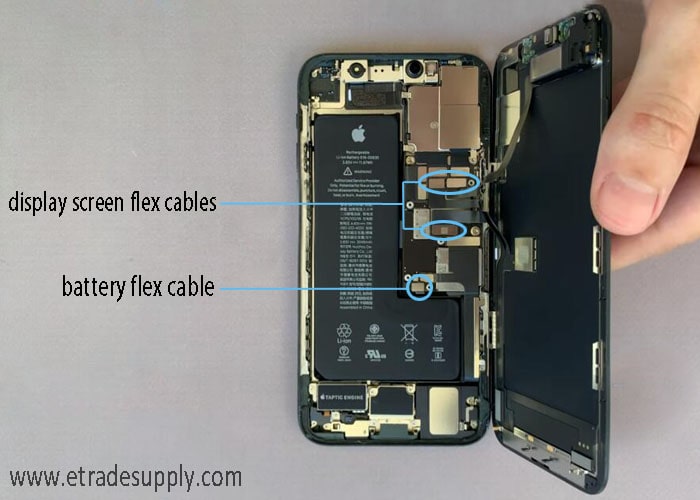
1.6 Pry and disconnect the battery flex cable, then the display cables with a spudger. Remove the display screen after the flex cables are disconnected.
Step 2: Replace the iPhone 11 Pro speaker
2.1 Loosen the four Y-type screws and remove the metal panel
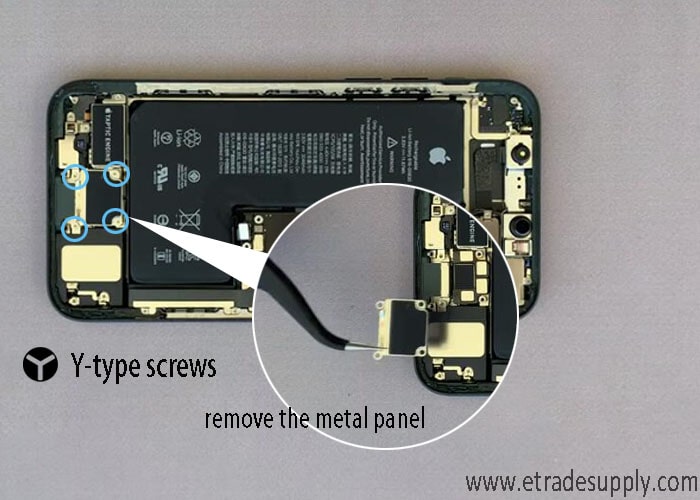
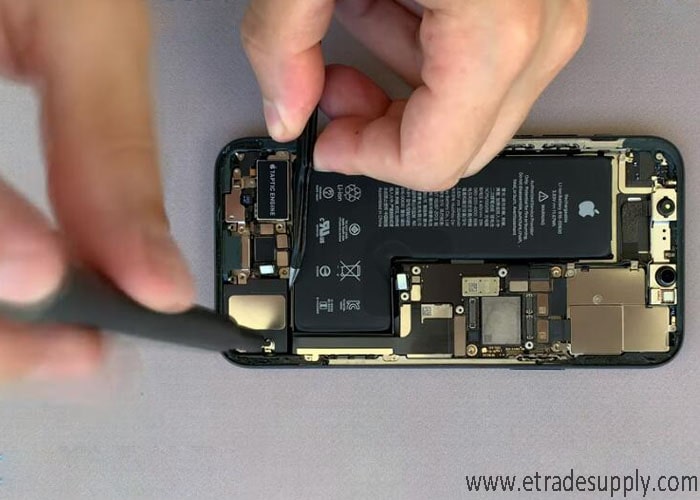
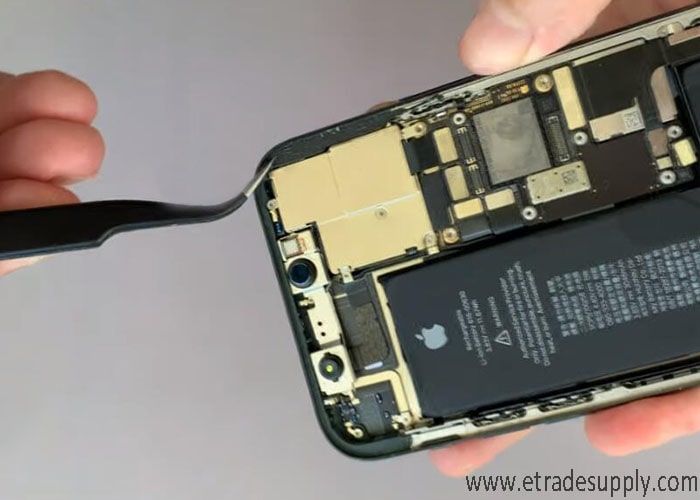
2.2 Pry and disconnect the second battery flex cable and the speaker flex cable after the metal panel is removed
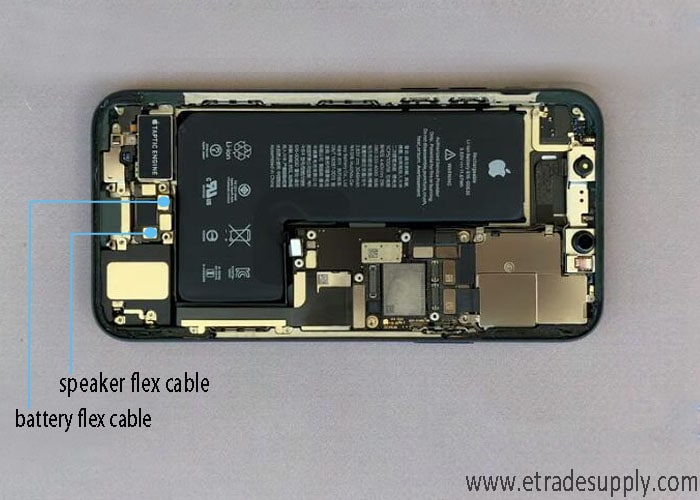
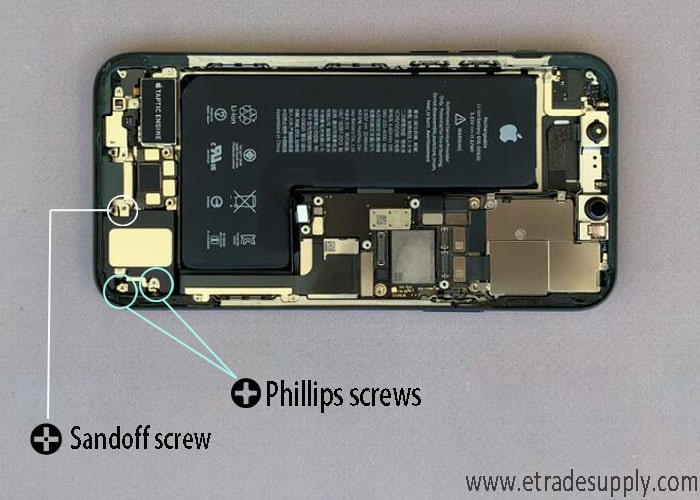
2.3 Remove the two Phillips screws and one standoff screw for fixing the speaker
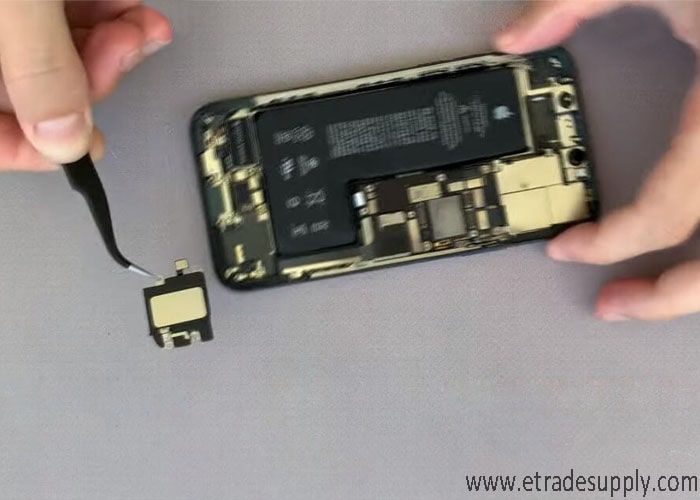
2.4 Use 80 ℃ hot air gun blowing the speaker to heat up the black glue adhesive for easy removing, then gently remove the speaker with tweezers
2.5 Install the new speaker in the phone and screw the three screws backing for fixing it
Step 3: Reassemble the iPhone 11 Pro
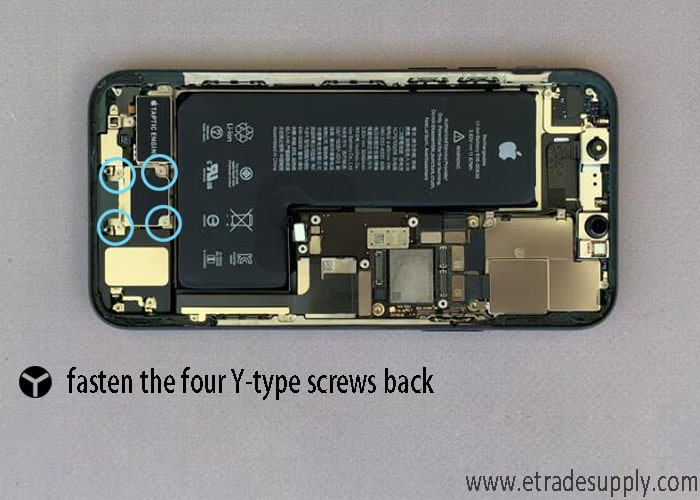
3.1 Connect the battery cable and the speaker cable, install the metal panel back and fasten the four Y-type screws for fixing it
3.2 Connect the display screen cable to the phone and battery cable as well. Turn on the iPhone and test the iPhone. Check the functions of each application. Make sure they are all ok
3.3 Turn off the phone again, disconnect the display cables and the battery cable. Remove the display. Clear out the black adhesive glue with tweezers.
3.4 Attached a new frame adhesive tape on the frame edge. Operating procedure refers to our previous tutorial on How to Replace iPhone 11 Pro Rear-facing Camera.
3.5 Install and connect the display screen cable and the battery cable. Place the metal panel and fasten the six Y-type screws fixing the flex cables. Place the small metal panel back and fasten the two Y-type screws back
3.6 Assemble the display screen on the phone and gently press the edge to make sure it is no gap left on the edge. Fasten the two pentalobe screws on the bottom. All process is done.
Notes: the whole operating procedure above is under the hands of our professional repair team. We do not suggest you tear down and replace the parts of the iPhone 11 Pro at home if you are unfamiliar with iPhone repair. The display screen some replacement parts for iPhone 11 Pro are easy to be broken, which requires our patience and insistence. Questions about iPhone 11 Pro speaker repair will be answered as long as you leave it on the comments below.
RECOMMENDED PARTS
- For Apple iPhone 11 Pro LCD Screen and Digitizer Assembly with Frame Replacement - Black - Grade S+
- For Apple iPhone 11 Pro /Pro Max Rear Facing Camera Replacement - Grade S+
- For Apple iPhone 11 Pro Digitizer Frame Adhesive Replacement - Grade S+
- For Apple iPhone 11 Pro/Pro Max Side Keys Replacement (4pcs/set) - Gold - Grade S+
POPULAR ARTICLE
- How to Replace the iPhone 11 Pro/Pro Max Rear-facing Camera?
- How to Replace the iPhone XS Taptic Engine & Loudspeaker?
- 3 Steps for iPhone 11 Back Rear Camera Replacement
- How to Teardown iPhone 11 for Display Screen Replacement
- iPhone X Water Damage Repair Guide (Still Work in 2019)
- How Much Does It Cost To Replace An iPhone XS Display?
- iPhone X Explosion: 7 Small But Important Things To Note
- 7 Ways To Fix Your iPad Not Charging In 2018
- iPhone 7 Screen Replacement | iPhone 7 Repair
- Which Parts of iPhone X and iPhone XS Are Exchangeable?
- iPhone X, XS, XS Max, and XR Battery Comparison
- How To Fix iPhone XS/XS Max, And XR Bluetooth Connection Issue
- Apple Will Fix the iPhone 8/8 Plus/X Auto Brightness Issue in iOS 12
- iPhone got exploded too?! How to protect your phone from battery explosion
- HTC 10 DIY Teardown for screen, charging port, battery replacement
- 6 Quick Tips To Distinguish Between Real And Fake iPhone SE
- Analysis on: Are China made LCDs for iPhone 5S Compatible with iPhone SE?
- How to Replace the Galaxy S7, S7 Edge Battery Replacement
- How to Disassemble the Galaxy S7 LCD Assembly to Replace Screen, Charging Port and Home Button
- How to Repair Samsung Galaxy S7 Edge Cracked Screen
- How to Tear Down/Disassemble the Galaxy S7 for Screen Replacement
- How to Fix Phone Gets Hot and Battery Drains Fast
- Xperia Z5 Premium USB Charging Port Replacement Tutorial
- How to Replace Your Broken Sony Xperia Z5 Premium Screen Step by Step Guide
- 15 Tips to Improve Your Galaxy Note 5’s Battery Life
- How To Replace A Cracked Motorola Droid Turbo 2 Screen
- How To Fix iPhone 6S Auto Shutdown When It Still Has Battery?
- How To Replace A HTC One A9 Cracked Screen
- How to Distinguish the Fake Apple Earpod from the Real One
- How to Replace the LG V10 Screen in 5 Steps
- How To Solder/Replace A Samsung Galaxy or iPhone Charging Port
- The Cost of Repairing a Cracked Galaxy S6, S6 Edge Screen
- How To Fix Cracked Xperia Z5 For Screen Replacement
- What’s Need to Be Prepared As a Startup Cell Phone Repair Shop
- *Update* The Root of Differences among Copy iPhone LCDs: Structure
- Important Info: Pay Attention To Defective Recycled iPhone LCDs
- How to Replace Galaxy Note 5, S6 Edge Plus Battery
- Are The Flood of New High Copy iPhone LCD Screens as Good as The OEM Ones?
- iPhone 6+ and iPhone 6S+ Screen Comparison Report
- How to Recover Photos and Data with Broken Screens
- How To Identify Different LG G4 Model Numbers
- How to Fix Cracked iPhone 6S for Screen Replacement
- Cost of Repairing a Damaged Screen on the LG G4
- How To Fix LG G4 Digitizer Touch Screen Issue
- As a Newbie, What You Should Know About Jailbreaking
- How To Tear Down/Disassemble Galaxy S6 Edge Plus For Screen Replacement
- 90% Of People Don’t Know These Cellphone Battery Information
- Insider Tips to Save Your Water-damaged Device
- How to Set Up ETrade Supply’s Adhesive Dispenser Robot
- Top 10 iPhone 6 Problems and Solutions
- How To Fix Vertical Lines On An iPhone Screen After Replacement
- How to Replace Sony Xperia Z3+ Screen/Screen Replacement Guide
- How To Disassemble/Tear Down Sony Xperia Z3+
- How to Assemble Small Parts on iPhone 6 LCD Screen Assembly
- Reasons Behind & Solutions for iPhone 6 Frame and LCD Separation Issues
- How to Replace The LG G4 Charging Port
- How to Replace the Cracking LG G4 Screen in 10 Minutes
- How To Replace An Oneplus One Cracked Screen
- iPhone 5 LCD Screen Assembly Small Parts List
- How to Replace the HTC One M9 Charging Port
- How to Replace HTC M9 LCD Screen Assembly
- Top 5 Most Common iPhone 6 Issues You May Come Across
- How To Tear Down The Samsung Galaxy S6 In 10 Steps
- The Cost Of Repairing A Cracked Nexus 6 Screen
- How To Repair A Nexus 6 Cracked Screen
- How To Disassemble Nexus 6 In 10 Steps
- The Cost Of Repairing A Broken iPhone 6 Screen
- Five Minutes Work to Replace Your iPhone 6 Plus Broken Screen
- How to Repair a Cracked Samsung Galaxy S5 Screen