


How to reassemble Samsung Galaxy Note 4
BY Davi | 一月 19th, 2015 | 0 | 0
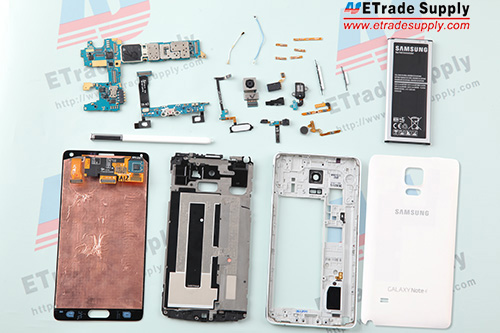
At first glance, you’ll easily find that the Samsung Galaxy Note 4 inherits the design and the great figuration of Galaxy Note series. After tearing down Samsung Galaxy Note 4, we found it’s very easy to repair. Compared with Samsung Galaxy Note Edge, it’s not only easier for you to use (The curve-display is not easy to hold) but also easier to be repaired. Here we show you how to reassemble Samsung Galaxy Note 4 step by step, just in 10 minutes.
1. Put the ear speaker mesh cover in the middle plate.

2. Insert the home button flex ribbon in the middle plate.

3. Connect the charging port assembly to the middle plate.

4. Assemble the plastic bracket with a front-facing camera.

5. Connect the rear-facing camera to the motherboard.

6. Connect the front-facing camera to the motherboard.

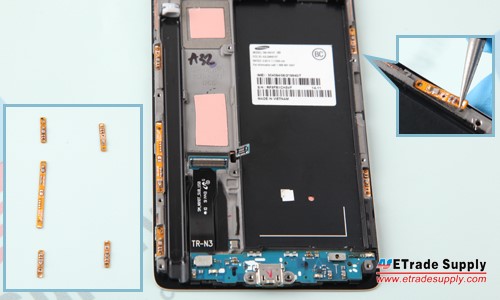
7. Insert the 5 antenna chips in slots.
(Notice: The 5 signal chips are different in shape, be careful not to place in the wrong position when reassembling.)
8. Insert the vibrating motor with power button flex in the slot.

9. Put the ear speaker flex into the slot.

10. Put the volume key flex into the slot.

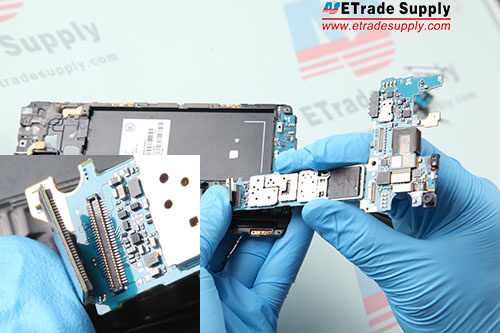
11. Put the motherboard in the slot and connect the charging port assembly to the motherboard.
12. Connect the ear speaker flex cable to the motherboard.

13. Connect the home button flex cable to the motherboard.

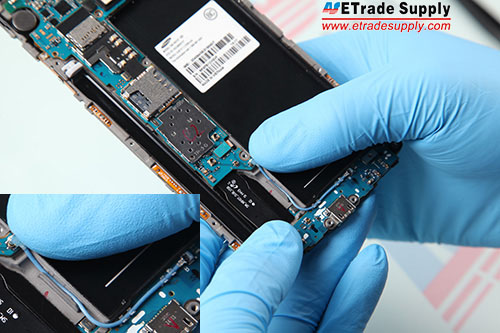
14. Connect 2 antennas to the motherboard.

15. Fasten 1 screw in the charging port assembly.
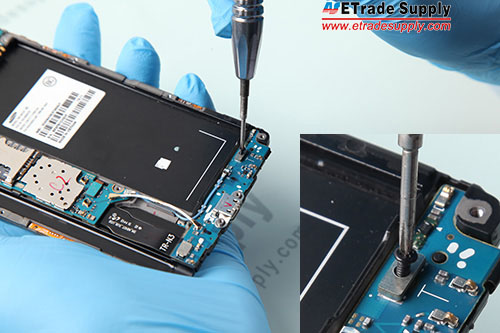
16. Fasten 1 screw in the motherboard.

17. Adhere to Samsung Galaxy Note 4 front housing adhesive to the middle plate. Install the LCD screen and digitizer assembly, then connect the LCD screen flex cable and digitizer flex cable to the motherboard.


18. Insert the volume key and power key.


19. Insert the earphone jack.

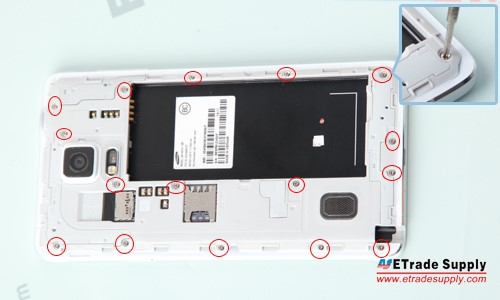
20. Cover the rear housing and fasten 16 screws in the rear housing.
21. Put the battery in and insert the stylus to the rear housing.


22. Cover the battery door, then the reassembly is complete.
|
|

|
|
|
|
|
|---|


 IOS 17.4 official version pushed to block battery vulnerability
  Is the Chinese-made rear case for the iPhone 15 series going on the market?
  New products coming:USB to MFI Lightning Cable
  Big BUG of iPhone 15
  Successfully submitted!