


How to Take Apart the Moto X for Screen/Parts Repair
BY alina | 十月 19th, 2013 | 0 | 0
Moto X is the first smartphone assembled in the U.S.A and features a 4.7-inch AMOLED display with the resolution of 720 x 1280 pixels, 10MP rear facing camera, 2MP front facing camera and 2200mAh battery, etc. If you cracked some of these parts, it’s not very difficult for you to replace them since Moto X performs scores 7 out of 10 on repairability. You can follow our Moto X complete disassembly tutorial to learn how to fix the damaged parts on your device, such as the broken Moto X battery cover or the cracked screen. Please note that the DIY repair will void the warranty of your Moto X.
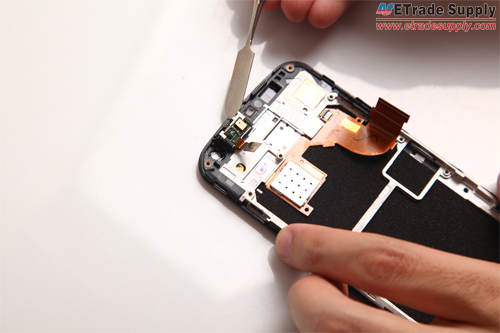 Step 13
Use eject pin to remove 7 pins holding the middle chassis in place.
Step 13
Use eject pin to remove 7 pins holding the middle chassis in place.
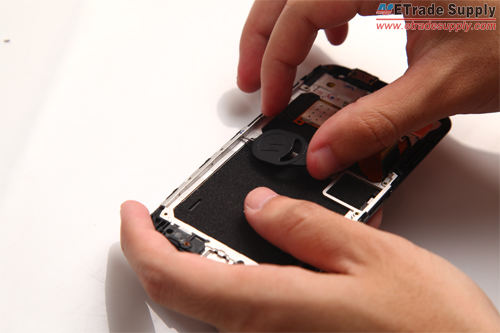 Step 14
Once the 7 pins removed, use plastic case opening tool to release the middle chassis around the edge carefully. Then remove the chassis and the Moto X LCD assembly is free. (Please note that do not use metal opening tool or it will damage the LCD screen.)
Step 14
Once the 7 pins removed, use plastic case opening tool to release the middle chassis around the edge carefully. Then remove the chassis and the Moto X LCD assembly is free. (Please note that do not use metal opening tool or it will damage the LCD screen.)


Step 13
Use eject pin to remove 7 pins holding the middle chassis in place.

Step 14
Once the 7 pins removed, use plastic case opening tool to release the middle chassis around the edge carefully. Then remove the chassis and the Moto X LCD assembly is free. (Please note that do not use metal opening tool or it will damage the LCD screen.)


Share:


 IOS 17.4 official version pushed to block battery vulnerability
  Is the Chinese-made rear case for the iPhone 15 series going on the market?
  New products coming:USB to MFI Lightning Cable
  Big BUG of iPhone 15
  Successfully submitted!