

 Loading...


- Compatible With: SM-G900, SM-G900A, SM-G900V, SM-G900P, SM-G900R4, SM-G900T, SM-G900F
-
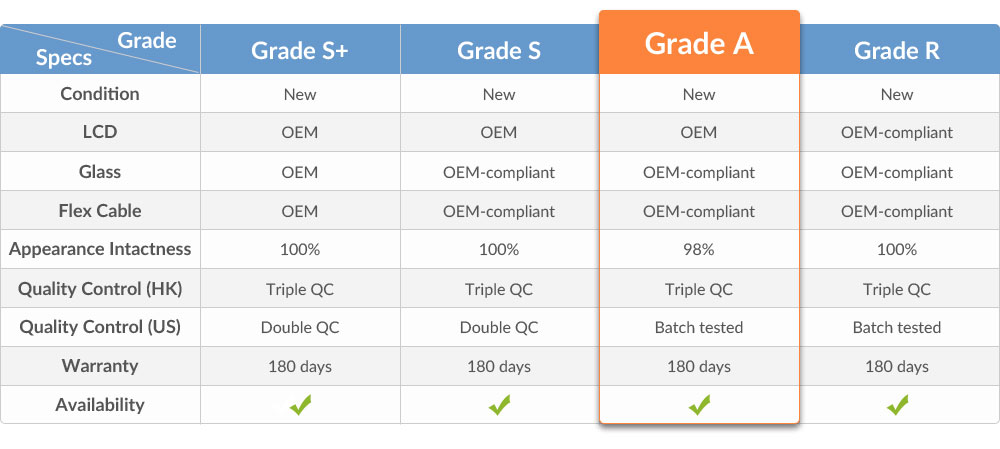
For Samsung Galaxy S5 SM-G900/G900A/G900V/G900P/G900R4/G900T/G900F LCD Assembly with Home Button - White - With Logo - Grade A
This item includes the following parts:1. LCD Screen;
2. Digitizer Touch Screen;
3. Home Button.
Notice: Please test the functionality of this item before installation.
Specifications:
Color: White
Screen Size: 5.1inches
Display Type: Super AMOLED capacitive touchscreen, 16M colors
Resolution: 1080 x 1920 pixels, 432 ppi pixel density
Multi-touch: Yes
Compatibility: SM-G900, SM-G900A, SM-G900V, SM-G900P, SM-G900R4, SM-G900T, SM-G900F
Features:
This Galaxy S5 SM-G900F LCD Assembly includes the LCD, digitizer touch screen and Home Button.
This Samsung S5 SM-G900F LCD Screen Assembly is branded with logo on the top, please note.
This item is white, please note.
This LCD Digitizer for Samsung S5 SM-G900F is original but not brand new replacement. It has some cosmetic imperfections but still function.
This replacement LCD Screen and Digitizer Assembly is compatible with SM-G900, SM-G900A, SM-G900V, SM-G900P, SM-G900R4, SM-G900T, SM-G900F.
How to Install / Tips:
Be sure to choose the right color and version before placing an order.
Please try to handle the repair or replacement work in a dry and dust free environment without direct sunlight.
The installation of any new part should be done by a qualified person. ETS is not responsible for any damage caused during installation.Step 1: Power off the Galaxy S5.

Step 2: Peel the battery door off this GS5 with your thumb.
Note: The ease of removal design on Galaxy S5 battery case enables the DIY lifestyle for Galaxy S5 users. In hence, you can replace the Galaxy S5 back cover without any hassle if you suffer a broken one.

Step 3: Remove the Galaxy S5 battery.
Note: The GS5 battery is easy to remove and install. Please kindly note if you purchase a new Galaxy S5, you have to install the battery yourself after unboxing it.

Step 4: Remove the cover protecting the connector underneath it.

Step 5: Disconnect the Galaxy S5 home button connector.

Step 6: Use a hair dryer to heat up the Galaxy S5 screen.
Note: The GS5 display is fixed by strongly sticky adhesive tape, so a large amount of heat is needed to loose the glue. You should apply heat persistently to make the screen hot enough, then the screen is easier to pry it out. If you want to replace a new GS5 screen, you need a new set of S5 front housing adhesive too.

Step 7: Pry the screen out of the device by case opening tool and spudger.
Note: After the glue is loosen, you can wedge several case opening tools around the side between the screen and rear housing. And then pry the screen out of the device by spudger tool. Please make sure you pry the display from the top of the phone rather than the bottom, for there is a cable on the home button.

Step 8: Disconnect a cable connecting the LCD and digitizer on Galaxy S5
Note: The connector is at the top of the screen, so you need to gently pry the display and use a spudger to disconnect the cable controlling the GS5 LCD screen and digitizer touch screen.

Step 9: Pull the Samsung Galaxy S5 screen assembly away from the rear housing.
Note: When the connector is disconnected, you can pull the Galaxy S5 LCD screen assembly away from the rear housing.

Step 10: The Samsung Galaxy S5 LCD screen and digitizer touch screen assembly is disassembled.
Note: The disassembled Galaxy S5 LCD screen assembly carries the home button. You can remove the Galaxy S5 home button if the home button performs well and you only need to replace a new Galaxy S5 screen replacement part. But please remember to assemble the home button to the new GS5 screen replacement part you buy.
Step 11: Replace a new Galaxy S5 screen assembly replacement part.

-
Customer also bought


-
(Posted on 09/14/17)Great product