

 Loading...
Tools you will need:

 For Case Opening Tool Double Head
 For Heavy Duty Suction Cup Dent Sucker Puller for Cellphone Screen


How to Fix Broken Galaxy S5 Screen and Other Parts after Teardown
Although many reports claimed that it's harder to repair Galaxy S5 than S4, it gets 5 out of 10 (10 is the easiest to repair). Therefore, compared with other smartphones, Galaxy S5 is not hard to repair. Here we walk you through detailed steps for replacing a cracked Galaxy S5 screen, damaged GS5 camera, broken S5 loudspeaker, middle frame etc. ETrade Supply is always your prior choice to get Samsung Galaxy S5 replacement parts and components.
Please note the DIY repair will void the warranty of your Galaxy S5 but may save money. Watch the following step-by-step GS5 teardown tutorial to find how to repair your Galaxy S5 screen and other parts and components showed in below.
• Replace a cracked or shattered Galaxy S5 screen
• Fix a damaged Galaxy S5 battery
• Replace broken Samsung Galaxy S5 camera
• Fix malfunctioned Galaxy S5 ear speaker or loudspeaker
• Repair a broken GS5 battery door or problematic rear housing
• Fix a damaged Galaxy S5 earphone jack
• Repair a problematic Galaxy S5 charging port
Tools needed to disassemble Samsung Galaxy S5
Hair Dryer
Small Phillips Screw driver
Plastic Spudger
Suction Cup Tool
Several Case Opening Toll
Tweezers
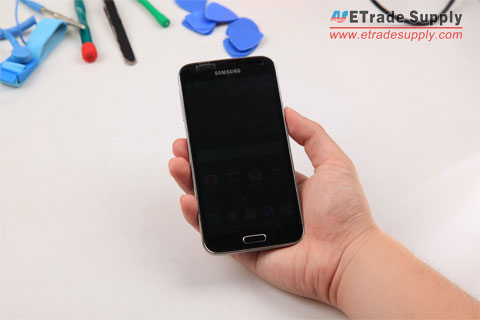
Step 1: Power off the Samsung Galaxy S5.
Step 2: Remove the GS5 battery door with your thumb.
Note: If your GS5 back cover is broken, you can replace it with a new back panel at this step.

Step 3: Peel the Galaxy S5 battery off.
Note: If you suffer a damaged Galaxy S5 battery, you can buy a new one and fix it by replacing it at this step. However, please take care to check if the Samsung Galaxy S5 battery you buy is genuine, for a fake battery may trigger an explosion. (Here is good tutorial: How to Identify the Original and Fake Cellphone Battery)

Step 4: Remove the cover protecting the connector underneath it.
Note: Do not use sharp tweezers which will damage the plastic cover.

Step 5: Disconnect the Galaxy S5 home button connector.

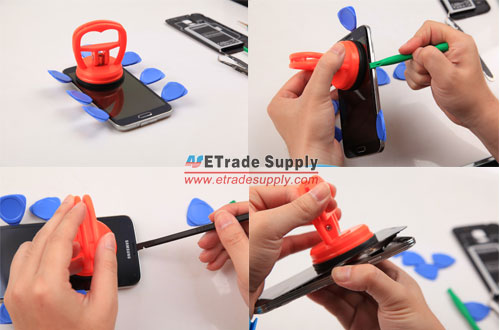
Step 6: Use a hair dryer to heat up the Galaxy S5 screen.
The Galaxy S5 LCD screen and digitizer touch screen assembly is firmly glued to the rear housing by sticky adhesive, so you have to heat up the screen of Galaxy S5 with a hair dryer or heat gun. Make the screen hot enough until the glue is loose.

Step 7: Use the plastic spudger to pry the Galaxy S5 screen and wedge several case opening tools around the side.
Note: Do not pry the Galaxy S5 screen from the bottom of the phone, because the GS5 home button, back button and menu button locate at the bottom. Also, you have to be aware there is a flex cable connecting the LCD screen and digitizer and mainboard at the upper side of the screen component, so do not push too deeply when you detach the tape with the spudger tool.
Step 8: Disconnect the flex cable of Galaxy S5 screen assembly connecting the LCD screen and digitizer to the mother board.
Note: When there is a gap between the Galaxy S5 LCD screen assembly and the rear housing, you can use a plastic spudger to disconnect the GS5 screen assembly flex cable.

Step 9: Separate the Galaxy S5 screen assembly from the rear housing. You need to detach the Braket Cu tape carefully from the S5 LCD assembly.
Note: you want to replace any of the Galaxy S5 internals, you have to go through the screen removal process at first. After free the display assembly on Galaxy S5, other part replacements are very easy.

Step 10: The Samsung Galaxy S5 LCD screen and digitizer assembly is separated from the rear housing.
Note: At this step, the Galaxy S5 screen is removed. If your Galaxy S5 screen is shattered or broken, you can replace a new one. But please kindly note the Galaxy S5 home button is attached to the screen. You can buy a new GS5 screen with home button, if not, you have to remove the home button from the broken screen and install it to the new one you buy. Also, if your GS5 home button is broken, you can replace it at this step too.

Step 11: The form tape on the back of GS5 LCD assembly must be changed to the new one whenever reassembled.
Note: When the Galaxy S5 is disassembled, the water resistance performance would be affected. Therefore, you should change the form tape or Galaxy S5 front housing adhesive to a new one to better warranty the feature.

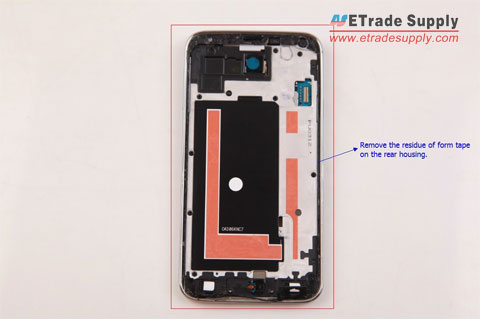
Step 12: You need to remove the residue of form tape on the Galaxy S5 rear housing with cary jig & rework tape.
Note: It is necessary to clean the form tape residue which will affect water resistance performance.
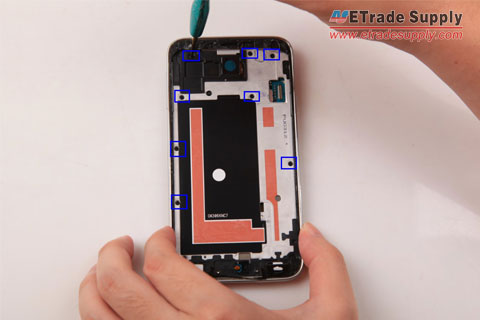
Step 13: Remove the Galaxy S5 Bracket Cu tape.
Note: This Bracket Cu tape is helpful for water resistance performance, and it must be replaced to the new one whenever reassembled to provide a better warranty on water resistance.

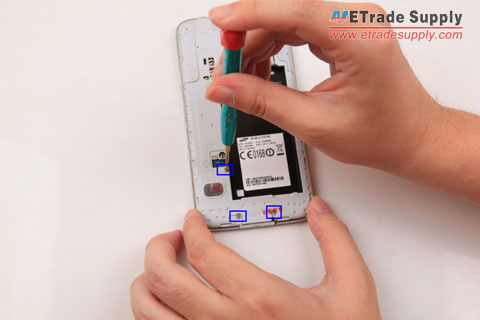
Step 14: Unscrew 10 screws holding the middle frame and rear frame on the Galaxy S5 front side.
Note: When you disassemble Galaxy S5, these 10 screws should be replaced to the new one, in order to guarantee the water-resistant function.
Step 15: Unscrew 3 screws at the back of the Galaxy S5.
Note: Whenever reassembled Galaxy S5, these 3 screws should be replaced to the new one for water resistance performance.
Step 16: Pull the rear frame out of middle frame on Galaxy S5. You can start the job from the top.

Note: You also can separate out the Galaxy S5 middle frame with the help of case opening tool. The Galaxy S5 motherboard is fixed to the middle plate.
Step 17: The Galaxy S5 rear housing is removed from the middle plate.

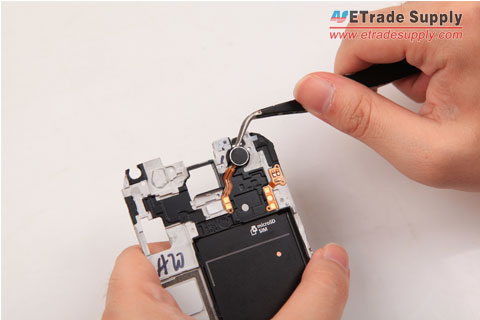
Step 18: Peel off the Samsung Galaxy S5 ear phone jack with tweezers.

Step 19: Remove the Galaxy S5 loud speaker with the help of tweezers.

Step 20: Unscrew 2 screws securing the Galaxy S5 mainboard to the frame.

Step 21: Disconnect the antennas on Galaxy S5 connecting the charging port to the mainboard.

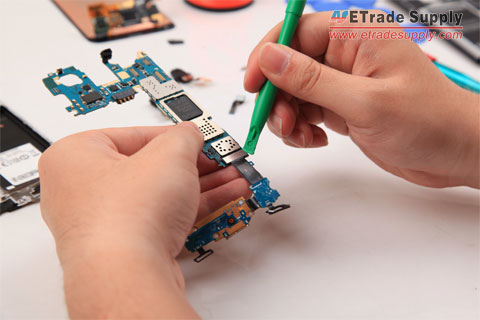
Step 22: Separate the Galaxy S5 motherboard from rear housing.

Step 23: Lift up the Samsung Galaxy S5 rear-facing camera which is attached to the mainboard.

Step 24: Peel off the Samsung Galaxy S5 front-facing camera with spudger.

Step 25: Remove the Galaxy S5 charging port with the menu button, back button, and fingerprint scanner.
Note: You may replace the charging port the most often on the phone besides the cracked screen. So at this step, you can replace a new charging port by follow the instructions.
Step 26: Peel off the Galaxy S5 vibrating motor with tweezers.
Step 27: Step-by-step Samsung Galaxy S5 disassembly job is finished.

Samsung Galaxy S5 comes with the new water resistance performance. However, if your Galaxy S5 suffers breakage and need to be repaired, you have to be aware of some non-reusable parts that must be replaced to the new one when reassemble.
These parts are:
Galaxy S5 front housing adhesive / form tap
Galaxy S5 Bracket Cu tape
10 screws on the middle frame
3 screws on the rear housing.
|
|

|
|
|
|
|
|---|


Download and print the repair tutorials here!


