

 Loading...
![]()


- Compatible With: SM-G920, SM-G920A, SM-G920V, SM-G920P, SM-G920R4, SM-G920T, SM-G920F
-
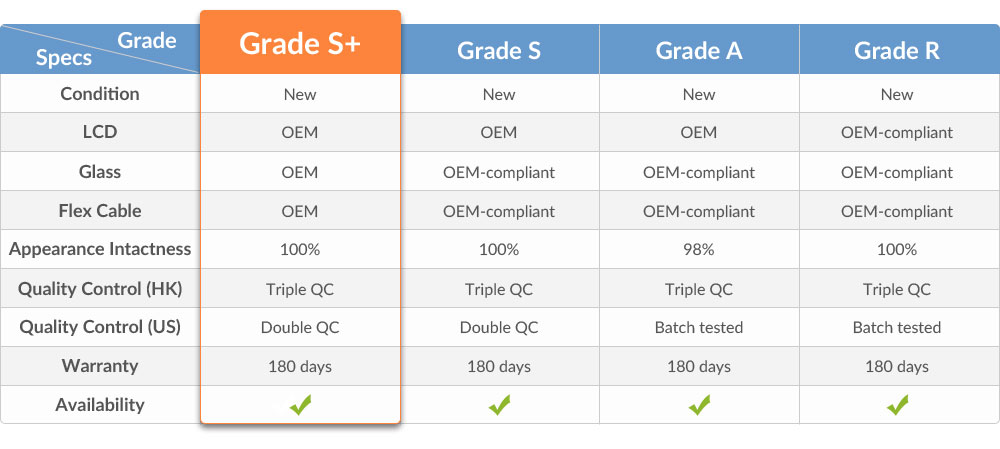
For Samsung Galaxy S6 SM-G920/G920A/G920P/G920R4/G920T/G920F/G920V LCD Screen and Digitizer Assembly Replacement - Sapphire - Samsung Logo - Grade S+
This item includes the following components:
1. LCD Display;
2. Digitizer Touch Screen.
This item does NOT include Front Housing.
Notes: Please test the functionality of this item before installation.
Specifications:
Color: Sapphire
Screen Size: 5.1 inches
Resolution: 1440 x 2560 pixels, 577 ppi pixel density
Display Type: Super AMOLED capacitive touchscreen, 16M colors
Protective Material: Corning Gorilla Glass 4
Compatibility: SM-G920A (AT&T), SM-G920F (Global), SM-G920P (Sprint), SM-G920V (Verizon), SM-G920T (T-Mobile), SM-G920R (US Cellular)
Features:
● This Galaxy S6 Screen Replacement includes the LCD Screen, Digitizer Touch Screen with Glass Lens already attached, it does not include the front housing and home button.
● This Galaxy S6 LCD and Digitizer Assembly is a brand new and original replacement. And each product of ETradeSupply goes through strictly inspection before shipping out.
● The Samsung Galaxy S6 Replacement Screen is available in sapphire, white, blue and gold.
● This LCD Touch Screen Assembly is compatible with all Samsung Galaxy S6 models. Please do not confuse it with other version.
How to Install / Tips:
● Please choose the right part before placing an order.
● Special repairing tools are required for assembling or disassembling, as the Samsung Galaxy S6 LCD and Digitizer Assembly is hermetically attached.
● Handle the vulnerable and fragile flex cable ribbon carefully.
● Please try to handle the repair or replacement work in a dry and dust free environment without direct sunlight.
● The installation of any new part should be done by a qualified person. ETS is not responsible for any damage caused during installation.
Samsung Galaxy S6 Teardown Tutorial Guide and Video:Step 1: Take Out The SIM Card Tray.
● Power off the Samsung Galaxy S6.
● Use an ejector pin or tweezers to take out the SIM Card Tray.

Step 2: Take Apart The Battery Door.
● Heat up the Samsung Galaxy S6's Battery Door.
● Pull the battery cover up with a screen suction cup tool. (The battery door is stuck to the middle plate with some really strong adhesive, take your time to remove it)
● Separate the battery door with a case opening tool.

Step 3: Release The Rear Housing.
● Undo the 13 screws in the rear housing.
● Heat up the LCD Assembly.
● Separate the rear housing from the LCD Assembly with the help of a suction cup tool and case opening tool.
(Notice: be careful not to damage the wireless charging chip attached to the battery.)


Step 4: Remove The Case Buttons.
● Remove the power button flex.
● Remove the volume button flex.
● Remove the Case Buttons. (Notice: the Galaxy S6 power button and volume buttons are compatible with each other.)


Step 5: Release The Wireless Charging Chip.
● Pry up the wireless charging coil's flex ribbons on both sides of rear housing. (Notice: be careful not to damage the flex ribbons.)

Step 6: Remove The Motherboard.
● Pry up the LCD assembly connector, front facing camera connector, battery connector, ear speaker connector and home button flex ribbon connector.
● Turn over the motherboard and pry up the connector.

Step 7: Remove The Battery.
● Gently pry up the battery with a spudger tool.

Step 8: Remove Small Components.
● Remove the front facing camera.
● Remove the ear speaker. (Notice: be careful not to break the flex ribbon.)
● Remove the vibrating motor.
● Remove the rear facing camera.


Step 9: Release The Charging Port Assembly.
● Remove the Bluetooth and Wi-Fi cables.
● Undo the earphone jack screw. (Notice: the screw is different than the rear housing screws.)
● Heat up the LCD Assembly to release the front housing.
● Pry up the navigation light stickers.


Step 10: Release The Home Button With Flex.
● Pry up the connector on the back side of home button.
● Pry up the home button.

The Samsung Galaxy S6 disassembly is now complete.
Samsung Galaxy S6 Disassembly Video
-
(8)3.3 StarsReviewed by Arct** Te** Solutio** -Ca** Ma**Rating
Great product and excellent service!
Reviewed by Dan** Vogelza**RatingWould absolutely recommend, superb quality. A+++
Reviewed by eli** rapo**Ratingworks perfectly!
Reviewed by Liber** Shi**Ratinggreat part
Reviewed by Ange** Kurb**RatingYou just have to be careful installing it back into the mid plate. There is a small, very space for he flex cable to pass thru. Just remember it has to go thru there else it could cost you a new lcd. Very good scree, just like when I got the phone.
Reviewed by Ange** Kurb**RatingYou just have to be careful installing it back into the mid plate. There is a small, very space for he flex cable to pass thru. Just remember it has to go thru there else it could cost you a new lcd. Very good scree, just like when I got the phone.
Reviewed by C** Ce** Pho** Repa** -Robe** Eld**RatingWorks great!
Reviewed by J** Trollo**RatingGreat parts and great service for reasonable prices!
Reviewed by Cin** Tarra**RatingThanks for saving me a bundle of money. One happy camper!!!
- 1
- 2

-
Customer also bought
 GT-I9300/T999/I747/I535/L710/R530 Battery Replacement - With NFC Connector - Grade S+")


-
(Posted on 05/02/18)great quality and service