


Tutorial: How to Repair Cracked Nokia Lumia 920 Screen
BY Junior | 十一月 25th, 2013 | 12 | 0
We’ve already made lots of disassembly and reassembly videos which including the popular models of the iPhone 5S, Galaxy S4, Nexus 4, etc. And we are very glad that the tutorials on our official YouTube channel have taught more than ten thousand people on fixing their damaged smartphone successfully. Today, we publish this how-to article so that help much more people know how to DIY repair cracked screen on Lumia 920.
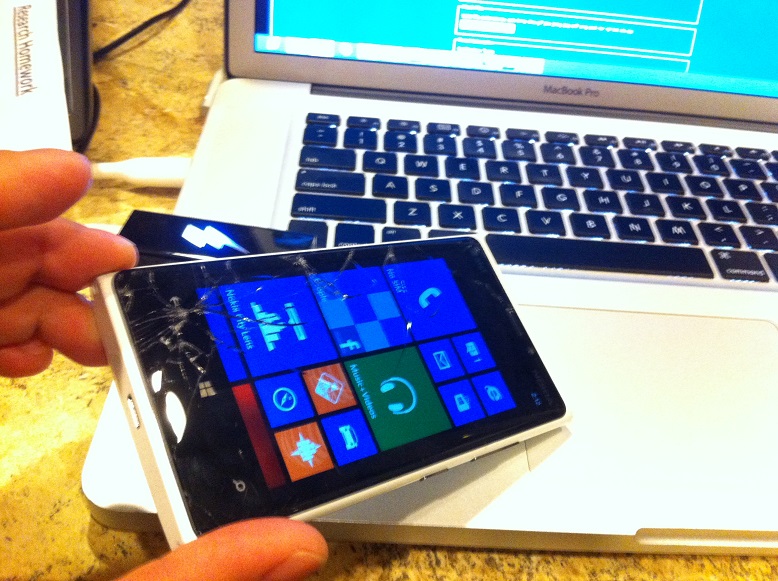
[caption id="attachment_5608" align="alignnone" width="300"] How to Repair Cracked Lumia 920 Screen[/caption]
Before you start to change the cracked or shattered screen on Lumia 920, you need to know which component of the smartphone was damaged. Now we offer you the professional guide to tell which part of the screen you need for the Lumia 920:
LCD Display Only: If the picture under the screen is broken and the touch screen digitizer is NOT then you only need a Lumia 920 LCD replacement.
Digitizer Panel Only: If the upper touch screen digitizer or aka glass top is damaged but the picture under it is normal, you just need to replace a brand new Lumia 920 digitizer screen replacement (it’s a fact that the Lumia 920 glass can be separated from the digitizer, however, it will be a little tricky, so just change a new digitizer for the device if you are not a professional man).
Screen Assembly (consisting of the touch screen digitizer and LCD display): If the upper digitizer screen is broken and the LCD picture is either black liquid or broken, you need to change the full Lumia 920 screen assembly.
Tutorial: How to Repair Cracked Lumia 920 Screen:
You’ll need the following tools:
* Three Torx screwdrivers (T2, T4, and T5)
* Small bladed screwdriver
* Plastic separation tool
* Tweezers
* SIM eject Pin
* Adhesive.
1. Remove the SIM Card with the eject pin.
[caption id="attachment_5583" align="alignnone" width="300"]
How to Repair Cracked Lumia 920 Screen[/caption]
Before you start to change the cracked or shattered screen on Lumia 920, you need to know which component of the smartphone was damaged. Now we offer you the professional guide to tell which part of the screen you need for the Lumia 920:
LCD Display Only: If the picture under the screen is broken and the touch screen digitizer is NOT then you only need a Lumia 920 LCD replacement.
Digitizer Panel Only: If the upper touch screen digitizer or aka glass top is damaged but the picture under it is normal, you just need to replace a brand new Lumia 920 digitizer screen replacement (it’s a fact that the Lumia 920 glass can be separated from the digitizer, however, it will be a little tricky, so just change a new digitizer for the device if you are not a professional man).
Screen Assembly (consisting of the touch screen digitizer and LCD display): If the upper digitizer screen is broken and the LCD picture is either black liquid or broken, you need to change the full Lumia 920 screen assembly.
Tutorial: How to Repair Cracked Lumia 920 Screen:
You’ll need the following tools:
* Three Torx screwdrivers (T2, T4, and T5)
* Small bladed screwdriver
* Plastic separation tool
* Tweezers
* SIM eject Pin
* Adhesive.
1. Remove the SIM Card with the eject pin.
[caption id="attachment_5583" align="alignnone" width="300"] Remove the SIM Card with the eject pin[/caption]
2. Remove the two Torx screws on the bottom with large T5 screwdriver.
[caption id="attachment_5584" align="alignnone" width="300"]
Remove the SIM Card with the eject pin[/caption]
2. Remove the two Torx screws on the bottom with large T5 screwdriver.
[caption id="attachment_5584" align="alignnone" width="300"]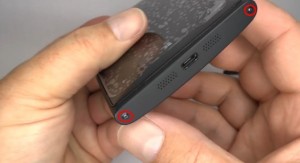 Remove the two screws on the bottom[/caption]
3. Take apart Lumia 920 bottom housing. Be careful not to damage the flex cable ribbon, as it is a fragile part.
[caption id="attachment_5585" align="alignnone" width="300"]
Remove the two screws on the bottom[/caption]
3. Take apart Lumia 920 bottom housing. Be careful not to damage the flex cable ribbon, as it is a fragile part.
[caption id="attachment_5585" align="alignnone" width="300"]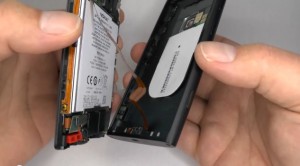 Take Apart bottom housing[/caption]
4. Remove the headphone on the motherboard.
[caption id="attachment_5586" align="alignnone" width="300"]
Take Apart bottom housing[/caption]
4. Remove the headphone on the motherboard.
[caption id="attachment_5586" align="alignnone" width="300"] Remove the headphone on the motherboard[/caption]
5. To lift the battery out. You need to use the T2 screwdriver to remove the T2 screw in the picture, and then use the plastic tool to lift up the film to release the flex ribbon of the battery.
[caption id="attachment_5587" align="alignnone" width="300"]
Remove the headphone on the motherboard[/caption]
5. To lift the battery out. You need to use the T2 screwdriver to remove the T2 screw in the picture, and then use the plastic tool to lift up the film to release the flex ribbon of the battery.
[caption id="attachment_5587" align="alignnone" width="300"] To lift the battery out on Lumia 920[/caption]
 [caption id="attachment_5589" align="alignnone" width="300"]
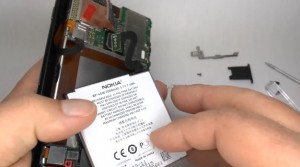 Lift the battery out[/caption]
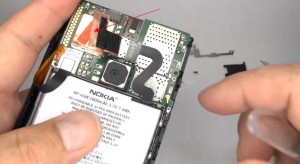
6. Remove the metal shield clip and disconnect the flex ribbon of the back housing on the motherboard.
[caption id="attachment_5590" align="alignnone" width="300"]
Lift the battery out[/caption]
6. Remove the metal shield clip and disconnect the flex ribbon of the back housing on the motherboard.
[caption id="attachment_5590" align="alignnone" width="300"] Remove the metal shield[/caption]
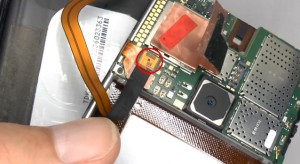 7. Unplug the ribbon to remove the volume, camera and power assembly.
[caption id="attachment_5592" align="alignnone" width="300"]
7. Unplug the ribbon to remove the volume, camera and power assembly.
[caption id="attachment_5592" align="alignnone" width="300"] 1. Unplug the ribbon[/caption]
 8. Choose the T2 screwdriver to remove the two screws.
[caption id="attachment_5597" align="alignnone" width="300"]
8. Choose the T2 screwdriver to remove the two screws.
[caption id="attachment_5597" align="alignnone" width="300"] Remove the two screws[/caption]
9. Use T4 screwdriver to remove the 3 Torx screws on the side.
[caption id="attachment_5598" align="alignnone" width="300"]
Remove the two screws[/caption]
9. Use T4 screwdriver to remove the 3 Torx screws on the side.
[caption id="attachment_5598" align="alignnone" width="300"] Remove the 3 Torx screws on the side[/caption]
10. Use the small screwdriver to lift this red plastic part.
[caption id="attachment_5600" align="alignnone" width="300"]
Remove the 3 Torx screws on the side[/caption]
10. Use the small screwdriver to lift this red plastic part.
[caption id="attachment_5600" align="alignnone" width="300"] Lift this red plastic part[/caption]
11. Disconnect the 3 flex cable ribbons.
[caption id="attachment_5601" align="alignnone" width="300"]
Lift this red plastic part[/caption]
11. Disconnect the 3 flex cable ribbons.
[caption id="attachment_5601" align="alignnone" width="300"]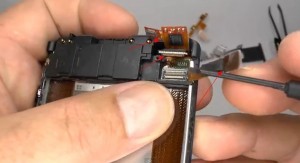 Disconnect the 3 flex cable ribbons[/caption]
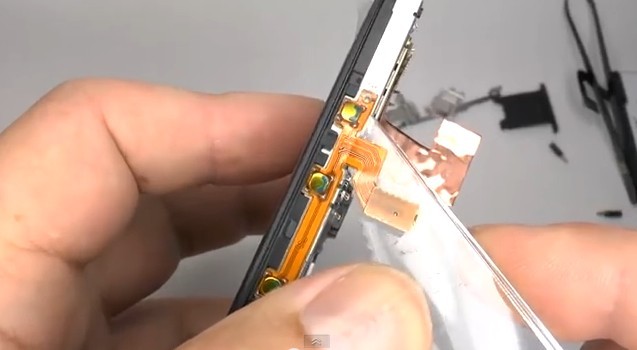
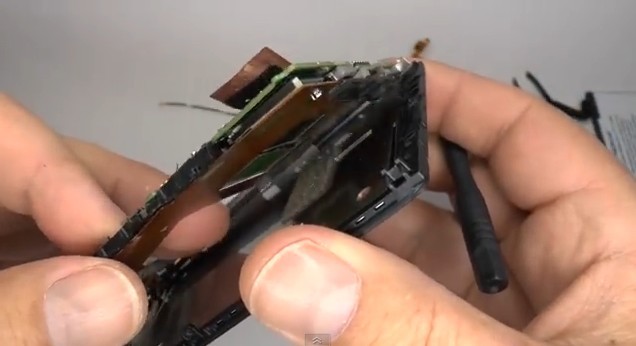
12. Use the thin bladed screwdriver to open the case gently.
[caption id="attachment_5602" align="alignnone" width="300"]
Disconnect the 3 flex cable ribbons[/caption]
12. Use the thin bladed screwdriver to open the case gently.
[caption id="attachment_5602" align="alignnone" width="300"] Use the thin bladed screwdriver to open the case gently[/caption]
 13. Use the plastic separation tool to separate the touch screen from LCD display. Be careful to handle the flex cable ribbon in this step.
[caption id="attachment_5604" align="alignnone" width="300"]
13. Use the plastic separation tool to separate the touch screen from LCD display. Be careful to handle the flex cable ribbon in this step.
[caption id="attachment_5604" align="alignnone" width="300"] Separate the touch screen from LCD display[/caption]
[caption id="attachment_5605" align="alignnone" width="300"]
Separate the touch screen from LCD display[/caption]
[caption id="attachment_5605" align="alignnone" width="300"] Separate the touch screen[/caption]
[caption id="attachment_5606" align="alignnone" width="300"]
Separate the touch screen[/caption]
[caption id="attachment_5606" align="alignnone" width="300"]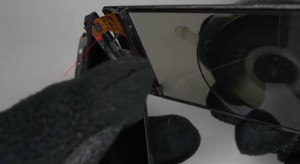 Handle the flex cable ribbon carefully[/caption]
14. Finally, you can replace a brand new digitizer or LCD screen on your Lumia 920.
[caption id="attachment_5607" align="alignnone" width="300"]
Handle the flex cable ribbon carefully[/caption]
14. Finally, you can replace a brand new digitizer or LCD screen on your Lumia 920.
[caption id="attachment_5607" align="alignnone" width="300"] Replace a brand new digitizer or LCD screen for Lumia 920[/caption]
Welcome to visit ETrade Supply’s official Twitter, Facebook and YouTube. We will publish more DIY repair tutorials and the latest news of upcoming smartphones on these social media platforms.
Replace a brand new digitizer or LCD screen for Lumia 920[/caption]
Welcome to visit ETrade Supply’s official Twitter, Facebook and YouTube. We will publish more DIY repair tutorials and the latest news of upcoming smartphones on these social media platforms.
 How to Repair Cracked Lumia 920 Screen[/caption]
Before you start to change the cracked or shattered screen on Lumia 920, you need to know which component of the smartphone was damaged. Now we offer you the professional guide to tell which part of the screen you need for the Lumia 920:
LCD Display Only: If the picture under the screen is broken and the touch screen digitizer is NOT then you only need a Lumia 920 LCD replacement.
Digitizer Panel Only: If the upper touch screen digitizer or aka glass top is damaged but the picture under it is normal, you just need to replace a brand new Lumia 920 digitizer screen replacement (it’s a fact that the Lumia 920 glass can be separated from the digitizer, however, it will be a little tricky, so just change a new digitizer for the device if you are not a professional man).
Screen Assembly (consisting of the touch screen digitizer and LCD display): If the upper digitizer screen is broken and the LCD picture is either black liquid or broken, you need to change the full Lumia 920 screen assembly.
Tutorial: How to Repair Cracked Lumia 920 Screen:
You’ll need the following tools:
* Three Torx screwdrivers (T2, T4, and T5)
* Small bladed screwdriver
* Plastic separation tool
* Tweezers
* SIM eject Pin
* Adhesive.
1. Remove the SIM Card with the eject pin.
[caption id="attachment_5583" align="alignnone" width="300"]
How to Repair Cracked Lumia 920 Screen[/caption]
Before you start to change the cracked or shattered screen on Lumia 920, you need to know which component of the smartphone was damaged. Now we offer you the professional guide to tell which part of the screen you need for the Lumia 920:
LCD Display Only: If the picture under the screen is broken and the touch screen digitizer is NOT then you only need a Lumia 920 LCD replacement.
Digitizer Panel Only: If the upper touch screen digitizer or aka glass top is damaged but the picture under it is normal, you just need to replace a brand new Lumia 920 digitizer screen replacement (it’s a fact that the Lumia 920 glass can be separated from the digitizer, however, it will be a little tricky, so just change a new digitizer for the device if you are not a professional man).
Screen Assembly (consisting of the touch screen digitizer and LCD display): If the upper digitizer screen is broken and the LCD picture is either black liquid or broken, you need to change the full Lumia 920 screen assembly.
Tutorial: How to Repair Cracked Lumia 920 Screen:
You’ll need the following tools:
* Three Torx screwdrivers (T2, T4, and T5)
* Small bladed screwdriver
* Plastic separation tool
* Tweezers
* SIM eject Pin
* Adhesive.
1. Remove the SIM Card with the eject pin.
[caption id="attachment_5583" align="alignnone" width="300"]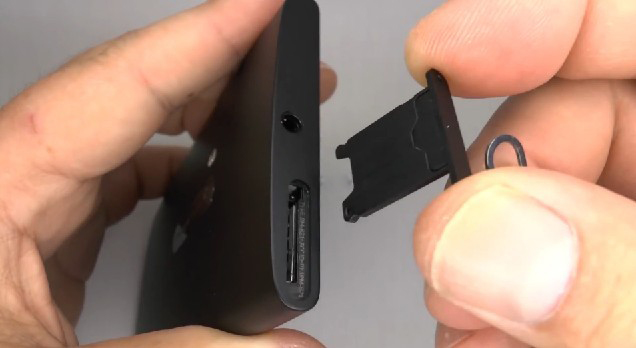 Remove the SIM Card with the eject pin[/caption]
2. Remove the two Torx screws on the bottom with large T5 screwdriver.
[caption id="attachment_5584" align="alignnone" width="300"]
Remove the SIM Card with the eject pin[/caption]
2. Remove the two Torx screws on the bottom with large T5 screwdriver.
[caption id="attachment_5584" align="alignnone" width="300"] Remove the two screws on the bottom[/caption]
3. Take apart Lumia 920 bottom housing. Be careful not to damage the flex cable ribbon, as it is a fragile part.
[caption id="attachment_5585" align="alignnone" width="300"]
Remove the two screws on the bottom[/caption]
3. Take apart Lumia 920 bottom housing. Be careful not to damage the flex cable ribbon, as it is a fragile part.
[caption id="attachment_5585" align="alignnone" width="300"]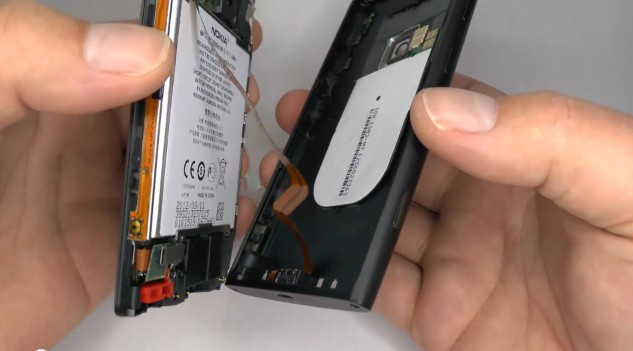 Take Apart bottom housing[/caption]
4. Remove the headphone on the motherboard.
[caption id="attachment_5586" align="alignnone" width="300"]
Take Apart bottom housing[/caption]
4. Remove the headphone on the motherboard.
[caption id="attachment_5586" align="alignnone" width="300"]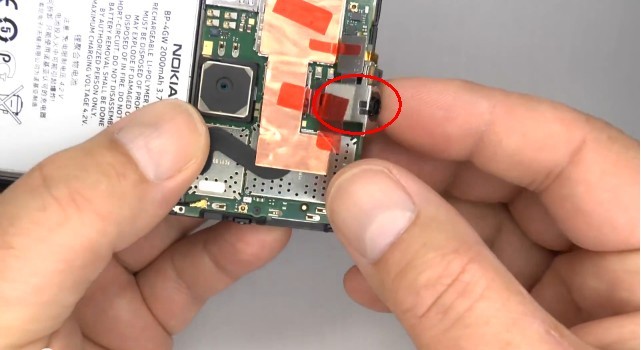 Remove the headphone on the motherboard[/caption]
5. To lift the battery out. You need to use the T2 screwdriver to remove the T2 screw in the picture, and then use the plastic tool to lift up the film to release the flex ribbon of the battery.
[caption id="attachment_5587" align="alignnone" width="300"]
Remove the headphone on the motherboard[/caption]
5. To lift the battery out. You need to use the T2 screwdriver to remove the T2 screw in the picture, and then use the plastic tool to lift up the film to release the flex ribbon of the battery.
[caption id="attachment_5587" align="alignnone" width="300"]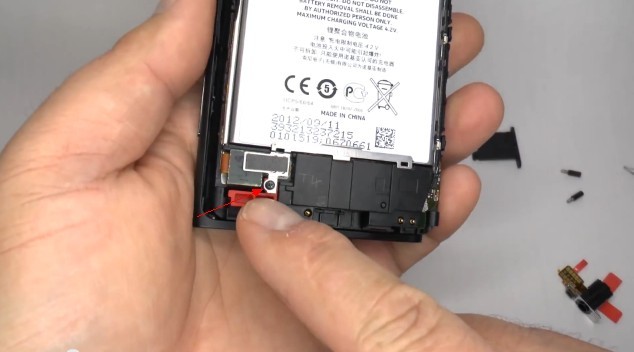 To lift the battery out on Lumia 920[/caption]
 [caption id="attachment_5589" align="alignnone" width="300"]
 Lift the battery out[/caption]
6. Remove the metal shield clip and disconnect the flex ribbon of the back housing on the motherboard.
[caption id="attachment_5590" align="alignnone" width="300"]
Lift the battery out[/caption]
6. Remove the metal shield clip and disconnect the flex ribbon of the back housing on the motherboard.
[caption id="attachment_5590" align="alignnone" width="300"]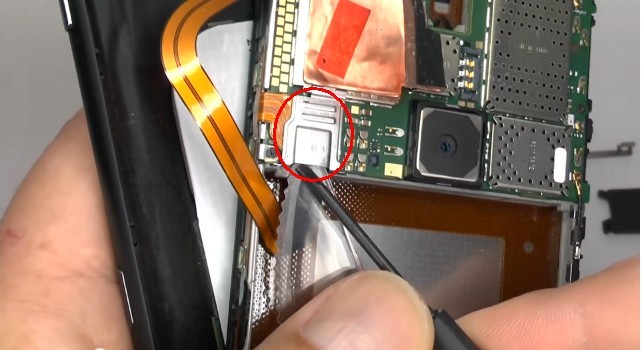 Remove the metal shield[/caption]
 7. Unplug the ribbon to remove the volume, camera and power assembly.
[caption id="attachment_5592" align="alignnone" width="300"]
7. Unplug the ribbon to remove the volume, camera and power assembly.
[caption id="attachment_5592" align="alignnone" width="300"]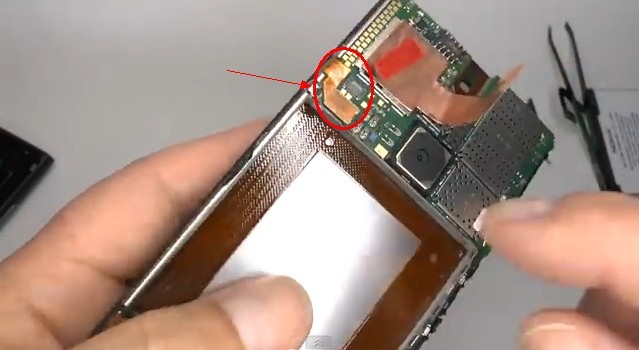 1. Unplug the ribbon[/caption]
 8. Choose the T2 screwdriver to remove the two screws.
[caption id="attachment_5597" align="alignnone" width="300"]
8. Choose the T2 screwdriver to remove the two screws.
[caption id="attachment_5597" align="alignnone" width="300"]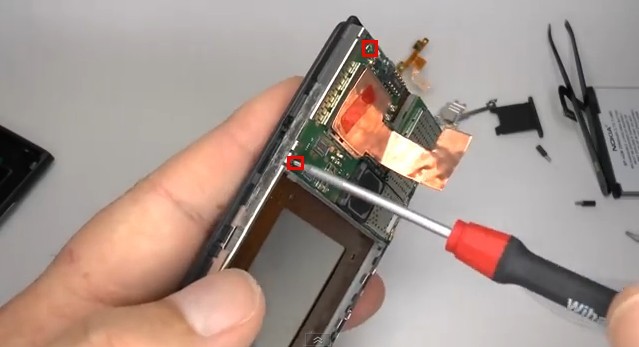 Remove the two screws[/caption]
9. Use T4 screwdriver to remove the 3 Torx screws on the side.
[caption id="attachment_5598" align="alignnone" width="300"]
Remove the two screws[/caption]
9. Use T4 screwdriver to remove the 3 Torx screws on the side.
[caption id="attachment_5598" align="alignnone" width="300"]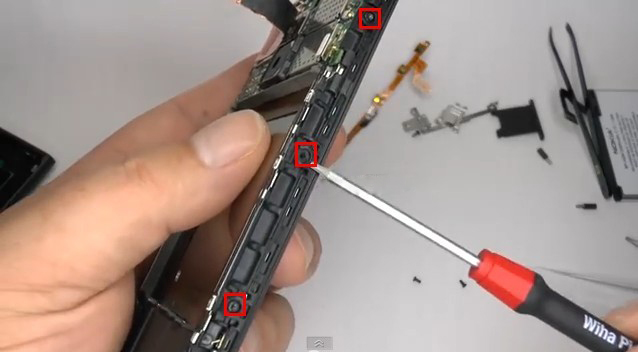 Remove the 3 Torx screws on the side[/caption]
10. Use the small screwdriver to lift this red plastic part.
[caption id="attachment_5600" align="alignnone" width="300"]
Remove the 3 Torx screws on the side[/caption]
10. Use the small screwdriver to lift this red plastic part.
[caption id="attachment_5600" align="alignnone" width="300"]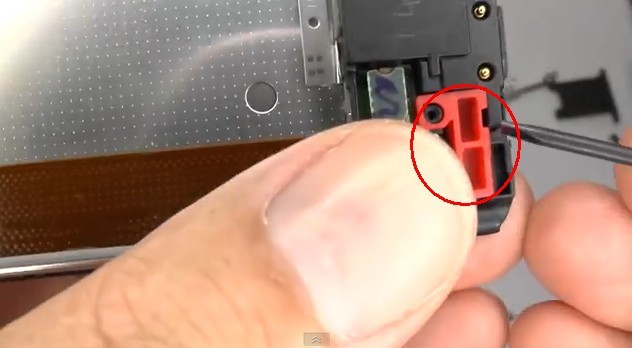 Lift this red plastic part[/caption]
11. Disconnect the 3 flex cable ribbons.
[caption id="attachment_5601" align="alignnone" width="300"]
Lift this red plastic part[/caption]
11. Disconnect the 3 flex cable ribbons.
[caption id="attachment_5601" align="alignnone" width="300"] Disconnect the 3 flex cable ribbons[/caption]
12. Use the thin bladed screwdriver to open the case gently.
[caption id="attachment_5602" align="alignnone" width="300"]
Disconnect the 3 flex cable ribbons[/caption]
12. Use the thin bladed screwdriver to open the case gently.
[caption id="attachment_5602" align="alignnone" width="300"]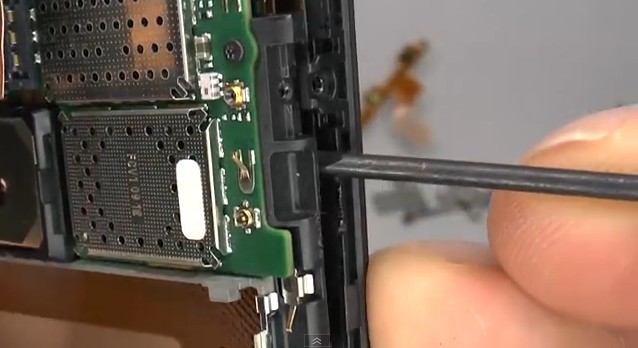 Use the thin bladed screwdriver to open the case gently[/caption]
 13. Use the plastic separation tool to separate the touch screen from LCD display. Be careful to handle the flex cable ribbon in this step.
[caption id="attachment_5604" align="alignnone" width="300"]
13. Use the plastic separation tool to separate the touch screen from LCD display. Be careful to handle the flex cable ribbon in this step.
[caption id="attachment_5604" align="alignnone" width="300"]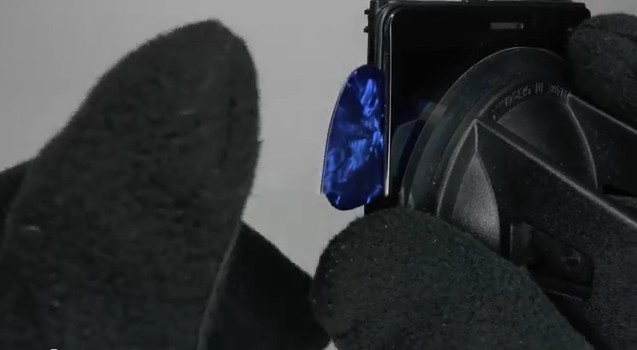 Separate the touch screen from LCD display[/caption]
[caption id="attachment_5605" align="alignnone" width="300"]
Separate the touch screen from LCD display[/caption]
[caption id="attachment_5605" align="alignnone" width="300"]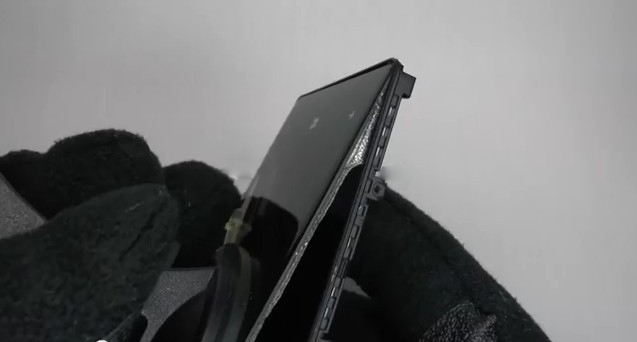 Separate the touch screen[/caption]
[caption id="attachment_5606" align="alignnone" width="300"]
Separate the touch screen[/caption]
[caption id="attachment_5606" align="alignnone" width="300"] Handle the flex cable ribbon carefully[/caption]
14. Finally, you can replace a brand new digitizer or LCD screen on your Lumia 920.
[caption id="attachment_5607" align="alignnone" width="300"]
Handle the flex cable ribbon carefully[/caption]
14. Finally, you can replace a brand new digitizer or LCD screen on your Lumia 920.
[caption id="attachment_5607" align="alignnone" width="300"]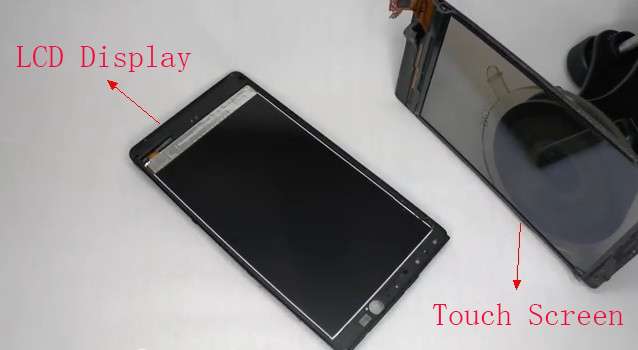 Replace a brand new digitizer or LCD screen for Lumia 920[/caption]
Welcome to visit ETrade Supply’s official Twitter, Facebook and YouTube. We will publish more DIY repair tutorials and the latest news of upcoming smartphones on these social media platforms.
Replace a brand new digitizer or LCD screen for Lumia 920[/caption]
Welcome to visit ETrade Supply’s official Twitter, Facebook and YouTube. We will publish more DIY repair tutorials and the latest news of upcoming smartphones on these social media platforms.
Share:


 IOS 17.4 official version pushed to block battery vulnerability
  Is the Chinese-made rear case for the iPhone 15 series going on the market?
  New products coming:USB to MFI Lightning Cable
  Big BUG of iPhone 15
  Successfully submitted!
After replacing the digitizer/screen assembly, the phone booted up, the NEW screen responded to touch input. After about 15 minutes, it simply REFUSED to respond to touch input. THEN, after about 90 minutes, it AGAIN responded to touch input for about 90 minutes. NOW it will NOT respond to touch input. I have triple checked the connections, even attempted to put back the old screen, which then the phone didn’t start at all. Could the digitizer be faulty? Could the software just not want to talk to the hardware? Could a master reset (if I can get into the phone) fix it? Please note: this is NOT a password issue. I do not password my phone for this very type of reason.
i wan to replace screen lumia 920 if you want to need help you can contact me on fb: rezturezpec
Hello, i’ve bought the digitizer-touch-screen-with-adhesive-and-light-guide but i dont know where i have to put the adhesive ? Can you show me on the 14th picture ?
Thx !
Hi Moreche, you may refer to below video for details:
http://www.youtube.com/watch?v=or1mcpaVxOU
Thanks May. However I have purchased, on ebay, a new screen with the digitizer bonded to the glass (without adhesive).
As you recommend I need adhesive to re-bond the glass touch screen to the LCD display? What type of adhesive do I require and the technique? Can I get the adhesive on ebay? I want to be prepared when I start dismantling the phone. Thanks in advance.
You can buy the digitizer adhesive on ebay, it’s about $4.00
Could you please explain, after the last step 14 what do you do? Do you reassemble without the need for additional adhesive to re-attach the touch screen to the LCD display.
In other words is the remnant of adhesive enough to re-attach the new screen to the LCD display?
Thanks in advance.
Not enough, additional adhesive is also needed. This is the product for your reference:
http://www.etradesupply.com/oem-nokia-lumia-920-digitizer-touch-screen-with-adhesive-and-light-guide.html
Use a heat gun or hair dryer on full. Heat it for about 5 mins at 85 and slowly take off the screen with a thin plastic tool round the edges but it’s a hell of a job I would pay the extra £5.
Neil.
What if I want to replace the GLASS only?? My digitizer works fine… nobody seems to know how to loosen the glue (as it is only glue holding the glass to the phone) and remove the broken glass ONLY..
i have the same problem here , if you manage to separate the glass from the digitizer , please tell me
Same here. I bought a screen glass that for some reason does not have digitizer/ flex cable ribbon with it. I could take digitizer/ flex cable ribbon from the old one and put it in the new one. I don’t know how. In short, I’m screwed.