


Samsung Galaxy S10 Plus Disassembly Teardown and Reinstallation
BY kaye | 六月 25th, 2019 | 0 | 2
Samsung S10 Plus was hot sale in the smartphone market when it was released in February. The triple rare camera and sizable full-screen exterior look is a great attraction to customers. As Samsung brand fans, we are all fantastic about Samsung S10’s great looking and powerful function, meanwhile, some of us might be curious about inflatable park for sale the interior parts and structure. In this article, we quote the Samsung S10 Plus disassembly teardown and reinstall demonstration from YouTube video. We hope this would widen our horizon and would be helpful to our smartphone fix.
1. Samsung S10 Plus Teardown:
Before we start the process of Samsung S10 teardown, we should take all the tools ready like the prying tools, screen opening suck-cup, Philip screw driver. The whole process is complex and a bit difficult, we need to be careful and patient. Some of the internal parts and flex may be easy to break, we should focus on it. Now let’s do it.
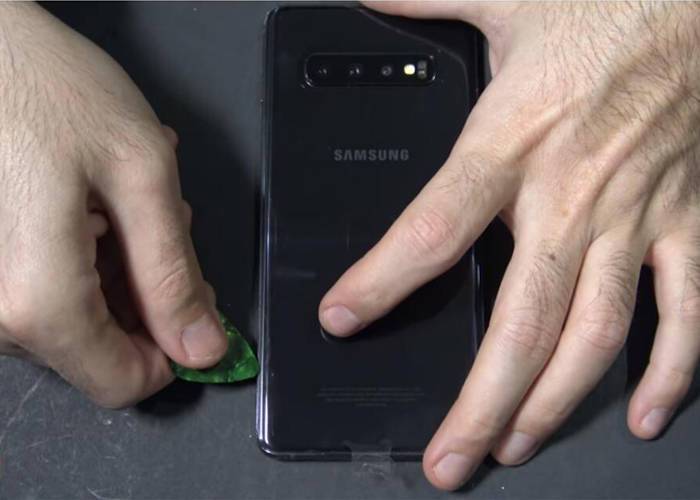
1.1 Power off the phone, separate the back plate by prying it off with the pry tool
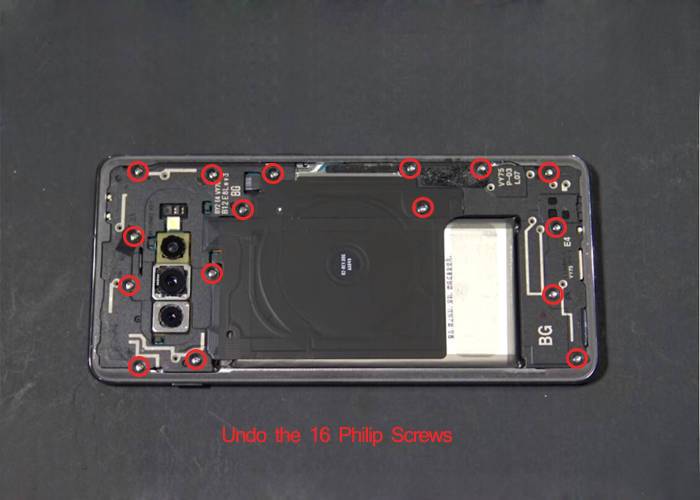
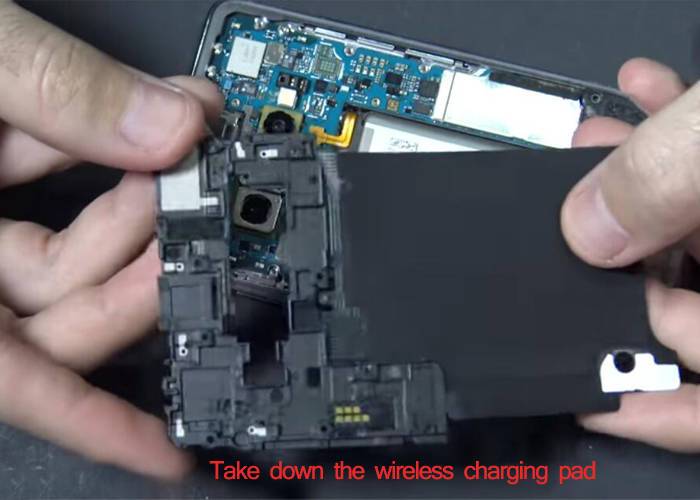
1.2 Undo the 16 Philip screws on the back plate, take down the wireless charging pad
1.3 Remove the bottom plastic cover
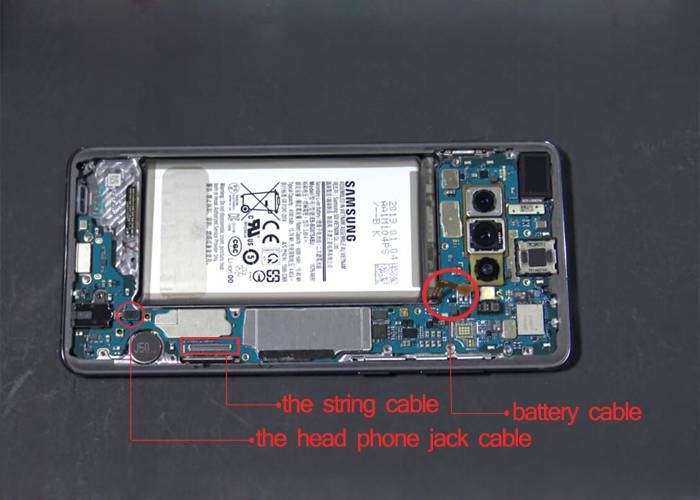
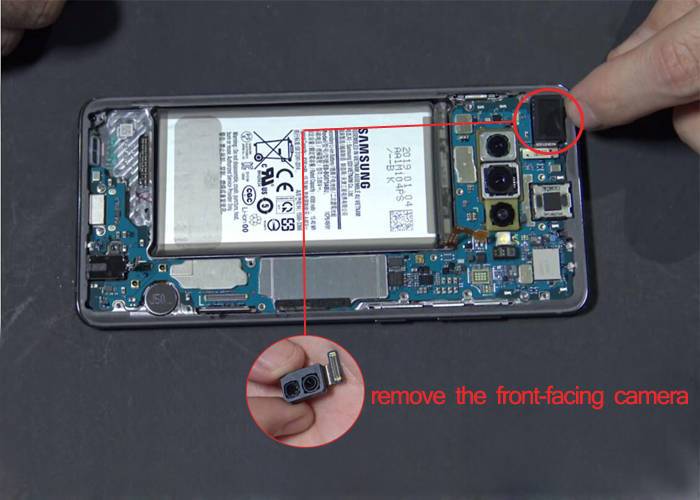
1.4 Disconnect the battery cable, the string cable, the headphone jack cable, the front-facing camera cable and remove the front-facing camera
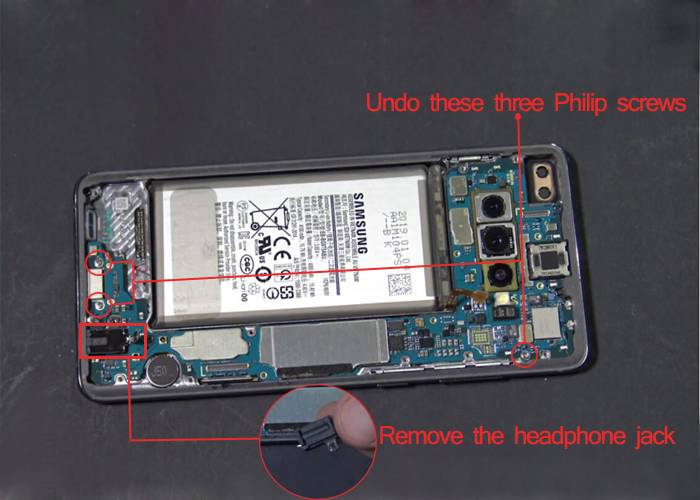
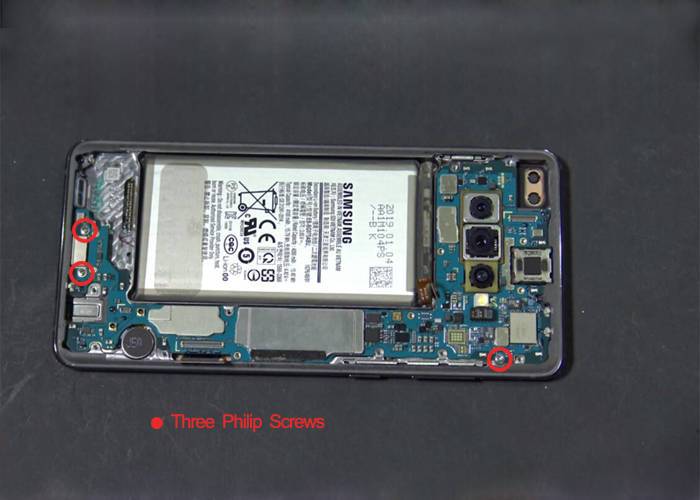
1.5 Unscrew the three Philip screws on the board and remove the headphone jack
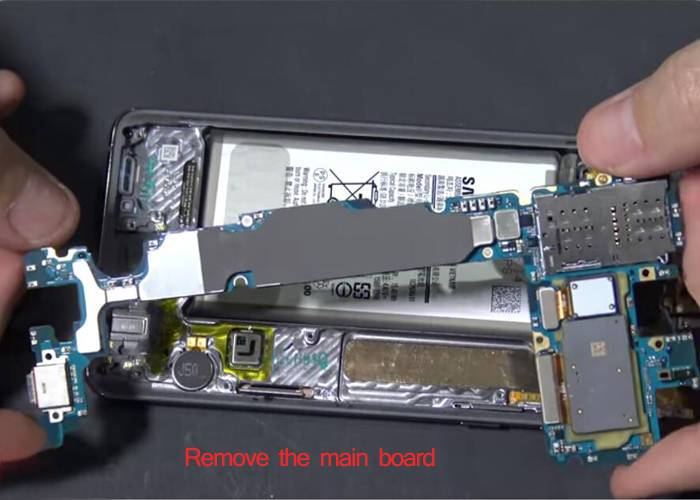
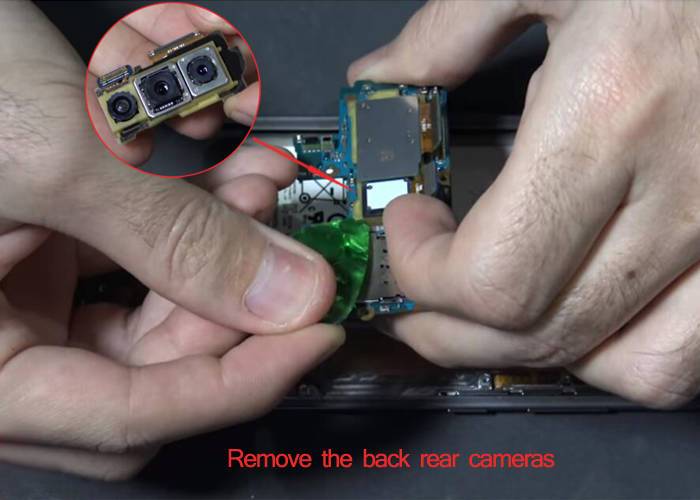
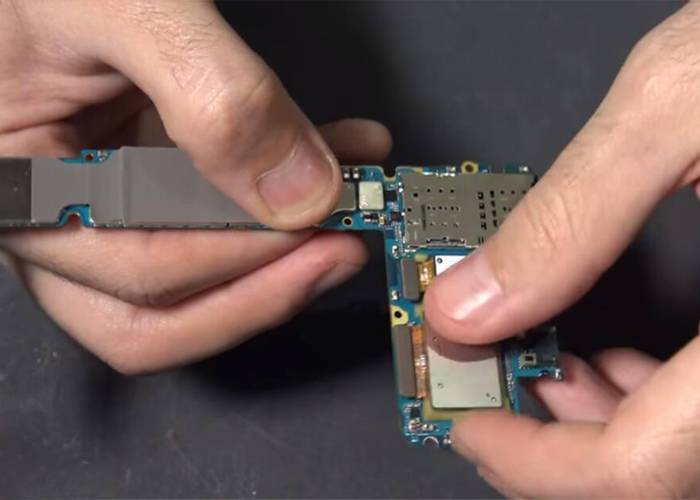
1.6 Remove the main board by prying up slowly, disconnect the back Samsung S10 Plus rear-facing cameras cable and remove it from the board
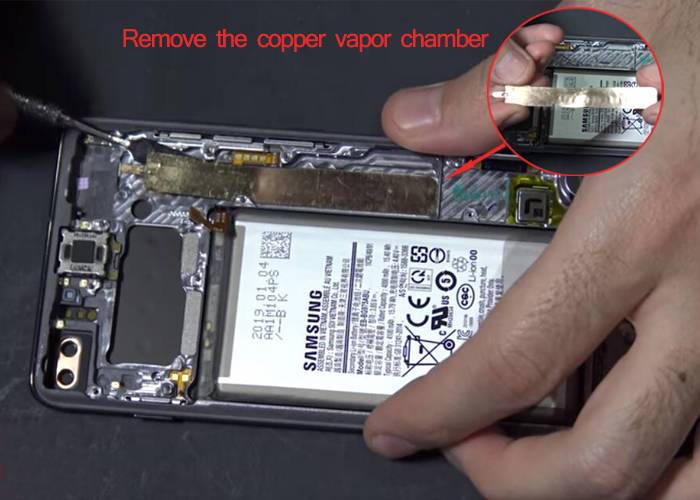
1.7 Peel off the protective tape and pry up and remove the copper vapor chamber
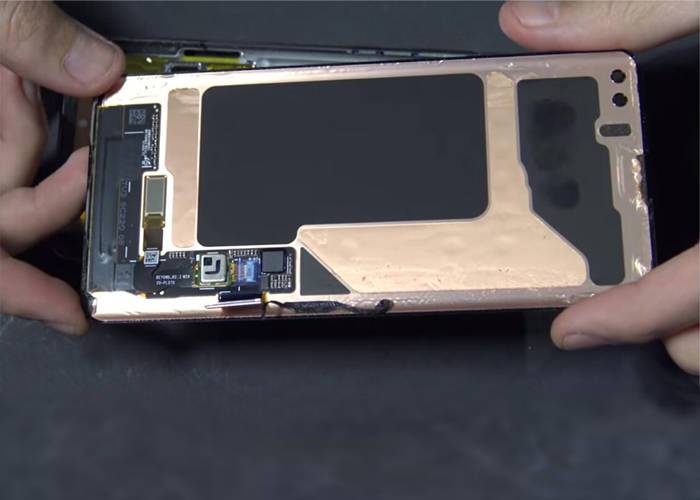
1.8 Separate the screen from the frame with a triangle prying tool
1.9 Tear off the protective adhesive tape and pry up the screen flex cable, don’t break the screen fingerprint scanner flex

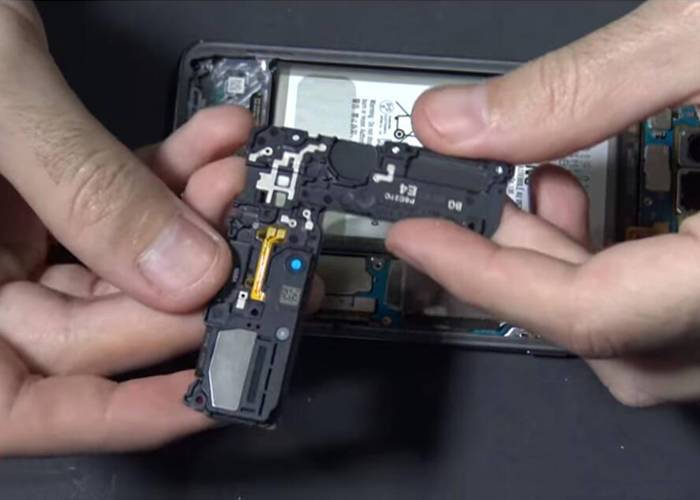
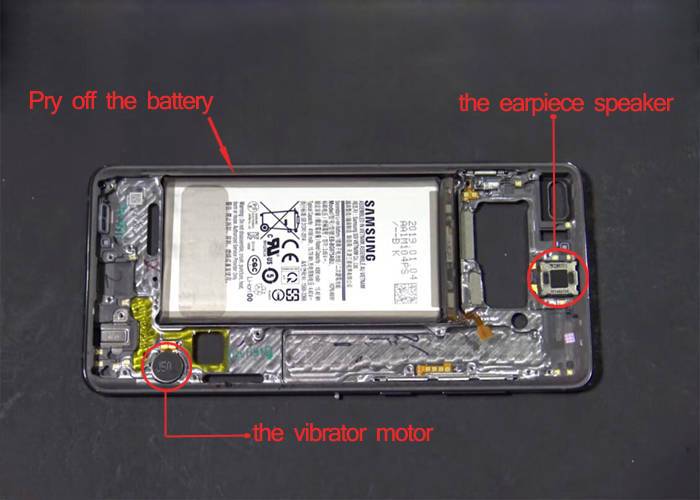
1.10 Pry off the battery from the frame and then the vibrator motor and earpiece speaker as well
2. Samsung S10 Plus Reinstall:
The reinstallation process is easier than teardown, we just follow the above step order back and reinstall the parts. On the other hand, we have to keep in mind the right place each part it used to be and don’t mess up the order. Here we go.
2.1 Put the headphone sticker and the vibrator motor back in the frame, as well as the battery
2.2 Insert the cable back to the slot, reseal the screen back to the frame and adjust the right position
2.3 Place the copper vapor chamber back
2.4 Put the front cameras back to the main board and connect the cable
2.5 Place the mainboard back and screw the three Phillip screws
2.6 Connect the headphone jack and the screen flex back to the main board, install the front-facing cameras back
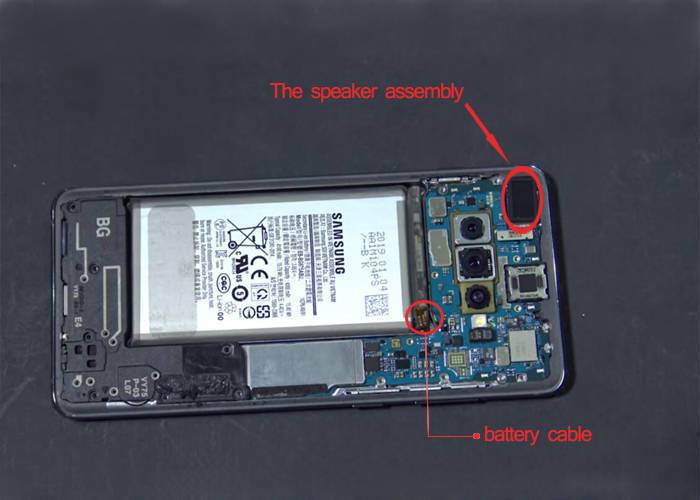
2.7 Restore the speaker assembly and connect the battery cable back to the mainboard
2.8 Put the plastic cover with wireless charging pot back, screw the 16 Philip screws back
2.9 Seal up the back plate back, better cover with new adhesive on the edge by hot gun blowing
The demonstration steps might be a little complicated, but we have learned much about Samsung S10 Plus model from this article. On the other hand, you will know much about Samsung S10 Plus internal parts and repair technology if you are clear about all these steps. As a mobile phone parts supplier, we suggest you take attention on the parts like Samsung Galaxy S10 Plus LCD Screen and Digitizer Assembly or Samsung Galaxy S10 Plus Rear Face Camera if you are running a repair shop. Any new idea about Samsung S10 repair or questions the above steps, please leave your comment below.


RECOMMENDED PARTS
POPULAR ARTICLE
- Samsung Galaxy Note 8 Teardown In 7 Steps
- Galaxy Note 7 Teardown for screen, battery, charging port replacement
- How To Tear Down The Samsung Galaxy S6 In 10 Steps
- How To Disassemble Samsung Galaxy Note Edge
- iPhone X Water Damage Repair Guide (Still Work in 2019)
- How Much Does It Cost To Replace An iPhone XS Display?
- iPhone X Explosion: 7 Small But Important Things To Note
- 7 Ways To Fix Your iPad Not Charging In 2018
- iPhone 7 Screen Replacement | iPhone 7 Repair
- Which Parts of iPhone X and iPhone XS Are Exchangeable?
- iPhone X, XS, XS Max, and XR Battery Comparison
- How To Fix iPhone XS/XS Max, And XR Bluetooth Connection Issue
- Apple Will Fix the iPhone 8/8 Plus/X Auto Brightness Issue in iOS 12
- iPhone got exploded too?! How to protect your phone from battery explosion
- HTC 10 DIY Teardown for screen, charging port, battery replacement
- 6 Quick Tips To Distinguish Between Real And Fake iPhone SE
- Analysis on: Are China made LCDs for iPhone 5S Compatible with iPhone SE?
- How to Replace the Galaxy S7, S7 Edge Battery Replacement
- How to Disassemble the Galaxy S7 LCD Assembly to Replace Screen, Charging Port and Home Button
- How to Repair Samsung Galaxy S7 Edge Cracked Screen
- How to Tear Down/Disassemble the Galaxy S7 for Screen Replacement
- How to Fix Phone Gets Hot and Battery Drains Fast
- Xperia Z5 Premium USB Charging Port Replacement Tutorial
- How to Replace Your Broken Sony Xperia Z5 Premium Screen Step by Step Guide
- 15 Tips to Improve Your Galaxy Note 5’s Battery Life
- How To Replace A Cracked Motorola Droid Turbo 2 Screen
- How To Fix iPhone 6S Auto Shutdown When It Still Has Battery?
- How To Replace A HTC One A9 Cracked Screen
- How to Distinguish the Fake Apple Earpod from the Real One
- How to Replace the LG V10 Screen in 5 Steps
- How To Solder/Replace A Samsung Galaxy or iPhone Charging Port
- The Cost of Repairing a Cracked Galaxy S6, S6 Edge Screen
- How To Fix Cracked Xperia Z5 For Screen Replacement
- What’s Need to Be Prepared As a Startup Cell Phone Repair Shop
- *Update* The Root of Differences among Copy iPhone LCDs: Structure
- Important Info: Pay Attention To Defective Recycled iPhone LCDs
- How to Replace Galaxy Note 5, S6 Edge Plus Battery
- Are The Flood of New High Copy iPhone LCD Screens as Good as The OEM Ones?
- iPhone 6+ and iPhone 6S+ Screen Comparison Report
- How to Recover Photos and Data with Broken Screens
- How To Identify Different LG G4 Model Numbers
- How to Fix Cracked iPhone 6S for Screen Replacement
- Cost of Repairing a Damaged Screen on the LG G4
- How To Fix LG G4 Digitizer Touch Screen Issue
- As a Newbie, What You Should Know About Jailbreaking
- How To Tear Down/Disassemble Galaxy S6 Edge Plus For Screen Replacement
- 90% Of People Don’t Know These Cellphone Battery Information
- Insider Tips to Save Your Water-damaged Device
- How to Set Up ETrade Supply’s Adhesive Dispenser Robot
- Top 10 iPhone 6 Problems and Solutions
- How To Fix Vertical Lines On An iPhone Screen After Replacement
- How to Replace Sony Xperia Z3+ Screen/Screen Replacement Guide
- How To Disassemble/Tear Down Sony Xperia Z3+
- How to Assemble Small Parts on iPhone 6 LCD Screen Assembly
- Reasons Behind & Solutions for iPhone 6 Frame and LCD Separation Issues
- How to Replace The LG G4 Charging Port
- How to Replace the Cracking LG G4 Screen in 10 Minutes
- How To Replace An Oneplus One Cracked Screen
- iPhone 5 LCD Screen Assembly Small Parts List
- How to Replace the HTC One M9 Charging Port
- How to Replace HTC M9 LCD Screen Assembly
- Top 5 Most Common iPhone 6 Issues You May Come Across
- The Cost Of Repairing A Cracked Nexus 6 Screen
- How To Repair A Nexus 6 Cracked Screen
- How To Disassemble Nexus 6 In 10 Steps
- The Cost Of Repairing A Broken iPhone 6 Screen
- Five Minutes Work to Replace Your iPhone 6 Plus Broken Screen
- How to Repair a Cracked Samsung Galaxy S5 Screen
 Samsung Galaxy Note 8 Teardown In 7 Steps
 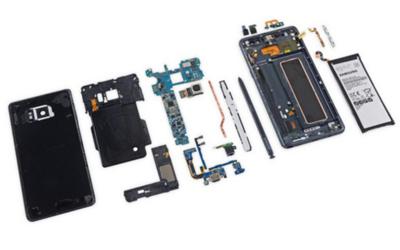 Galaxy Note 7 Teardown for screen, battery, charging port replacement
 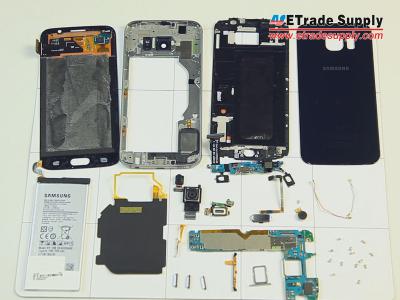 How To Tear Down The Samsung Galaxy S6 In 10 Steps
  How To Disassemble Samsung Galaxy Note Edge
  IOS 17.4 official version pushed to block battery vulnerability
  Is the Chinese-made rear case for the iPhone 15 series going on the market?
  New products coming:USB to MFI Lightning Cable
  Big BUG of iPhone 15
  How Chinese celebrate Christmas?
  Disadvantages of iPhone 15 Standard Edition
  Rumors about the Samsung Galaxy S24 Ultra
  TWS Wireless Bluetooth Headset: Connect Your Wireless World
  iPhone 15 Black Screen Self-Rescue Guide
  Comparison of LCD screens of different mobile phones
  Successfully submitted!