


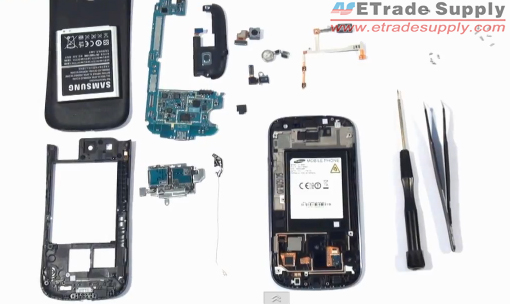
Samsung Galaxy S3 GT-I9300 Assembly Tutorials
BY alina | 七月 10th, 2013 | 2 | 0
This is an article for assembling the Samsung Galaxy S3 step by step after disassembly. If you cracked your Galaxy S3 screen or have to replace the microphone, the front or rear facing camera, SIM and SD card reader as well as other broken parts, you can follow these comprehensive tutorials. All the components are built in the back of the LCD display assembly. So our mainly task is to put all the parts back on the LCD assembly.
Tools: Small Philips Screwdriver Tweezers
Step 1
Install the Ear Phone flex cable on the LCD assembly with front Housing as carefully as possible. The front glass and LCD display are adhered strongly together making it almost impossible to separate them. So we didn’t tear apart these parts when disassembling the Galaxy S3. It also means if you only cracked the glass lens, you may have to replace the entire screen.

Step 2
Assemble the vibrating motor on the LCD assembly, and make sure the two little pins line up on the case there and it stuck down with a proper push. Then install the Bluetooth antenna cable start by placing the circuit at the top, then make sure the two little holes that line up with pins on the case, gently push that down. Then bring the antenna cable down into the channel carefully.


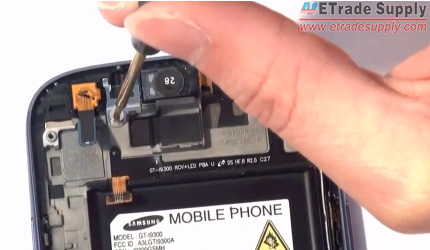
Step 3
Install the front facing camera and use screwdriver to fasten the front facing camera with one screw. Then replace the microphone gasket with tweezers.


Step 4
Install the rear facing camera and SIM and SD card reader on the motherboard carefully.


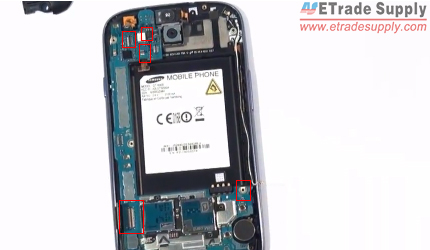
Step 5
Assemble the motherboard on the LCD assembly carefully when putting it down into place, and bring it down all the way.

Step 6
Connect 5 connectors to connect the main screen flex cable, the earpiece and volume flex cables, the rear facing camera and Bluetooth antenna carefully.
Step 7
Fasten the SIM and SD card reader with screws.

Step 8
Install the loud speaker module on the top, push that down into place, then plug in the ribbon connector. Make sure everything is plugged in and put in place.

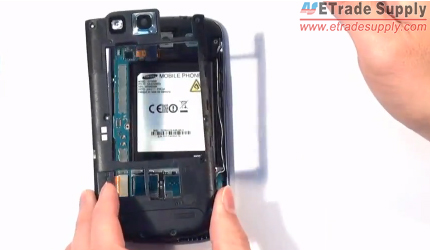
Step 9
Assemble the rear housing, and gently push down the clips at the bottom, then fasten it with 10 screws.

Step 10
Install the battery and battery cover, then the whole Galaxy S3 has been assembled.

For more information, please check out our YouTube videos of Samsung Galaxy S3 disassembly tutorials and Galaxy S3 assembly tutorials. Subscribe our YouTube channel to get more cell phone repair guides!


