


LG G3 Disassembly/Tear Down/Tear Apart
BY May | 八月 16th, 2014 | 1 | 2
As the successor to LG G2, the LG G3 inherits the design from LG G2, such as the special rear-mounted power button and volume buttons. Compared with LG G2, this new generation flagship sports a bigger size and higher resolution screen. Moreover, LG G3 adopts a newly-developed protection technology, Corning Gorilla Glass 3. How about the inside structure? Here let’s walk you through how to tear down this phone step by step and have a closer look.
Tools Needed:
Screwdriver
Tweezers
Case Opening Tool
[caption id="attachment_7699" align="alignnone" width="500"]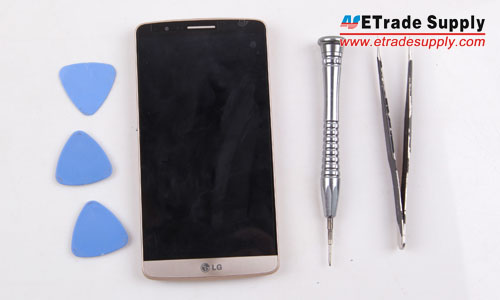 LG G3 Disassembly[/caption]
1. Power off the LG G3 and take out the battery door.
[caption id="attachment_7700" align="alignnone" width="500"]
LG G3 Disassembly[/caption]
1. Power off the LG G3 and take out the battery door.
[caption id="attachment_7700" align="alignnone" width="500"] Take out the battery door[/caption]
2. The LG G3 battery cover and LCD assembly with housing assembly are separated.
[caption id="attachment_7701" align="alignnone" width="500"]
Take out the battery door[/caption]
2. The LG G3 battery cover and LCD assembly with housing assembly are separated.
[caption id="attachment_7701" align="alignnone" width="500"]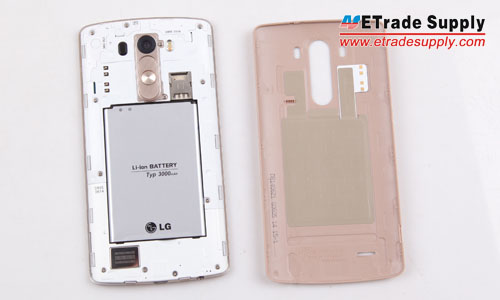 The back cover and LCD assembly with housing assembly are separated[/caption]
3. Take out the battery.
[caption id="attachment_7702" align="alignnone" width="500"]
The back cover and LCD assembly with housing assembly are separated[/caption]
3. Take out the battery.
[caption id="attachment_7702" align="alignnone" width="500"] Take out the battery[/caption]
4. Undo the 13 screws. (Notice: there’re 2 screws on the area of camera lens and power button.)
[caption id="attachment_7703" align="alignnone" width="500"]
Take out the battery[/caption]
4. Undo the 13 screws. (Notice: there’re 2 screws on the area of camera lens and power button.)
[caption id="attachment_7703" align="alignnone" width="500"]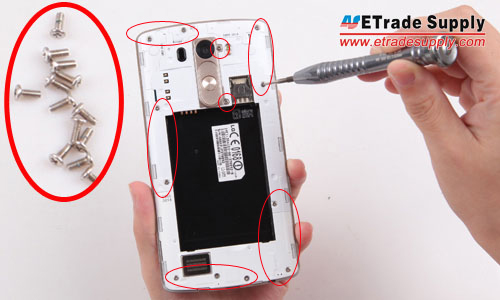 Undo the 13 screws[/caption]
5. Take out the loud speaker assembly.
[caption id="attachment_7704" align="alignnone" width="500"]
Undo the 13 screws[/caption]
5. Take out the loud speaker assembly.
[caption id="attachment_7704" align="alignnone" width="500"] Take out the loud speaker assembly[/caption]
6. Take out the rear housing.
[caption id="attachment_7705" align="alignnone" width="500"]
Take out the loud speaker assembly[/caption]
6. Take out the rear housing.
[caption id="attachment_7705" align="alignnone" width="500"]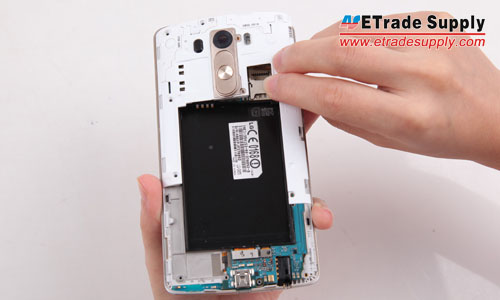 Take out the rear housing[/caption]
7. Pry up the front facing camera connector.
[caption id="attachment_7706" align="alignnone" width="500"]
Take out the rear housing[/caption]
7. Pry up the front facing camera connector.
[caption id="attachment_7706" align="alignnone" width="500"]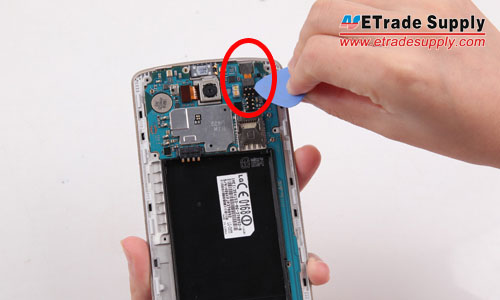 Pry up the front facing camera connector[/caption]
8. Pry up the rear facing camera connector.
[caption id="attachment_7707" align="alignnone" width="500"]
Pry up the front facing camera connector[/caption]
8. Pry up the rear facing camera connector.
[caption id="attachment_7707" align="alignnone" width="500"] Pry up the rear facing camera connector[/caption]
9. Pry up the LCD screen and digitizer connectors.
[caption id="attachment_7708" align="alignnone" width="500"]
Pry up the rear facing camera connector[/caption]
9. Pry up the LCD screen and digitizer connectors.
[caption id="attachment_7708" align="alignnone" width="500"]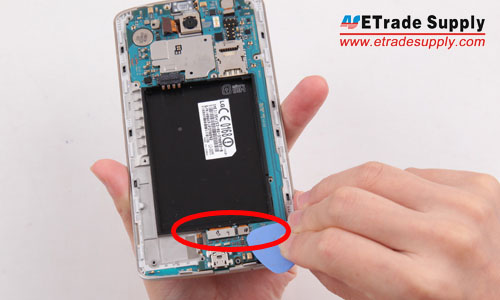 Pry up the LCD screen and digitizer connectors[/caption]
10. Take out the motherboard.
[caption id="attachment_7709" align="alignnone" width="500"]
Pry up the LCD screen and digitizer connectors[/caption]
10. Take out the motherboard.
[caption id="attachment_7709" align="alignnone" width="500"] Take out the motherboard[/caption]
11. Take out the front facing camera. (Notice: be careful not to break the flex ribbon.)
[caption id="attachment_7710" align="alignnone" width="500"]
Take out the motherboard[/caption]
11. Take out the front facing camera. (Notice: be careful not to break the flex ribbon.)
[caption id="attachment_7710" align="alignnone" width="500"]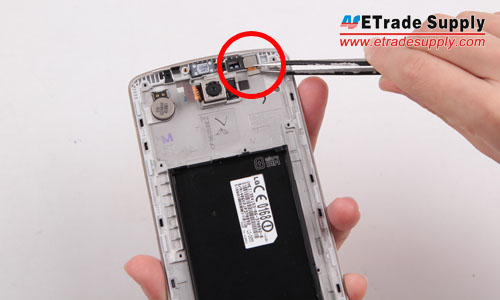 Take out the front facing camera[/caption]
12. Take out the back facing camera. (Notice: be careful not to destroy the flex ribbon.)
[caption id="attachment_7711" align="alignnone" width="500"]
Take out the front facing camera[/caption]
12. Take out the back facing camera. (Notice: be careful not to destroy the flex ribbon.)
[caption id="attachment_7711" align="alignnone" width="500"]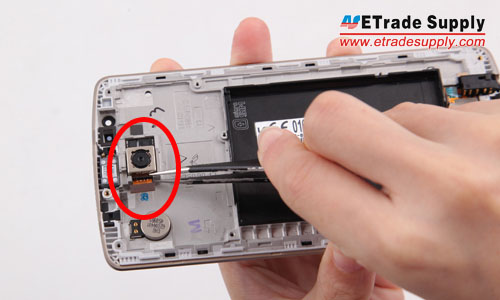 Take out the back facing camera[/caption]
13. Take out the ear speaker.
[caption id="attachment_7712" align="alignnone" width="500"]
Take out the back facing camera[/caption]
13. Take out the ear speaker.
[caption id="attachment_7712" align="alignnone" width="500"]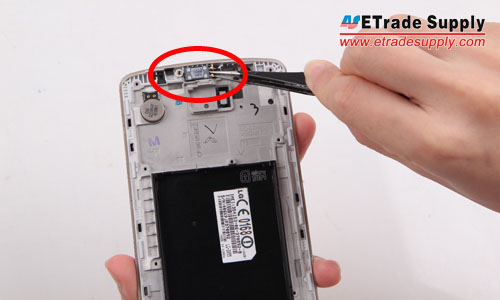 Take out the ear speaker[/caption]
14. Take out the earphone jack. (Notice: the earphone jack is cohered to the front housing, be careful!)
[caption id="attachment_7713" align="alignnone" width="500"]
Take out the ear speaker[/caption]
14. Take out the earphone jack. (Notice: the earphone jack is cohered to the front housing, be careful!)
[caption id="attachment_7713" align="alignnone" width="500"]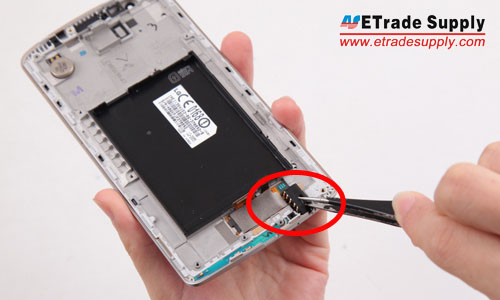 Take out the earphone jack[/caption]
15. The LG G3 disassembly has been finished.
[caption id="attachment_7714" align="alignnone" width="500"]
Take out the earphone jack[/caption]
15. The LG G3 disassembly has been finished.
[caption id="attachment_7714" align="alignnone" width="500"] The LG G3 disassembly has been finished[/caption]
LG G3 Disassembly[/caption]
1. Power off the LG G3 and take out the battery door.
[caption id="attachment_7700" align="alignnone" width="500"] Take out the battery door[/caption]
2. The LG G3 battery cover and LCD assembly with housing assembly are separated.
[caption id="attachment_7701" align="alignnone" width="500"] The back cover and LCD assembly with housing assembly are separated[/caption]
3. Take out the battery.
[caption id="attachment_7702" align="alignnone" width="500"] Take out the battery[/caption]
4. Undo the 13 screws. (Notice: there’re 2 screws on the area of camera lens and power button.)
[caption id="attachment_7703" align="alignnone" width="500"] Undo the 13 screws[/caption]
5. Take out the loud speaker assembly.
[caption id="attachment_7704" align="alignnone" width="500"] Take out the loud speaker assembly[/caption]
6. Take out the rear housing.
[caption id="attachment_7705" align="alignnone" width="500"] Take out the rear housing[/caption]
7. Pry up the front facing camera connector.
[caption id="attachment_7706" align="alignnone" width="500"] Pry up the front facing camera connector[/caption]
8. Pry up the rear facing camera connector.
[caption id="attachment_7707" align="alignnone" width="500"] Pry up the rear facing camera connector[/caption]
9. Pry up the LCD screen and digitizer connectors.
[caption id="attachment_7708" align="alignnone" width="500"] Pry up the LCD screen and digitizer connectors[/caption]
10. Take out the motherboard.
[caption id="attachment_7709" align="alignnone" width="500"] Take out the motherboard[/caption]
11. Take out the front facing camera. (Notice: be careful not to break the flex ribbon.)
[caption id="attachment_7710" align="alignnone" width="500"] Take out the front facing camera[/caption]
12. Take out the back facing camera. (Notice: be careful not to destroy the flex ribbon.)
[caption id="attachment_7711" align="alignnone" width="500"] Take out the back facing camera[/caption]
13. Take out the ear speaker.
[caption id="attachment_7712" align="alignnone" width="500"] Take out the ear speaker[/caption]
14. Take out the earphone jack. (Notice: the earphone jack is cohered to the front housing, be careful!)
[caption id="attachment_7713" align="alignnone" width="500"] Take out the earphone jack[/caption]
15. The LG G3 disassembly has been finished.
[caption id="attachment_7714" align="alignnone" width="500"] The LG G3 disassembly has been finished[/caption]
Share:


 IOS 17.4 official version pushed to block battery vulnerability
  Is the Chinese-made rear case for the iPhone 15 series going on the market?
  New products coming:USB to MFI Lightning Cable
  Big BUG of iPhone 15
  Successfully submitted!
my phone started loosing network, doesnt detect sd card, screen goes blank quite often, what can i do to recover this without much cost