


HTC Droid DNA Teardown Tutorial
BY alina | 八月 29th, 2013 | 2 | 0
HTC Droid DNA features a 5.0-inch Super LCD3 display with 1080 x 1920 pixels, an 8MP primary camera and a quad-core processor, etc. If you want to replace the cracked screen on the Droid DNA yourself, it will be a little bit complicated. Because we found there are many adhesives inside this device when we disassemble it. You can learn how to repair your HTC Droid DNA as our teardown tutorial, and know the steps that you have to be careful.
 Tools:
Small Phillips Screwdriver
T5 Torx Screwdriver
Tweezers
Case Opening Tool
Step 1
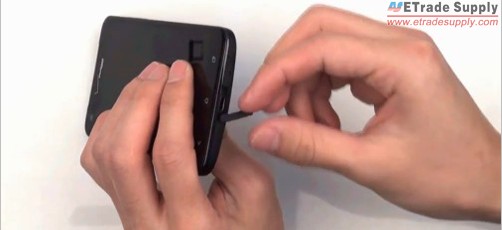
Power off the HTC Droid DNA first, take out the SIM card tray and make sure the USB cover is open.
Tools:
Small Phillips Screwdriver
T5 Torx Screwdriver
Tweezers
Case Opening Tool
Step 1
Power off the HTC Droid DNA first, take out the SIM card tray and make sure the USB cover is open.
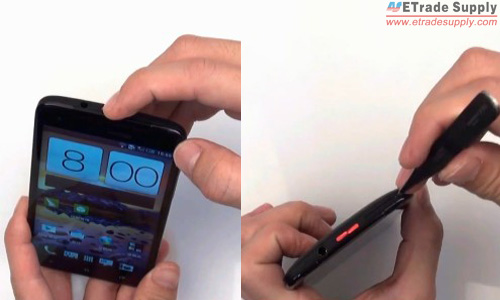
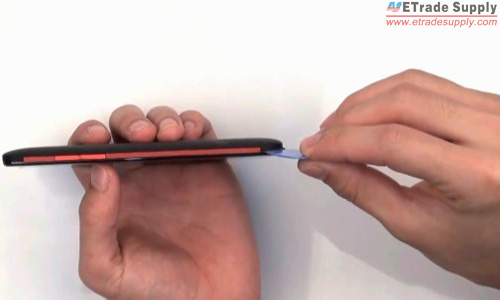
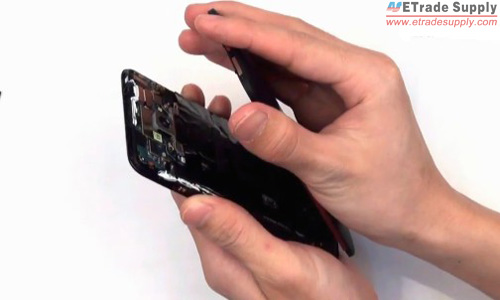
 Step 2
Insert the case opening tool between the front housing and rear housing by starting from the corner to remove the rear housing.
Step 2
Insert the case opening tool between the front housing and rear housing by starting from the corner to remove the rear housing.
 Step 3
Gently peel off the paper covering on the motherboard with the help of tweezers.
Step 3
Gently peel off the paper covering on the motherboard with the help of tweezers.
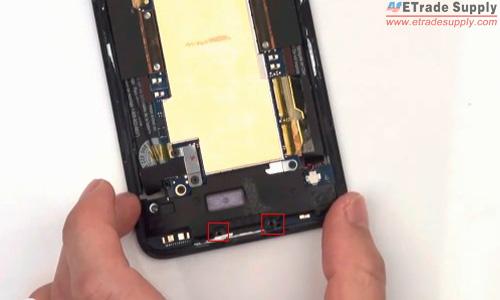
 Step 4
Use T5 Torx Screwdriver to take out the two screws at the bottom.
Step 4
Use T5 Torx Screwdriver to take out the two screws at the bottom.
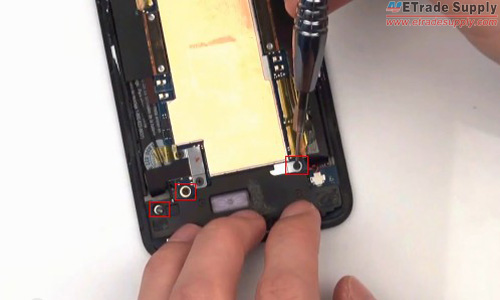
 Step 5
Use Small Phillips Screwdriver to undo the three screws on the motherboard.
Step 5
Use Small Phillips Screwdriver to undo the three screws on the motherboard.
 Step 6
Use tweezers to pick out the metal shield in the bottom right, and peel off the two yellow tapes.
Step 6
Use tweezers to pick out the metal shield in the bottom right, and peel off the two yellow tapes.
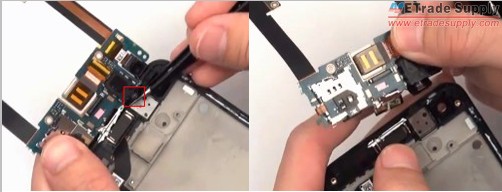
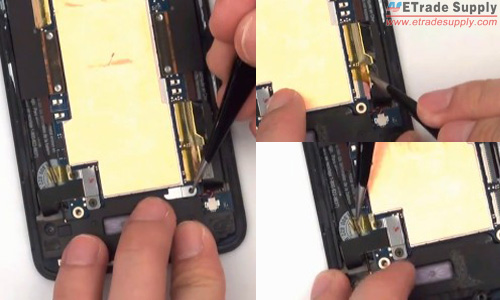 Step 7
Disconnect the two wires by using the tweezers on the top.
Step 7
Disconnect the two wires by using the tweezers on the top.
 Step 8
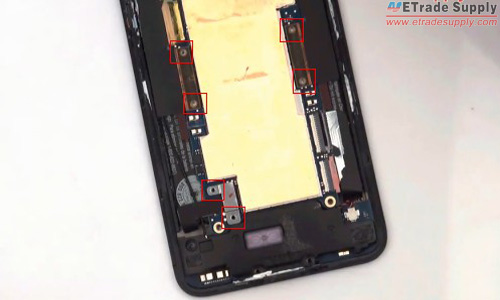
Use Phillips Screwdriver to release the six screws on the motherboard.
Step 8
Use Phillips Screwdriver to release the six screws on the motherboard.
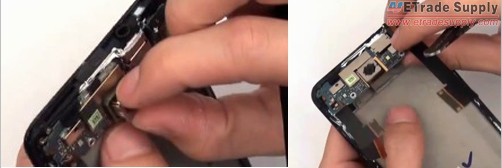
 Step 9
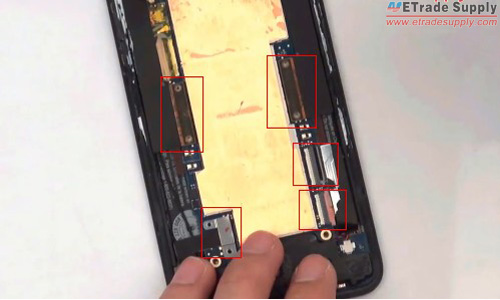
Use opening tool to gently disconnect the connectors on the motherboard. Handle the fragile flex cable carefully
Step 9
Use opening tool to gently disconnect the connectors on the motherboard. Handle the fragile flex cable carefully
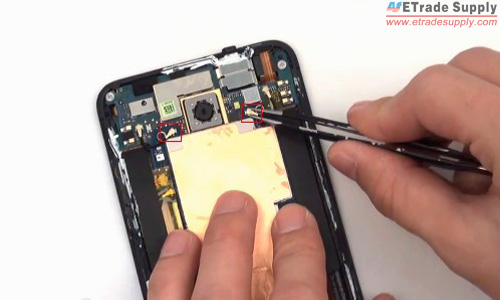
 Step 10
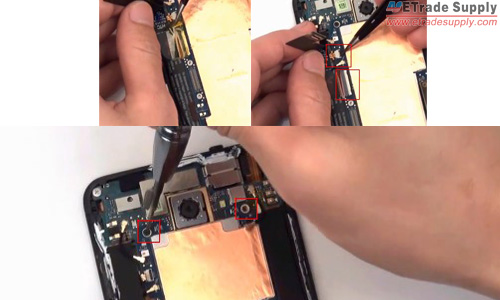
Use tweezers to peel off the yellow tape and disconnect the small connectors. Then take out the last two screws at the top of the motherboard.
Step 10
Use tweezers to peel off the yellow tape and disconnect the small connectors. Then take out the last two screws at the top of the motherboard.
 Step 11
Now you can slowly pull up the motherboard by using tweezers, make sure it doesn’t cut any flex cable or any wire. Then pull it out.
Step 11
Now you can slowly pull up the motherboard by using tweezers, make sure it doesn’t cut any flex cable or any wire. Then pull it out.
 Step 12
Use case opening tool to take out the charging port assembly by gently wedging in.
Step 12
Use case opening tool to take out the charging port assembly by gently wedging in.
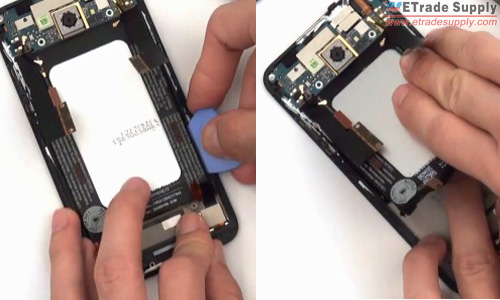
 Step 13
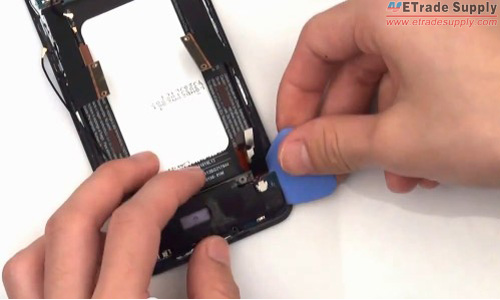
Use case opening tool to release the battery by slowly wedging it in between the battery and the front housing around. There is a piece of adhesive around the battery. So slowly pull put the battery to try to hold the adhesive in place and not rip it, which can be used again.
Step 13
Use case opening tool to release the battery by slowly wedging it in between the battery and the front housing around. There is a piece of adhesive around the battery. So slowly pull put the battery to try to hold the adhesive in place and not rip it, which can be used again.
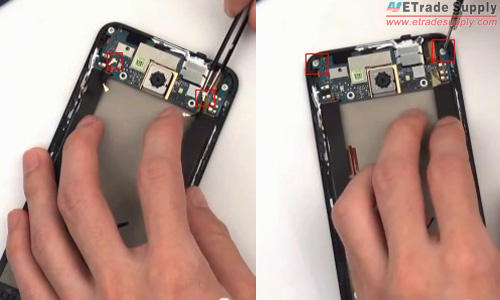
 Step 14
Use tweezers to release the two wires, and use Phillips Screwdriver to remove the two screws on the top.
Step 14
Use tweezers to release the two wires, and use Phillips Screwdriver to remove the two screws on the top.
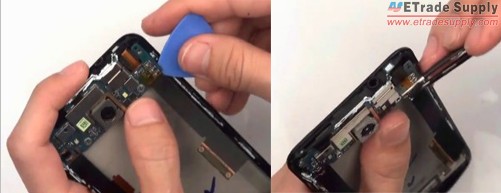
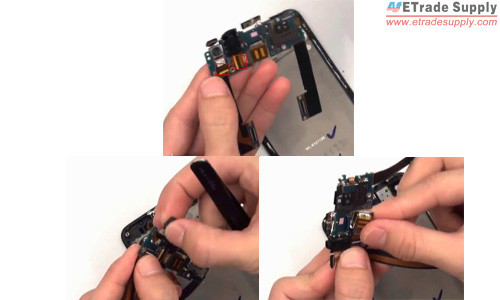
 Step 15
Use case opening tool to loosen motherboard flex cable because the power button, the front facing camera and some other small parts are stuck by the adhesive. Once the bottom is loose, use tweezers to gently pull out the front facing camera.
Step 15
Use case opening tool to loosen motherboard flex cable because the power button, the front facing camera and some other small parts are stuck by the adhesive. Once the bottom is loose, use tweezers to gently pull out the front facing camera.
 Step 16
Use tweezers to remove the adhesive between the front housing and power button, loose other adhesive between the front housing and the board.
Step 16
Use tweezers to remove the adhesive between the front housing and power button, loose other adhesive between the front housing and the board.
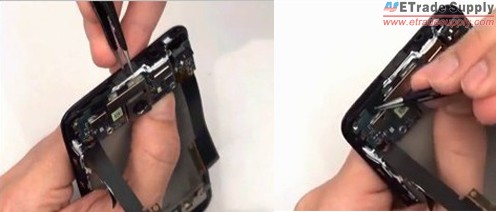 Step 17
Loosen the camera in the middle, once you loosen as much as you can, you can slowly fold up the board and work a little a bit on the part that is still stuck. Then you can remove the PCB board.
Step 17
Loosen the camera in the middle, once you loosen as much as you can, you can slowly fold up the board and work a little a bit on the part that is still stuck. Then you can remove the PCB board.
 Step 18
Remove the anti-static yellow tapes that cover the connectors, then remove the front facing camera and rear facing camera.
Step 18
Remove the anti-static yellow tapes that cover the connectors, then remove the front facing camera and rear facing camera.
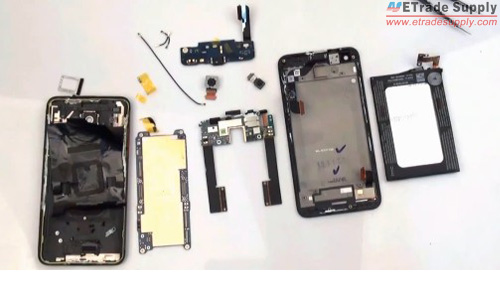 These are the whole processes about how to disassemble the HTC Droid DNA. You can watch our HTC Droid DNA teardown video and assembly video for detailed information. Subscribe our YouTube Channel for more updates of cellphone repair guides.
Tools:
Small Phillips Screwdriver
T5 Torx Screwdriver
Tweezers
Case Opening Tool
Step 1
Power off the HTC Droid DNA first, take out the SIM card tray and make sure the USB cover is open.
Step 2
Insert the case opening tool between the front housing and rear housing by starting from the corner to remove the rear housing.
Step 3
Gently peel off the paper covering on the motherboard with the help of tweezers.
Step 4
Use T5 Torx Screwdriver to take out the two screws at the bottom.
Step 5
Use Small Phillips Screwdriver to undo the three screws on the motherboard.
Step 6
Use tweezers to pick out the metal shield in the bottom right, and peel off the two yellow tapes.
Step 7
Disconnect the two wires by using the tweezers on the top.
Step 8
Use Phillips Screwdriver to release the six screws on the motherboard.
Step 9
Use opening tool to gently disconnect the connectors on the motherboard. Handle the fragile flex cable carefully
Step 10
Use tweezers to peel off the yellow tape and disconnect the small connectors. Then take out the last two screws at the top of the motherboard.
Step 11
Now you can slowly pull up the motherboard by using tweezers, make sure it doesn’t cut any flex cable or any wire. Then pull it out.
Step 12
Use case opening tool to take out the charging port assembly by gently wedging in.
Step 13
Use case opening tool to release the battery by slowly wedging it in between the battery and the front housing around. There is a piece of adhesive around the battery. So slowly pull put the battery to try to hold the adhesive in place and not rip it, which can be used again.
Step 14
Use tweezers to release the two wires, and use Phillips Screwdriver to remove the two screws on the top.
Step 15
Use case opening tool to loosen motherboard flex cable because the power button, the front facing camera and some other small parts are stuck by the adhesive. Once the bottom is loose, use tweezers to gently pull out the front facing camera.
Step 16
Use tweezers to remove the adhesive between the front housing and power button, loose other adhesive between the front housing and the board.
Step 17
Loosen the camera in the middle, once you loosen as much as you can, you can slowly fold up the board and work a little a bit on the part that is still stuck. Then you can remove the PCB board.
Step 18
Remove the anti-static yellow tapes that cover the connectors, then remove the front facing camera and rear facing camera.
These are the whole processes about how to disassemble the HTC Droid DNA. You can watch our HTC Droid DNA teardown video and assembly video for detailed information. Subscribe our YouTube Channel for more updates of cellphone repair guides.
Share:


 IOS 17.4 official version pushed to block battery vulnerability
  Is the Chinese-made rear case for the iPhone 15 series going on the market?
  New products coming:USB to MFI Lightning Cable
  Big BUG of iPhone 15
  Successfully submitted!
Hello, I used your guide to take down my DNA in order to switch out a cracked screen. It was fairly straight forward however when I started my phone back up my SIM card would not read, also the charging light does not come on and the camera wont load. Ive quadruple checked all the connections. Can you think of anything im overlooking? thanks,
It sounds like one of the flex cables may have crimped. There are many videos that show this whole process being done with pry tools, but I strongly recommend the care that was displayed in the article above using tweezers.