


How to Replace the Nexus 5 Cracked Screen
BY alina | 十二月 8th, 2013 | 76 | 7
It's well known that the Nexus 5 front glass, digitizer and LCD are fused together to the display frame. This means although you only crack one of the three parts, you have to replace the entire Nexus 5 screen. Follow our Nexus 5 disassembly and assembly videos, you can learn how to replace the Nexus 5 cracked screen yourself. You can also learn how to replace other broken parts on your Nexus 5 according to these two videos. ETrade Supply is always your prime choice to get the Nexus 5 replacement parts. Please note the DIY repair will void the warranty of your device but may save money.
Watch the following video to find how to repair the cracked screen on your Nexus 5.
In fact, if you only need to fix the Nexus 5 cracked screen, you don't have to disassemble some small parts as this video, like the vibrating motor on the back cover. Therefore, you can follow the step-by-step tutorial below to replace the cracked screen on your Nexus 5.
Preparation before Starting the Replacement
Part:
New Nexus 5 Screen Assembly with frame
Nexus 5 Cracked Screen Replacement Steps
Step 1
Power the Nexus 5 off and take out the SIM card tray with eject pin.

Step 2
Use the case opening tool to release the clips on the back cover to separate it from the rear housing.

Step 3
Remove the back cover.

Step 4
Once the back cover is removed, use small Phillips screwdriver to undo six screws to remove the rear housing with the plastic pry tool.


Note: If the new Nexus 5 screen you get includes the small components, like this Nexus 5 screen, then you only have to transfer the motherboard and battery to the new screen. And then install the rear housing and back cover. But if the new Nexus 5 screen display doesn't include any small components, you have to continue to follow the steps below.
Step 5
Use small Phillips screwdriver to undo four screws to remove the loud speaker module.

Step 6
Release the battery connector and the main flex cable connector of connecting the display, loud speaker, microphone and notification LED carefully with case opening tool.

Step 7
Lift the battery up with plastic pry tool.

Step 8
Gently disconnect the the main flex cable connector, and unplug the 4G antenna cable (the white one) and 3G antenna cable (the black one) to remove them.

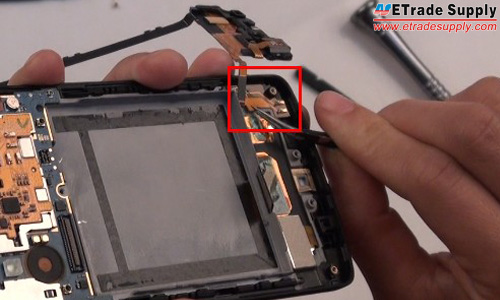
Step 9
Carefully lift up the charging port flex cable with plastic pry tool. Please note the rest part is glued to the housing. Please peel it off carefully with tweezers.

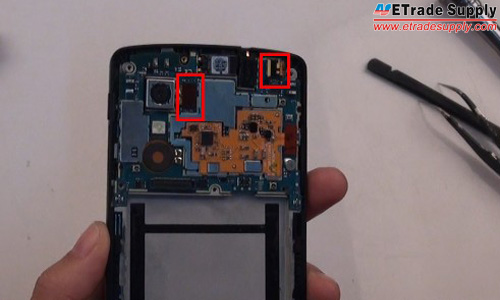
Step 10
Disconnect the rear facing camera and front facing camera connectors.
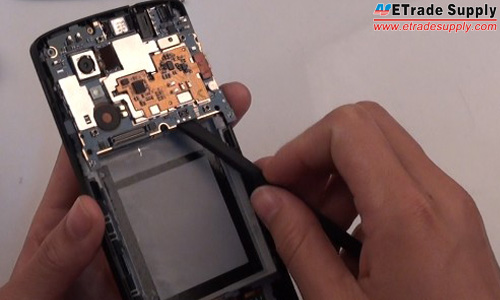
Step 11
Gently use plastic pry tool to lift the motherboard up and remove it.
Step 12
Remove the black tape, front camera, headphone jack, ear speaker, rubber gasket and rear camera from right to left carefully.

Step 13
Remove the power button and volume button with the help of tweezers.

Now the broken Nexus 5 screen assembly with frame is free.

You can reassemble all the components back to the new Nexus 5 replacement screen as the steps above in reverse order or as the Nexus 5 reassembly video below.
UPDATE: Here's the latest information we've from our supplier: the D820 and D821 LCD+digitizer+frame replacements are interchangeable after multiple tests. Sorry for the inconvenience caused from the incorrect information we posted before.


 IOS 17.4 official version pushed to block battery vulnerability
  Is the Chinese-made rear case for the iPhone 15 series going on the market?
  New products coming:USB to MFI Lightning Cable
  Big BUG of iPhone 15
  Successfully submitted!
Great guide! thanks
The small Phillips screwdriver doesn’t seem to be available on sale anymore. Any alternative?
Hi, you can try this screwdriver https://www.etradesupply.com/360-ph00x50-screwdriver.html
Also I can’t find any Plastic Pry Tool neither…
Hi, you mean this plastic spudger?https://www.etradesupply.com/repair-tools-bst-126.html
Awesome guide. Got the S+ New Screen Assembly with the Glass, Digitizer, and Front Housing, and just followed the disassembly and reassembly videos exactly.
Was able to replace the broken screen with the new one with no hassles at all!
Some things to be weary of when attempting this.
– Most of the parts have adhesive securing them to the screen assembly. Prying under them gently until they move is the best way to handle them. The hardest one is the battery, since there’s a square adhesive strip securing it to the screen assembly. The battery bent a bit on mine, but I was able to bend it back once I dislodged it from the broken screen.
– The Earpiece has a little extra piece that secures its position in the phone, one which the new screen assembly DID NOT come with. I had to take that piece from the broken assembly and transfer it to the new assembly for the Earpiece to stay in place.
thanks for sharing with us!
Hi Will the phone switch on if the digitizer connection is completely broken off?
Like should the LCD and other part power up with out it?
Hi,Roe, if the only broken part is the digitizer connector then the other part should not be affected theoretically, the phone could be switched on without touch function.
Thank you. I went to Machu Pichu and then Chile and cracked my screen horse back riding, I thought I lost all those pictures, this was way easier to do than i thought it would be, i just used a knife as a screwdriver, my fingernail for the prier, and 2 tweezers. There was no way into my phone and past the lock screen without replacing the screen and the people at the AT&T store couldnt do shit about it.
hi my Google nexus 5 ear speaker, and mic not work problem laud speaker working
Hi, what you need to replace is the ear speaker and charging port flex as the microphone is assembled in the charging port flex.
Ear speaker:www.etradesupply.com/lg-nexus-5-d820-ear-speaker.html
Charging port flex: http://www.etradesupply.com/lg-nexus-5-d820-charging-port-flex-cable-ribbon-black.html
Tutoriral: http://www.etradesupply.com/blog/disassemble-nexus-5-for-screen-parts-repair/
Do you sell the rear camera glass and if you do how much would it be for it and the front screen
Hi Brendan, sorry, we don’t have the neither the rear camera glass nor front screen glass. There’s no available stock in the market.
Hi,
after changing the lcd display my network connection seems to be much worse. Any tips about the antennas, how they should be placed etc?
doesn’t the reassembly require some sort of adhesive ?
coloquei a tela mas o toque pega quando quer mim ajuda
Your link to the LG Nexus 5 LCD Screen and Digitizer Assembly with Front Housing and Battery is not working. Do you not supply it anymore? I want the easiest way to fix my Nexus 5 screen. Only the glass is broken but I want to remove as few parts as possible.
Hi Erin, yes, we do not supply it anymore. I’d suggest you to buy a LCD Assembly with Front Housing and watch our tutorial guide to replace your screen. Good luck.
http://www.etradesupply.com/lg-nexus-5-d820-lcd-screen-and-digitizer-assembly-with-front-housing.html
Great info. I have a d821 nexus 5 with a cracked screen. Is the d820 replacement LCD, digitizer with front housing sold here on etrade supply compatible with it?
Thanks for the video, it’s really helpful.
Hi Kevin, yes, they’re compatible.
i need nexus 5 display connector which connected with sound cable.
i need nexus 5 display connector
I followed the instructions here to replace the screen on my Nexus 5. The new screen works great, but I have a new problem now – when I’m on a phone call with someone, the audio quality is very bad. The audio is very static-y at time, and the voice will fade in and out. As a result, often people cannot understand what I am saying.
Any idea what might have happened? Perhaps I damaged a part during the screen replacement?
Hello Nikhil, pls check your loud speaker module first, see if it’s well placed.
Hey Man my Phone just got a new screen but it gets black screen all the time and I cant do anything but the notifications and vibrations are still going on in it. I just dropped my again and my screen came back on but it just went black again. can it be a lose piece that is causing this? Thank you
Hi Perry, sounds like the new screen you replaced is a defected one.
Hello there , nice videos and helpful! I got a question , my screen is broken too in pieces as it falls down on the ground. To replace that screen do i have to order the Display Assembly with Frame included or only LCD Display + Touch Screen.The touchscreen will work if i will order only the LCD+ touch screen with no problem ? Hope u will help me… Best regards !
Hi Robishor, thank you! If your touchscreen still works, you need to replace the LCD Display only. However, considering the risk and difficulty, I’d suggest you to replace the LCD+Touch Screen+Frame. Here is the referential link: http://www.etradesupply.com/lg/android-models/lg-nexus-5.html?dir=asc&order=popular&part_category=139&stock=1
Alright, so i dropped my nexus 5 around march 2014 and i never got a screen repair because the touch and display worked just fine, although the front camera was ruined, recently this past week out of no where my screen got these discolored black spots around the cracks and now only the bottom portion of my screen will work, i have seen tutorials but i was wondering if the black spots mean i have to replace the digitizer along with the glass. If someone could let me know this would be perfect ccuuuzzzif i can do this repair myself it will save me 195$. And a follow up question would be, if i replace the glass will the front camera not be ruined? Thanks a ton to someone who answers 🙂
Be careful when lifting battery up on Step 7. Mine didn’t want to come off easily, so I tried using tweezers. And seems like I damaged my battery with tweezers (made a very small hole on the bottom of it). It doesn’t leak, but there is some smell.
Does anybody know if this smell is harmful?
i have a phone who,s screen is ok , cover, batary if any one want to purchase screen quot me 9810534481 or how much you want about your set both side about nexus 5 D820 black lg set in delhi near karol bagh
Hi,
My Nexu5 screen looks fine when it is off. But when I turn it on, I can see that there is a crack and what looks like a little ink bleed. And the screen is now flipped upside down and mirrored. Touch worked for awhile but now it doesn’t.
Would this screen replacement work for me also, since the front screen itself isn’t actually cracked.
Hi Robert, perpaps your Nexus 5 LCD Display and Touch Screen were damaged, we suggest you to replace the whole lcd assembly even though your front glass isn’t cracked. To replace the lcd assembly will be much easier and lower risk.
http://www.etradesupply.com/lg-nexus-5-d820-lcd-screen-and-digitizer-assembly-black.html
Thank you for this easy guide! I shattered my screen and the cost to fix it was almost as much as buying another phone so I ended up buying another nexus 5. Turns out the phone I bought was blacklisted so I swapped the motherboards and now I have a fixed phone that works IN A CASE 🙂 thanks again!
My glass is broken but display and touch working perfectly . anybody suggest me what is the best way to fix this problem. Is it possible to change only front glass ?? Which tools are required for this and any video suggest me.. Thnxs in advance
This is the video for your reference:
http://www.youtube.com/watch?v=ndgBUhYIhaM
Jens, you probably already did this, but I would try to disconnect the camera, then reconnect it and verify there is nothing obstructing the pins and that the connection is firm and oriented the right way.
My issue is the notification light. I don’t see anything wrong, but it won’t light up when I get messages. In comparing the new screen to my old one, the hole for the light looks mostly the same, one has silver metal tape, the other gold, and a hole with a white film in it. When I hold them up to the light, the old one seems more transparent than the new one, though. Anyone else have this issue and solve it?
Other than that, this screen is great. Really glad I did it myself and got this screen which seems to have the same quality as the original.
After changing my screen the camera doesn’t seem to work. I just get the “Cannot connect to camera” message. Additionally the mms-qcamera-daemon is always running and drains all my battery. Any ideas?
Just installed the new screen, and the right half of the screen is unresponsive. I followed all the directions and was very careful while assembling/disassembling. Is there any warrantys covering manufacturers defects?
Michael I have the same problem as you, the screen does not recognize well where i touch it, if i touch to get to the menu it the screen recognize that touch in other part of the screen. I don´t understand why this happens but I´ll get it to fix to a phone shop near my house. I hope the can find out what happens
Power+volume down is to reboot
I ordered a replacement screen for my Nexus 5 and received it within a week. Took only a half hour to re-assemble and it works well. Looked like new. Unfortunately after about two weeks the screen started showing systems of failure and the lower half of the screen appears to not refresh properly. After checking it to make sure that a connector wasn’t damaged it would appear that the screen is a second or has a manufacturing flaw. A lot of money for a two week fix.
I now own a paperweight.
Hi. I want to ask for my nexus 5 screeb is cracked but the touch work the same before cracked, which the best way to fix this?
Hey Ervin, you need to replace the glass lens.
Brilliant tutorial. Just used it to replace a smashed screen and saved myself £50
Hey I have a cracked screen with some damages on the side from consistent dropping. Can all that be replaced easily? Also where is a good place I can buy those replace for a good reasonable price? Also where is a place I can buy the tools for disassembling? And what stuff do I need to be cautious about and need before starting?
I have same problem as billy. The power and volume buttons will not push right. Anyone have any idea how to solve this?
guys, what about the screen display quality? and the touch? i mean how can we be sure that buying the lcd set from ebay or somewhere else, would i be getting the same full hd quality display and touch aspects? anybody had this kind of problem?
i have my screen cracked; touch and display working fine, only the top glass is cracked…wondering if i could have Only the top glass replaced, without having to open up the whole phone… thanksssssss
After putting back together the phone, the power button and volume rocker are stuck. Really hard to push in the first time, don’t come back out. I looked at pictures and everything looks fine. Was there a difference in buttons after the hardware revision to the nexus 5? The replacement I got seems to be the later model. Everything fit together fine except the buttons.
Billy,did it work… I’m considering getting this screen as mine broke.. would love some insight on the screen quality..
No mention of needed to heat the screen to remove it? would of been good to know before i pulled it all apart
Thanks, Alina, for the nice and clear walk through, just followed the orders and replaced broken screen on my Nexus successfully. Good job, guys.
Hello,
I too have a shattered screen :(.. I think I will try to change the screen by myself, but since I’m not really handy I will buy the assembly with all the small parts. Nevertheless, I have some doubts:
* You say that I can avoid the steps from 5 and so on, but to take the motherboard off I should at least do steps number 6 (disconnect main flex and battery), 7 (take off the battery), 10 (disconnect cameras) and 11 (take off the main board). The 6th and 11th are pretty obvious, of course, but please correct me for the other two.
* Can I do those steps without the other ones??? What about the white cables in step 8?
And the port flex cables in step 9??
Hello,
Today I was standing in the bus and got a message. So when I took my phone out to read it, the bus driver made an emergency stop. As a result, my phone dropped in the pathway (one with a hard anti slip surface) right on the screen and slid face down all the way to the front.
In short, my screen is now a spiderweb of cracks. Touch still functions normally.
So my question: Is there any difference between the screens of the D820 and the D821? As I have the D821 and all the screens available are for the D820.
Thanks in advance,
Gerke
No difference between d820 and d821 screen. it’s just for US and EU version.
Thanks for confirming.
I also noticed the rear housing (the part that covers the motherboard) saying LG-D820
thanks
Hello,
My screen is also cracked, but I would like to know how to recognise the versión of my nexus 5 to buy and assemble the correct screen. Thanks.
My screen and glass broke. I had to ship the phone into LG; the cost was about $153 with $8.something in tax so about $160 for them to repair and ship back. All in all, with the shipping to LG, it was about $180 and it took 10 days from shipping for them to contact me with a cost and start working on my phone.
Two questions:
What screwdrivers are need?
& does reassembly require soldering any connections together?
Thank you for your help & excellent video.
Hi Schwing,
The small Phillips screwdriver is needed. And reassembly does not require soldering connections together. You can see our reassembly video above.
eTrade has several “models” of screens. If only the screen is broken, can I buy / replace only the screen without front housing ($120) or do I need the front housing ($150 / ~$190)?
Hi Frank,
It depends on your repair skills, because it’s more difficult to separate the front housing from the screen assembly. Hope this can help you.
While replacing the screen, the new screen has a covering in front of the proximity sensor. Be sure to remove the covering otherwise the proximity sensor will remain obstructed.
Could you provide some info on screen quality compared to original
Will the white frame and black be interchangable?
Hi Luis,
Yes, they are interchangeable if they are the same version.
Hello Alina,
By “same version” do you mean DB20, and DB21?
I just bout a display+frame replacement for my white phone and it turned out a black phone frame.
Thank you
Hi Nael, firstly, the D820 LCD+digitizer+frame is not compatible with D821. Secondly, there’s no white frame for the Nexus 5, the Nexus 5 frame is available in black and red, while the earpiece mesh cover is available in black and white.
Hi, are you sure the D820 LCD+digitizer+frame is not compatible with my D821 ?
On other site, The LCD+digitizer+frame are compatible both d820 and d821
Hi j3rom3, here’s the latest information we’ve from our supplier: the D820 and D821 LCD+digitizer+frame replacements are interchangeable after multiple tests. Sorry for the inconvenience caused from the incorrect information we posted before.
Step 1 : Power the Nexus 5 off.
How does one power off the phone when it’s screen is non-responsive?
If you can still make out what is on the screen but can’t control it hold the power button for 10 seconds. This will force it to reboot. As soon as the screen shuts off hold volume down as you continue to hold power. This will take you to fastboot where you can use the volume keys to scroll to power off, hit the power button to select.
Just hold the power button for around 10 seconds.
Yep
If the touch screen is non-responsive, you need to open the phone and remove the battery to turn it off.