


How to Replace the Nokia Lumia 620 Screen
BY Junior | 十月 11th, 2013 | 2 | 2
[caption id="attachment_5309" align="alignnone" width="300"]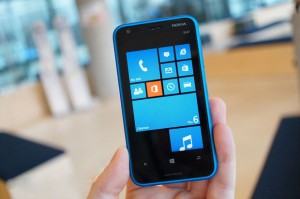 How to Repair Nokia Lumia 620 Damaged Screen[/caption]
Did you drop your Nokia Lumia 620? Do you know how to make DIY repair on the damaged Lumia 620 screen? Do you want to get a professional guide on how to replace the damaged Lumia 620 screen? If so, you don’t need to worry since this is a tutorial on how to replace the shattered, cracked, damaged screen for the Lumia 620. Before you start to replace the screen, you should know which component of the phone was damaged. Now we give you the professional tips to judge which screen part you need for the Nokia Lumia 620:
LCD Only: If the picture under the glass is broken and the touch screen digitizer is NOT then you only need a Lumia 620 LCD replacement.
Touch Screen Digitizer Only: If the top touch panel or aka glass top is damaged but the image under it is fine, then you only need a brand new Lumia 620 digitizer screen replacement.
Complete screen (Both touch screen digitizer and LCD screen): If the top digitizer screen is damaged and the LCD image is either black liquid or broken you need to change the complete Lumia 620 screen assembly.
Instructions: How to replace the Lumia 620 screen:
The professional smartphone repair tools you need:
1. T4 Screwdriver.
2. Case open tool.
3. Plastic card.
Step 1: Remove the battery door.
[caption id="attachment_5279" align="alignnone" width="300"]
How to Repair Nokia Lumia 620 Damaged Screen[/caption]
Did you drop your Nokia Lumia 620? Do you know how to make DIY repair on the damaged Lumia 620 screen? Do you want to get a professional guide on how to replace the damaged Lumia 620 screen? If so, you don’t need to worry since this is a tutorial on how to replace the shattered, cracked, damaged screen for the Lumia 620. Before you start to replace the screen, you should know which component of the phone was damaged. Now we give you the professional tips to judge which screen part you need for the Nokia Lumia 620:
LCD Only: If the picture under the glass is broken and the touch screen digitizer is NOT then you only need a Lumia 620 LCD replacement.
Touch Screen Digitizer Only: If the top touch panel or aka glass top is damaged but the image under it is fine, then you only need a brand new Lumia 620 digitizer screen replacement.
Complete screen (Both touch screen digitizer and LCD screen): If the top digitizer screen is damaged and the LCD image is either black liquid or broken you need to change the complete Lumia 620 screen assembly.
Instructions: How to replace the Lumia 620 screen:
The professional smartphone repair tools you need:
1. T4 Screwdriver.
2. Case open tool.
3. Plastic card.
Step 1: Remove the battery door.
[caption id="attachment_5279" align="alignnone" width="300"]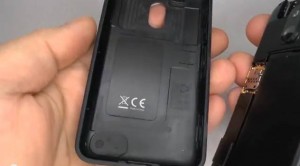 Remove the battery door[/caption]
Step 2: Remove the batter, SIM card and Memory SD card
[caption id="attachment_5280" align="alignnone" width="300"]
Remove the battery door[/caption]
Step 2: Remove the batter, SIM card and Memory SD card
[caption id="attachment_5280" align="alignnone" width="300"] Remove the batter, SIM card and Memeory SD card[/caption]
Step 3:Remove the six screws with T4 screw driver
[caption id="attachment_5281" align="alignnone" width="300"]
Remove the batter, SIM card and Memeory SD card[/caption]
Step 3:Remove the six screws with T4 screw driver
[caption id="attachment_5281" align="alignnone" width="300"]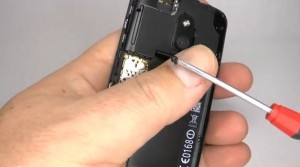 Remove the six screws with T4 screw driver[/caption]
Step 4: Remove the speaker housing
[caption id="attachment_5282" align="alignnone" width="300"]
Remove the six screws with T4 screw driver[/caption]
Step 4: Remove the speaker housing
[caption id="attachment_5282" align="alignnone" width="300"] Remove the speaker housing[/caption]
Step 5: Disconnect the flex ribbons of display and digitizer
[caption id="attachment_5283" align="alignnone" width="300"]
Remove the speaker housing[/caption]
Step 5: Disconnect the flex ribbons of display and digitizer
[caption id="attachment_5283" align="alignnone" width="300"]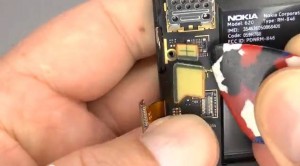 Disconnect the flex ribbons of display and digitizer[/caption]
Step 6: Lift up the Rear housing and motherboard
[caption id="attachment_5284" align="alignnone" width="300"]
Disconnect the flex ribbons of display and digitizer[/caption]
Step 6: Lift up the Rear housing and motherboard
[caption id="attachment_5284" align="alignnone" width="300"] Lift up the Rear housing and motherboard[/caption]
Step 7: Remove the middle plate
[caption id="attachment_5286" align="alignnone" width="300"]
Lift up the Rear housing and motherboard[/caption]
Step 7: Remove the middle plate
[caption id="attachment_5286" align="alignnone" width="300"]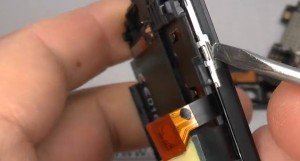 Remove the middle plate[/caption]
Step 8: Lift the LCD and digitizer, change a brand new Lumia 620 replacement screen and then assemble the phone according to the steps above in reverse orders.
[caption id="attachment_5287" align="alignnone" width="300"]
Remove the middle plate[/caption]
Step 8: Lift the LCD and digitizer, change a brand new Lumia 620 replacement screen and then assemble the phone according to the steps above in reverse orders.
[caption id="attachment_5287" align="alignnone" width="300"] Lift the LCD and digitizer[/caption]
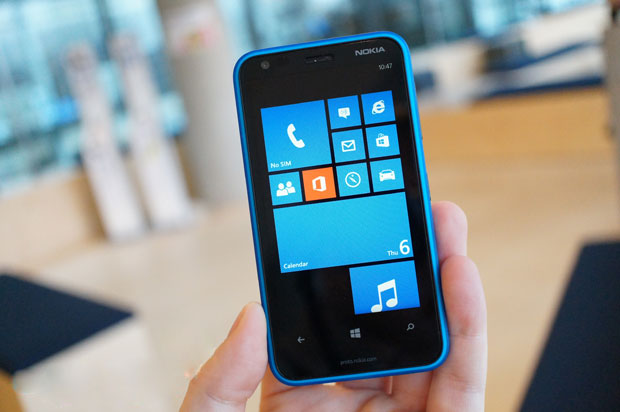 How to Repair Nokia Lumia 620 Damaged Screen[/caption]
Did you drop your Nokia Lumia 620? Do you know how to make DIY repair on the damaged Lumia 620 screen? Do you want to get a professional guide on how to replace the damaged Lumia 620 screen? If so, you don’t need to worry since this is a tutorial on how to replace the shattered, cracked, damaged screen for the Lumia 620. Before you start to replace the screen, you should know which component of the phone was damaged. Now we give you the professional tips to judge which screen part you need for the Nokia Lumia 620:
LCD Only: If the picture under the glass is broken and the touch screen digitizer is NOT then you only need a Lumia 620 LCD replacement.
Touch Screen Digitizer Only: If the top touch panel or aka glass top is damaged but the image under it is fine, then you only need a brand new Lumia 620 digitizer screen replacement.
Complete screen (Both touch screen digitizer and LCD screen): If the top digitizer screen is damaged and the LCD image is either black liquid or broken you need to change the complete Lumia 620 screen assembly.
Instructions: How to replace the Lumia 620 screen:
The professional smartphone repair tools you need:
1. T4 Screwdriver.
2. Case open tool.
3. Plastic card.
Step 1: Remove the battery door.
[caption id="attachment_5279" align="alignnone" width="300"]
How to Repair Nokia Lumia 620 Damaged Screen[/caption]
Did you drop your Nokia Lumia 620? Do you know how to make DIY repair on the damaged Lumia 620 screen? Do you want to get a professional guide on how to replace the damaged Lumia 620 screen? If so, you don’t need to worry since this is a tutorial on how to replace the shattered, cracked, damaged screen for the Lumia 620. Before you start to replace the screen, you should know which component of the phone was damaged. Now we give you the professional tips to judge which screen part you need for the Nokia Lumia 620:
LCD Only: If the picture under the glass is broken and the touch screen digitizer is NOT then you only need a Lumia 620 LCD replacement.
Touch Screen Digitizer Only: If the top touch panel or aka glass top is damaged but the image under it is fine, then you only need a brand new Lumia 620 digitizer screen replacement.
Complete screen (Both touch screen digitizer and LCD screen): If the top digitizer screen is damaged and the LCD image is either black liquid or broken you need to change the complete Lumia 620 screen assembly.
Instructions: How to replace the Lumia 620 screen:
The professional smartphone repair tools you need:
1. T4 Screwdriver.
2. Case open tool.
3. Plastic card.
Step 1: Remove the battery door.
[caption id="attachment_5279" align="alignnone" width="300"]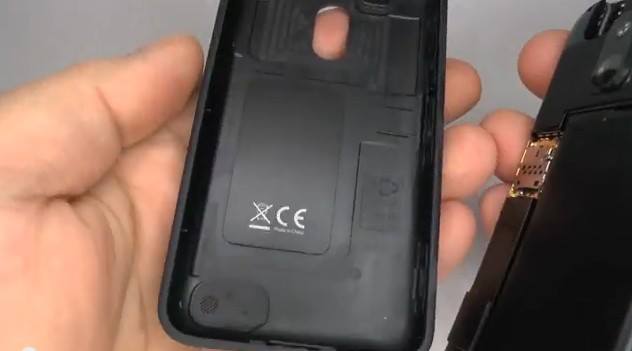 Remove the battery door[/caption]
Step 2: Remove the batter, SIM card and Memory SD card
[caption id="attachment_5280" align="alignnone" width="300"]
Remove the battery door[/caption]
Step 2: Remove the batter, SIM card and Memory SD card
[caption id="attachment_5280" align="alignnone" width="300"]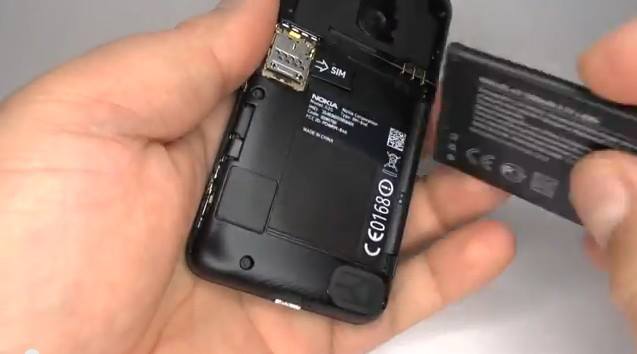 Remove the batter, SIM card and Memeory SD card[/caption]
Step 3:Remove the six screws with T4 screw driver
[caption id="attachment_5281" align="alignnone" width="300"]
Remove the batter, SIM card and Memeory SD card[/caption]
Step 3:Remove the six screws with T4 screw driver
[caption id="attachment_5281" align="alignnone" width="300"] Remove the six screws with T4 screw driver[/caption]
Step 4: Remove the speaker housing
[caption id="attachment_5282" align="alignnone" width="300"]
Remove the six screws with T4 screw driver[/caption]
Step 4: Remove the speaker housing
[caption id="attachment_5282" align="alignnone" width="300"]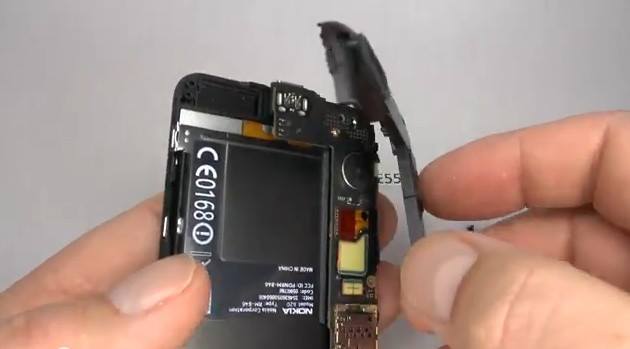 Remove the speaker housing[/caption]
Step 5: Disconnect the flex ribbons of display and digitizer
[caption id="attachment_5283" align="alignnone" width="300"]
Remove the speaker housing[/caption]
Step 5: Disconnect the flex ribbons of display and digitizer
[caption id="attachment_5283" align="alignnone" width="300"]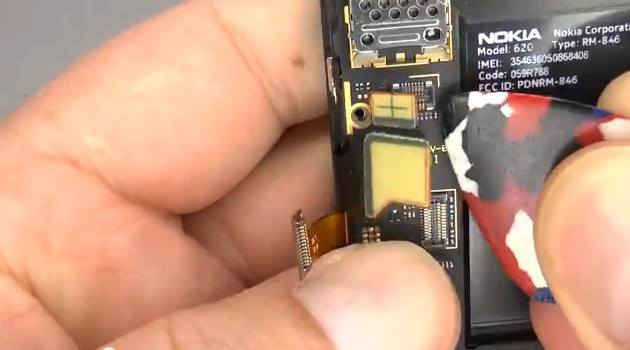 Disconnect the flex ribbons of display and digitizer[/caption]
Step 6: Lift up the Rear housing and motherboard
[caption id="attachment_5284" align="alignnone" width="300"]
Disconnect the flex ribbons of display and digitizer[/caption]
Step 6: Lift up the Rear housing and motherboard
[caption id="attachment_5284" align="alignnone" width="300"]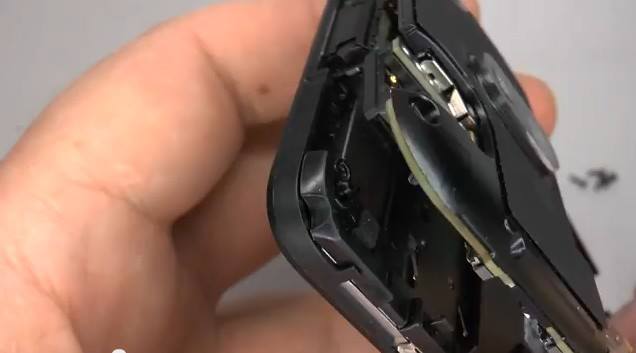 Lift up the Rear housing and motherboard[/caption]
Step 7: Remove the middle plate
[caption id="attachment_5286" align="alignnone" width="300"]
Lift up the Rear housing and motherboard[/caption]
Step 7: Remove the middle plate
[caption id="attachment_5286" align="alignnone" width="300"] Remove the middle plate[/caption]
Step 8: Lift the LCD and digitizer, change a brand new Lumia 620 replacement screen and then assemble the phone according to the steps above in reverse orders.
[caption id="attachment_5287" align="alignnone" width="300"]
Remove the middle plate[/caption]
Step 8: Lift the LCD and digitizer, change a brand new Lumia 620 replacement screen and then assemble the phone according to the steps above in reverse orders.
[caption id="attachment_5287" align="alignnone" width="300"]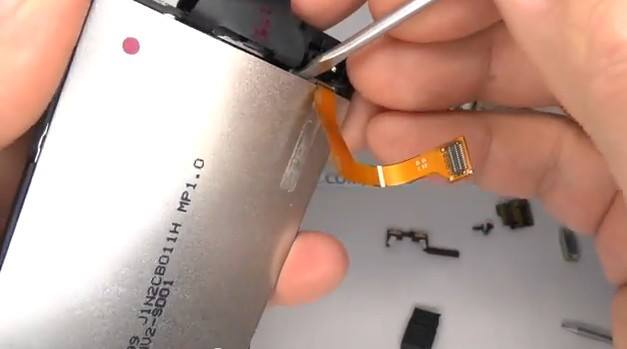 Lift the LCD and digitizer[/caption]
Share:


 IOS 17.4 official version pushed to block battery vulnerability
  Is the Chinese-made rear case for the iPhone 15 series going on the market?
  New products coming:USB to MFI Lightning Cable
  Big BUG of iPhone 15
  Successfully submitted!
useless. it doesn’t explain that which REV screen will be needed or how to find out which screen is needed
hello
i’want to buy a only Touch Screen digitizer , but it was writen “Nokia Lumia 620 (for REV: 1 version)” , does is it mean that this touch screen is only for one version ???