


How to Repair Cracked BlackBerry Z10 Screen
BY Junior | 八月 19th, 2013 | 71 | 1
According to the reports from some phone forums and scientific websites, there are a few BlackBerry Z10 problems the users are facing. Lots of users published the threads that “how to repair the device’s internal parts?” These BBZ10 internal parts include BlackBerry Z10 cracked screen, malfunctioning speaker, or damaged charging port. Also, many people asked “where are the professional Z10 repair guides (like Z10 take apart video or article) and excellent OEM parts for BlackBerry Z10”.
Now, you don't need to worry about the above-mentioned BlackBerry Z10 problems. You can repair a cracked, shattered or damaged screen and other internal parts on your phone with this detailed DIY disassemble tutorial, this guide will walk you through each step of taking apart your BlackBerry Z10 and show how to change the damaged components.
All the BlackBerry Z10 replacement parts and tools can be found on our official online store. Welcome to watch our BlackBerry Z10 take part video if you still can't understand this tutorial.
This DIY disassembling tutorial will help you replace the following BlackBerry Z10 part(s):
• BlackBerry Z10 LCD Screen Replacement
• BlackBerry Z10 Touch Screen Digitizer Replacement
• BlackBerry Z10 Rear Housing Replacement
• BlackBerry Z10 Middle Plate Replacement
• BlackBerry Z10 Charging Port Replacement
• BlackBerry Z10 Ear Speaker Replacement
• BlackBerry Z10 Rear Facing Camera Replacement
Tools and part Required:
• 0.8×40mm Pentalobe screwdriver
• New BlackBerry Z10 LCD screen and digitizer assembly with frame
BlackBerry Z10 Repair Instruction:
[caption id="attachment_4350" align="alignnone" width="300"]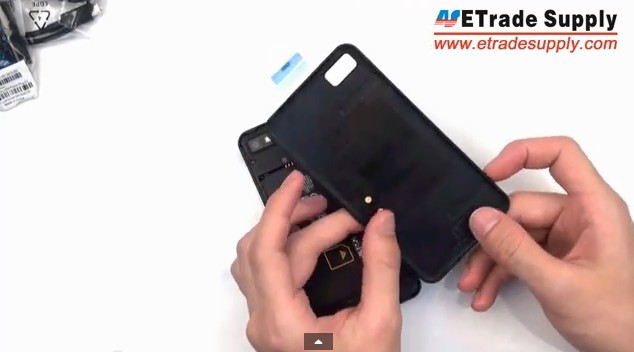 Take Out the Battery Door[/caption]
1. Take out the battery door
[caption id="attachment_4351" align="alignnone" width="300"]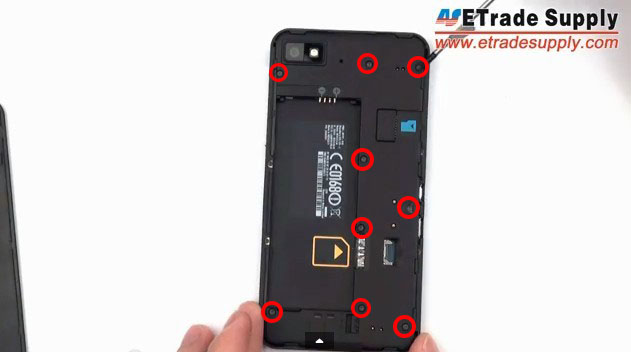 Remove 9 screws on the rear housing[/caption]
2. Use Torx 4 screwdriver to remove 9 screws on the rear housing
[caption id="attachment_4352" align="alignnone" width="300"]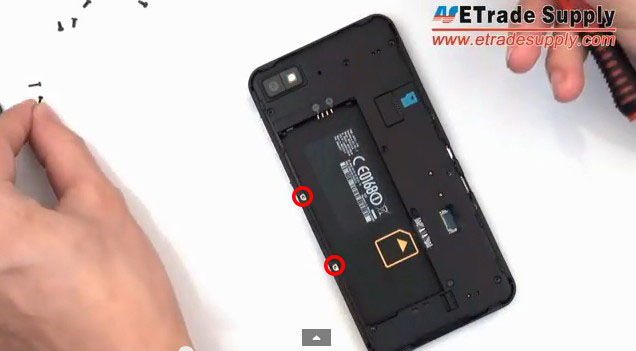 Remove 2 screws at the left edge side[/caption]
3. Use the 0.8×40mm Pentalobe screwdriver to remove 2 screws at the left edge side
[caption id="attachment_4353" align="alignnone" width="300"]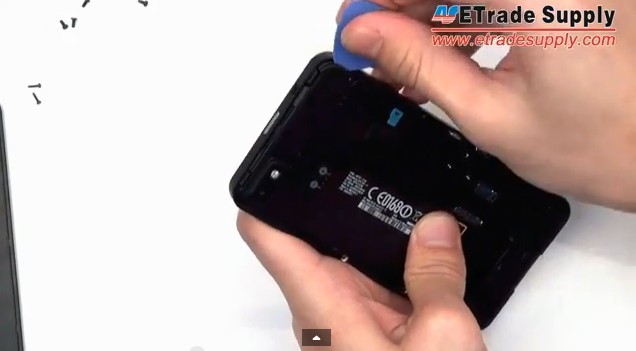 Open the clips on the four corners[/caption]
[caption id="attachment_4354" align="alignnone" width="300"]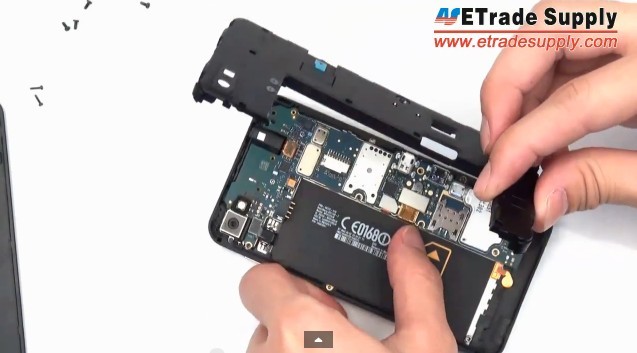 Remove the rear housing[/caption]
4. Use a case open tool to open the clips on the four corners then remove the rear housing
[caption id="attachment_4355" align="alignnone" width="300"] Open all connectors on the motherboard[/caption]
[caption id="attachment_4356" align="alignnone" width="300"]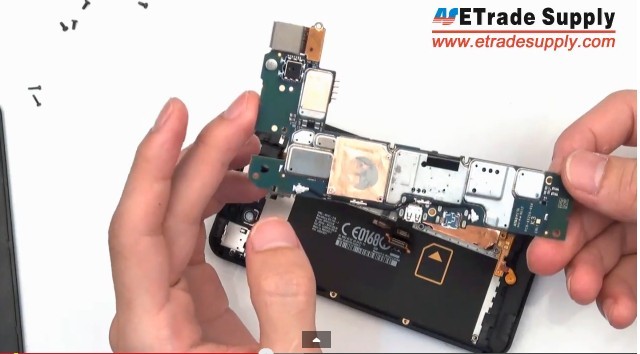 Remove the motherboard[/caption]
5. Open all connectors on the motherboard then remove it
[caption id="attachment_4357" align="alignnone" width="300"]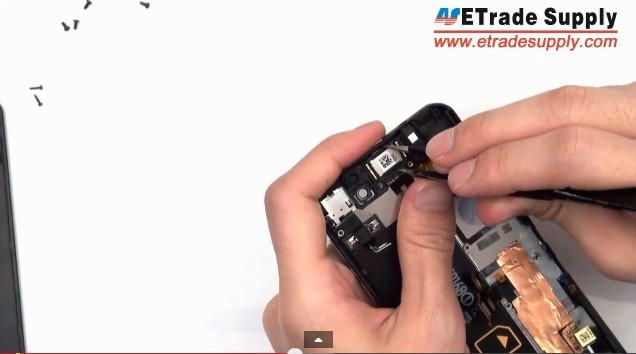 Remove the ear phone[/caption]
6. Use Tweezers to remove the ear phone
[caption id="attachment_4358" align="alignnone" width="300"]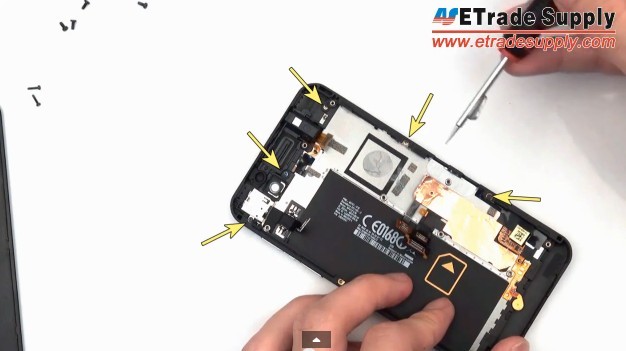 Remove 5 screws at the left edge side[/caption]
7. Use the 0.8×40mm Pentalobe screwdriver to remove 5 screws at the left edge side
[caption id="attachment_4359" align="alignnone" width="300"]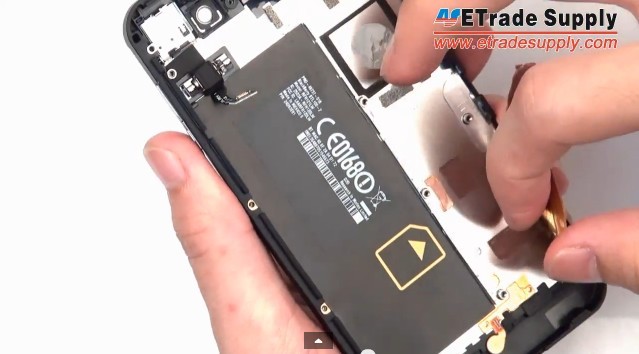 Carefully tear of the tape[/caption]
8. Carefully tear of the tape on the LCD flex cable
[caption id="attachment_4360" align="alignnone" width="300"]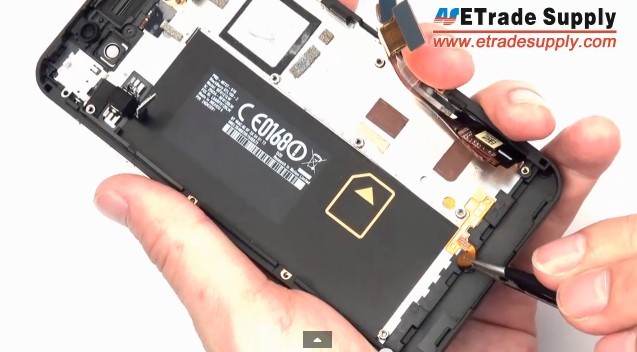 Pick out the microphone[/caption]
9. Use tweezers carefully pick out the microphone
[caption id="attachment_4361" align="alignnone" width="300"]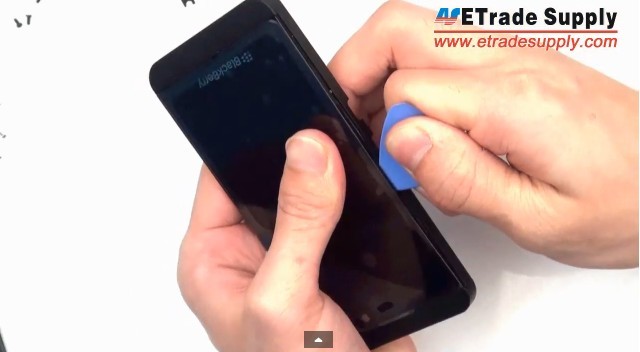 Release the LCD screen and digitizer assembly from the front housing[/caption]
10. Use a case open tool to release the LCD screen and digitizer assembly from the front housing
[caption id="attachment_4362" align="alignnone" width="300"] Thread flex cables through the hole on the front housing[/caption]
[caption id="attachment_4363" align="alignnone" width="300"]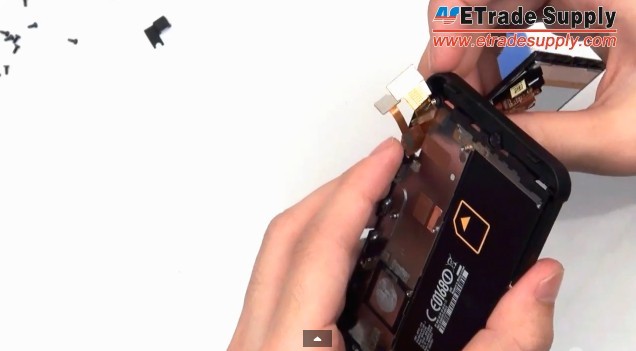 Remove the digitizer and lcd screen assembly[/caption]
11. Carefully thread flex cables through the hole on the front housing, remove the digitizer and lcd screen assembly
Notice:
Welcome to visit our official Twitter, Facebook and YouTube. We will post more DIY repair guide videos and the latest news of upcoming cellphone on these social media platforms.


 IOS 17.4 official version pushed to block battery vulnerability
  Is the Chinese-made rear case for the iPhone 15 series going on the market?
  New products coming:USB to MFI Lightning Cable
  Big BUG of iPhone 15
  Successfully submitted!
Hi there This is kind of urgent I don’t another phone – help needed please?
I know I may sound silly but my z10 I need it to work a little longer can’t buy new yet. The speaker doesn’t work suddenly only if headset plugged in — the sim card tray is stuck in the sim slot – help— the charging port came out if the blackberry – I have it – I only have tools for eye glasses I got 1 screw out but others seem not shaped for a screwdriver but a star shape tool they will not budge — help. I really need to fix this thing – can some tell me how to put the charging port back in to the z10 bb ? Where do I get tools to get the screws out – would Walmart have anything ? It’s open til 10-11 pm today ?
Advice needed asap please ?
Hellow, my blackberry Z10 wont turn on,I put a new battery but its still nothing,can you help me
Plug the charger to see if it is normal on charging. Maybe the battery flex cable is loose, or the display connector is loose.
hello sir . yesterday i try to do my blackberry Z10 reset my phone but after restart show the error on my screen http://www.bberror.com/bb 10-0015 . now i start to do upgrade my phone software then they show that u r phone already update version got . now my phone not start until now show upside error only what i do sir please give me advice
HI. My blackberry Z10 gets hot on its own whats the cus?
my z10 always take heat from behind close to the battry and do blackberry have any store or deport in kano
my z10 always take heat from behind close to the battry
There’s a crake on my Z10 rear housing leading to no connection on my Z10. Where to buy it.
Hi Calvin, here is the link where you can buy the good quality BlackBerry Z10 rear housing, please choose the right version before ordering. http://www.etradesupply.com/catalogsearch/result/?warehouse=0&q=blackberry+z10+rear+housing
Add a comment…Please help out…..there is one orange color IC next to the battery connector….the four(4) long which is positive and negative…that very orange IC next it….what’s is it called….that’s my major problem…it has blown off..I can’t quite get the IC name….is on the left side of the connector positive n negative orange color IC….
Is it possible to clean front camera without detaching the entire phone. Suggest me a way to clean the dust in it.
Hi, please somebody help me. My bbz10 screen was cracked though part of the screen still works. I bought a complete replacement screen and was fixed.
1.. A screw is missing.
2. My z10 comes on and I could hear my pings, messages etc coming in but the screen is black and I could see some sort of lightning slightly underneath..
Any ideas please… On what could be wrong?
Hello Mary, please check the LCD display connector first, see if it’s exactly connected to the logic board.
Hi, thank you for your help. I have checked and all the connectors are well connected…. Any more ideas please..thank you!
It starts with illuminated black screen, can hear all the sounds for email, pings, whatsapp etc.. But its just a black screen and I’ve checked all connectors…please help..
Hi, do you now have 46537- 002/111 LCD digitizer assembly in stock now? As I have bought another but still has the same problem. I observed that the two new LCD I purchased have the same code so maybe they both are the wrong ones. I googled up the model ( RFH121LW) of my z10 and it gave me the 46537-002/111 code. So if you have it in stock, maybe I could purchase and try one more time before I give up.
P.s. I didn’t know the code of the one that came with the phone originally since I wasn’t the one that changed it. Any more ideas will be appreciated.
Thank you!
Hi Mary, sorry, we don’t have the 46537-002/111 LCD and digitizer assembly in stock. I’m afraid you’ll have to buy it from eBay or Amazon, be careful not to buy the fraud one. Good luck!
Hi Mary, I’m afraid the new LCD display you installed is a damaged one.
nice work here…my bb z10 gets stuck when loading the ring like 4 percent..i have tried installing the os several times still doing the same thing..took it to some technicians,i was told it is not a software problem..it is hardware problem..can you pls tell me what can be done to it…tanx in anticipation
My blackberry z10 had developed a fault. It doesnt startup at all. When i press the power button to turn it on, it only show a red LED light nd it neva comes on. Pls need ur assistance.
Sounds like the LCD display went black.
my z10 charging jeck is broken….what is the market price for it….
Hi Azhar, the Blackberry Z10 charging port is less than $2.00.
http://www.etradesupply.com/blackberry-z10-charging-port.html
I want to purchase BB Z10 any one suggest display quality good or not, earlier i was used Lumia-720 and screen is damaged after dropped very less hight, please suggest.
My phone doesnt play songs via usb cable and even my headset doesn’t play
i dropped my bbz10 and it landed screen down and broke, it comes on but the sensitive of the screen don’t work, if i get it fixed will i loose anything on my phone
I dropped my BB z10 from knee height while standing up from seat. Unfortunately it fell on screen side. Nothing cracked screen seems to be fine, but my phone is not starting up. When i connect to my Mac machine with USB connector with out battery the Red light on the top right shows up for 20 seconds or so and then dissappear. After that i insert the battery and hold the start button on top, red light shows up again for few minutes and disappears. But nothing happens after that. The screen stays black.
my scrren cracked and i’m trying to fix it, where could i find the parts and tools???
The parts can be found here:
http://www.etradesupply.com/blackberry/bb-10-phone/blackberry-z10.html
The tools can be found here:
http://www.etradesupply.com/accessories/accessories/repair-tools.html
i have dropped my z10 and the screen broke so i need a new screen anyone?
oh and I should mention when I put them on speaker phone I can hear them fine
my BBZ10 may have been dropped a few times. last week I used the headphones for music while jogging, since then when I get an incoming call or make an out going call I can hear the voice on the other end but they cant hear me. Can this problem be fixed?
my bb z10 is switch off @75% of bettry plz help me i’m tired
Good day,
I need a motherboard for my BB Z10. could you please advise me.
Thanks in advance.
My brothers phone has a barely visible crack in the screen and the ink and picture still comes up but only half of the screen is touch sensitive. Would you recommend replacing more than just the touch screen? And would the LCD display be found on the inside of the phone?
Hi Tylan, we’d suggest you replace with this product: http://www.etradesupply.com/oem-blackberry-z10-lcd-screen-and-digitizer-assembly-with-frame-lcd-46537-001-111.html
Quick question, where can I get a 0.8x40mm pentalobe screwdriver?
Hi Tylan, you may refer to: http://www.etradesupply.com/accessories/accessories/repair-tools.html
please help,is there a place that sells/repairs blackberry Z10 screen in south africa jhb at an affordable price,compared to the min R4500 i heard about from cell c consultant? i dropped my husbands phone and NO am in no position to pay such ridiculous amounts to Cell C!
Hi Zethu, if you’re confident with your DIY skills, you may try to replace the BlackBerry Z10 screen by yourself, it’ll be much much cheaper than R4500. Here’s our another article guide for your reference: http://www.etradesupply.com/blog/how-to-repair-cracked-blackberry-z10-screen/
My z10 battery goes off at 75%, it just turns off and only connection to a power source brings it back on. Please help. Thanks
same problem happning to me .Its a major bug in z 10 it is a software problem .u have to delete ur software and reinstall it .or go to blacberry service center they replace the software . for any other problem contact me my mail id is ashu.kharb911@gmail.com …………………bb user
My blackberry z10 had developed a fault. It doesnt startup at all. When i press the power button to turn it on, it only show a red LED light nd it neva comes on. Pls need ur assistance.
my phone does the same thing. is the problem solved??? how did you fix it?
My z10….keeps going off..once d battery percentage is 48….i just goes completely dead n won’t come on till I recharge…am really confused..
I need a rear camera for Z10 STL 100-1. It uses the special version camera. Can you help me find it?
I need a Blackberry Z10 motherboard new or used…. Can you please help me?
Really part of articles. I merely became aware of your blog as well as in accession funds to say which i acquire in fact treasured accounts your blog discussions. Regardless We’re following as part of your add to and also I actually accomplishment you will get permission to access persistently swiftly.
My son sucked on my wife z10 (bottom part); speaker sounded horrible for a couple of weeks and now it doesn’t work. Is the speaker a removable piece? Thank you.
pressing the speaker at differnt points will help. or a google search of “speaker of z10 not working” will give you correct press points.
hope this helps
Hi.
The instructions show about removal of the screen.
There is some tape removed with the broken screen. Is there new tape on the new screen or is this something I need to reuse from the old screen?
Sorry to ask a potentially silly question. I don’t want to start a process I may not be able to finish.
Thanks.
Do you sell the tools to fix the z10 screen?
Hi
Where can I buy the tools for the repair the Z10 screen. I brought a set online but they do not fit. I am guessing they are not authentic.
Can you direct me to a site that sells the both the Torx 4 screwdriver and the 0.8×40mm Pentalobe screwdriver?
I found the Torx 4 on this site but not the 0.8×40mm Pentalobe screwdriver.
Help!
Hi please my Z10 STL100-1 won’t come on anymore not even a single light from d LED..I was told my Z10 is totally dead…can I get a Z10 motherboard from you guys?
Sorry, we don’t have the Z10 motherboard now.
How much does Z10 screen and digitizer cost?
The Z10 screen assembly with frame is about $27. You can find on our website etradesupply.com by searching “OEM BlackBerry Z10 LCD Screen and Digitizer Assembly with Frame”
Where can I find a replacement motherboard? I’m confused about which part it actually is.
Hi Paul,
Sorry, we don’t have the motherboard for BlackBerry Z10 now. You can go to eBay or Amazon to have a look. Good luck.
Hi,
i drop my BB Z10 today, and the screen cracked.. i can turn on the phone, however, when i touch the screen, nothing happen. do you have any idea what happening?
Probably the digitizer of your screen is broken, replace it can solve the problem. Good Luck!
Will you be able to ship my order to nigeria?
Hi Toneroww,
Yes, we are able to ship to Nigeria.
Hi, I have blackberry z10. My rear camera was not working. It just showed rainbow lines. I have replaced the camera itself but the problem still persists. Any recommendations
Do you ship in Canada or just the US?
Hi Danny, we ship to worldwide, including Canada.
I feel this is one of the most significant info for me. And i am glad studying your article.This is a great article.
Hi,
I am confused as to which part to order.
LCD-46537-002/111 or LCD-46537-001/111.
Are these different except for the Frame included?
and why is it 1/2 the price for it with the frame?
Do I have to open my phone first and see the part # on the existing display?
Please let me know so I know which one to order.
Thanks
Hi, Louis, you can find the LCD code on your BlackBerry Z10’s LCD display, the LCD-46537-002/111 or LCD-46537-001/111 is the version of the Blackberry’s smartphone. Please check your LCD code carefully to choose the correct version before purchasing. And I’m really very sorry to tell you that the version of LCD-46537-002/111 is out of stock now on our site, you could try Ebay or Amazon as we don’t know when we will have it.
I replaced my BBZ10 LCD and digitizer now BBZ10 will turn on. What do I need to do now?
i have a big problem with my z10 . when my z10 come on its display shivering . but when i open video than its play normally whats the problem in it pleaz any one guide me