


How to DIY Wooden Dock and Stand for iPhone
BY Junior | 八月 7th, 2013 | 0 | 1
 How to DIY Wooden Dock and Stand for iPhone[/caption]
In many cases, lots of people want to prop up the iPhone so that they can easily watch a video or appreciate the device’s special design and beautiful appearance. However, it’s very hard for most of users to find a better way of stabilizing the iPhone’s tilt. We know that it is very popular that flood in the websites of Do-It-Yourself iPhone docks and stands, and all of those accessories are not ordered from the online stores. Unfortunately, numerous of how-to are complex and difficult to achieve, but do not worry! Today we present a tutorial of DIY a simple wooden iPhone dock and stand.
Did you ever admire a basic wooden iPhone dock? If you don’t want to pay money for a dock and stand that didn’t come with your new iPhone, you can consider making one by yourself according to this step-by-step instruction.
You Need the Following Tools & Materials:
1. A piece of wood
2. Saw
3. Chisel
4. Pen
5. A piece of sandpaper
Step One: Prepare a Piece of Wood before DIY iPhone Dock
You need to get a piece of wood. In another word, you can use some related tools such as the saw and the chisel to finish this work. We get the wood from a used wooden door.
Step Two: Design a Deep Groove
Use the carving tools to make a deep groove, the width should be wider than the iPhone.
[caption id="attachment_4175" align="alignnone" width="300"]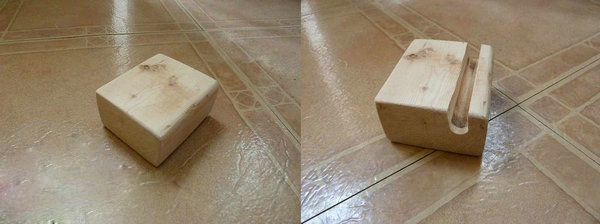 Design a Deep Groove[/caption]
Step 3: Design the Through-hole
Design a through-hole in the middle part of the deep groove, the size of the groove should be able to hold the port of the USB.
Step 4: Design the Groove on the Back Part of the Dock
Design the groove on the back part of the dock, so that the data cable can go through the groove successfully.
[caption id="attachment_4179" align="alignnone" width="300"]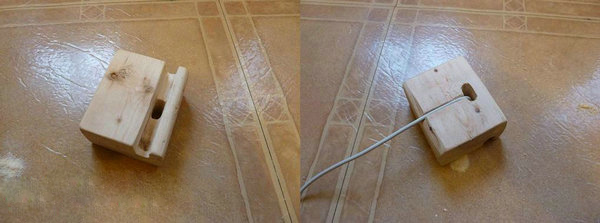 Design the Groove on the Back Part of the Dock[/caption]
Step 5: Polish the DIY iPhone Dock and Stand
Polish the surface of the dock with a piece of sandpaper.
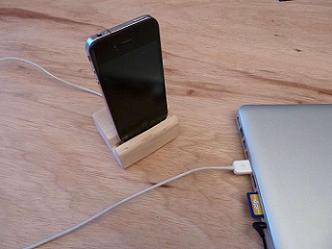
Step 6: Place the cellphone on the dock, the DIY work has been accomplished.
[caption id="attachment_4177" align="alignnone" width="300"]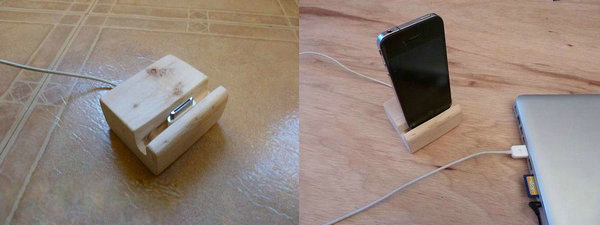 Try This Wooden iPhone Dock[/caption]
Conclusion: Here are some tips for the instruction, Firstly, it is advisable to use the pen to draw the lines on the position of the wood where you plan to design the groove before starting the design. Secondly, please be careful when using the sharp tools. What’s more, if you like DIY instructions, welcome to pay attention to our official Twitter, Facebook and YouTube, we will share the latest cellphone take apart videos and DIY tutorials on these social media platforms.


