


How to DIY a Paper Case for iPad 4
BY Junior | 八月 9th, 2013 | 0 | 1
Many people like the way that iPad looks without a protective case. However, we know it's obviously inadvisable to carry an iPad without a case, as we will never forgive ourselves once we crack it if the device has no protective case.
If you’re interested in the cases for your tablet, making a case by yourself is a great way to personalize your device without losing its original design. It’s even better than the expensive cases from an online shop. This tutorial teaches you how to use the basic tools and some materials to DIY a cheaper case. The idea of this tutorial is very simple and it won’t take you much time. Make this DIY iPad case and enjoy your original iPad! Enjoy!
[caption id="attachment_4226" align="alignnone" width="300"] How to DIY a Paper Case for iPad[/caption]
Tools & Materials:
1. A book
2. Paper Knife
3. Adhesive & Glue
4. Pencil
Step One: Draw the “frame” of the iPad
Select a book which has a bigger size than the iPad. Turn the cover page of the book, and then draw the “frame” of the iPad with the pencil on the first page.
[caption id="attachment_4227" align="alignnone" width="300"]
How to DIY a Paper Case for iPad[/caption]
Tools & Materials:
1. A book
2. Paper Knife
3. Adhesive & Glue
4. Pencil
Step One: Draw the “frame” of the iPad
Select a book which has a bigger size than the iPad. Turn the cover page of the book, and then draw the “frame” of the iPad with the pencil on the first page.
[caption id="attachment_4227" align="alignnone" width="300"] Draw the “frame” of the iPad[/caption]
Step Two: Hollow out the papers
Hollow out the papers that are lying in the frame. You should clip the interior angle carefully in this step, especially make a great radian.
Step Three: Stick all the interior pages together
As the following picture shows, stick all the interior pages together with adhesive while the frame is fit perfectly for the iPad. Attention: In this step, in order to prevent the interior pages from tilting, you should make the cover stand on the table, and position the cover and the pages at a 90-degree angle.
[caption id="attachment_4228" align="alignnone" width="300"]
Draw the “frame” of the iPad[/caption]
Step Two: Hollow out the papers
Hollow out the papers that are lying in the frame. You should clip the interior angle carefully in this step, especially make a great radian.
Step Three: Stick all the interior pages together
As the following picture shows, stick all the interior pages together with adhesive while the frame is fit perfectly for the iPad. Attention: In this step, in order to prevent the interior pages from tilting, you should make the cover stand on the table, and position the cover and the pages at a 90-degree angle.
[caption id="attachment_4228" align="alignnone" width="300"] Hollow out the papers & Stick all the interior pages together[/caption]
Step Four:
Turn the book to the back cover, use the glue to stick the back cover and the interior pages together, and then place something heavy above the front cover. The cheaper iPad case is finally done until the glue is dry.
If you worry that the side part of the iPad may be scratched by the pages, you can use the thin flannelette to cover the interior part of the pages.
[caption id="attachment_4229" align="alignnone" width="300"]
Hollow out the papers & Stick all the interior pages together[/caption]
Step Four:
Turn the book to the back cover, use the glue to stick the back cover and the interior pages together, and then place something heavy above the front cover. The cheaper iPad case is finally done until the glue is dry.
If you worry that the side part of the iPad may be scratched by the pages, you can use the thin flannelette to cover the interior part of the pages.
[caption id="attachment_4229" align="alignnone" width="300"] Stick the back cover and the interior pages together[/caption]
Attention:
When working with glue, make sure everything is dry and clean before touching the iPad.
When making this case, be very careful towards scratching your iPad’s display.
You need to measure, try, proof, etc. again and again with your iPad, as the case needs to be very precise in order to function well.
Welcome to visit more DIY tutorials on ETrade Supply’s official Facebook, Twitter, and watch the cellphone repair videos on Youtube.
Stick the back cover and the interior pages together[/caption]
Attention:
When working with glue, make sure everything is dry and clean before touching the iPad.
When making this case, be very careful towards scratching your iPad’s display.
You need to measure, try, proof, etc. again and again with your iPad, as the case needs to be very precise in order to function well.
Welcome to visit more DIY tutorials on ETrade Supply’s official Facebook, Twitter, and watch the cellphone repair videos on Youtube.
 How to DIY a Paper Case for iPad[/caption]
Tools & Materials:
1. A book
2. Paper Knife
3. Adhesive & Glue
4. Pencil
Step One: Draw the “frame” of the iPad
Select a book which has a bigger size than the iPad. Turn the cover page of the book, and then draw the “frame” of the iPad with the pencil on the first page.
[caption id="attachment_4227" align="alignnone" width="300"]
How to DIY a Paper Case for iPad[/caption]
Tools & Materials:
1. A book
2. Paper Knife
3. Adhesive & Glue
4. Pencil
Step One: Draw the “frame” of the iPad
Select a book which has a bigger size than the iPad. Turn the cover page of the book, and then draw the “frame” of the iPad with the pencil on the first page.
[caption id="attachment_4227" align="alignnone" width="300"]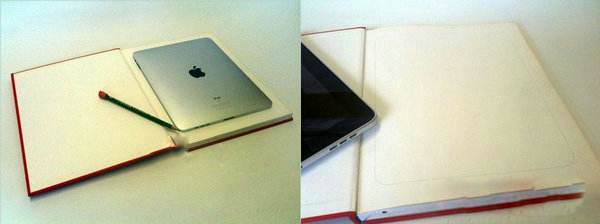 Draw the “frame” of the iPad[/caption]
Step Two: Hollow out the papers
Hollow out the papers that are lying in the frame. You should clip the interior angle carefully in this step, especially make a great radian.
Step Three: Stick all the interior pages together
As the following picture shows, stick all the interior pages together with adhesive while the frame is fit perfectly for the iPad. Attention: In this step, in order to prevent the interior pages from tilting, you should make the cover stand on the table, and position the cover and the pages at a 90-degree angle.
[caption id="attachment_4228" align="alignnone" width="300"]
Draw the “frame” of the iPad[/caption]
Step Two: Hollow out the papers
Hollow out the papers that are lying in the frame. You should clip the interior angle carefully in this step, especially make a great radian.
Step Three: Stick all the interior pages together
As the following picture shows, stick all the interior pages together with adhesive while the frame is fit perfectly for the iPad. Attention: In this step, in order to prevent the interior pages from tilting, you should make the cover stand on the table, and position the cover and the pages at a 90-degree angle.
[caption id="attachment_4228" align="alignnone" width="300"]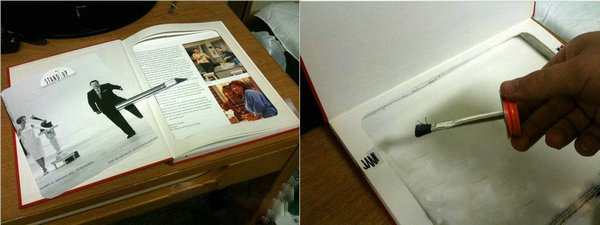 Hollow out the papers & Stick all the interior pages together[/caption]
Step Four:
Turn the book to the back cover, use the glue to stick the back cover and the interior pages together, and then place something heavy above the front cover. The cheaper iPad case is finally done until the glue is dry.
If you worry that the side part of the iPad may be scratched by the pages, you can use the thin flannelette to cover the interior part of the pages.
[caption id="attachment_4229" align="alignnone" width="300"]
Hollow out the papers & Stick all the interior pages together[/caption]
Step Four:
Turn the book to the back cover, use the glue to stick the back cover and the interior pages together, and then place something heavy above the front cover. The cheaper iPad case is finally done until the glue is dry.
If you worry that the side part of the iPad may be scratched by the pages, you can use the thin flannelette to cover the interior part of the pages.
[caption id="attachment_4229" align="alignnone" width="300"] Stick the back cover and the interior pages together[/caption]
Attention:
When working with glue, make sure everything is dry and clean before touching the iPad.
When making this case, be very careful towards scratching your iPad’s display.
You need to measure, try, proof, etc. again and again with your iPad, as the case needs to be very precise in order to function well.
Welcome to visit more DIY tutorials on ETrade Supply’s official Facebook, Twitter, and watch the cellphone repair videos on Youtube.
Stick the back cover and the interior pages together[/caption]
Attention:
When working with glue, make sure everything is dry and clean before touching the iPad.
When making this case, be very careful towards scratching your iPad’s display.
You need to measure, try, proof, etc. again and again with your iPad, as the case needs to be very precise in order to function well.
Welcome to visit more DIY tutorials on ETrade Supply’s official Facebook, Twitter, and watch the cellphone repair videos on Youtube.
Share:


