


How to Make A DIY Micro Lens for Camera Cellphone
BY Junior | 七月 22nd, 2013 | 0 | 1
It is interesting to make a DIY micro lens for camera cellphone, and lots of how-to articles exist on the websites. Today, we share an easy way to make a simple camera micro lens for your smartphone.
The weak spots of cellphone camera are poorly focusing effort and shooting the small or even tiny objects. So we DIY the Camera Micro Lens to better tackle with the focus problems.
Now we try to add a small magnifying glass on the front of the camera lens of the cellphone so that we can shot in macro. The hardest problem we must resolve is to firm the camera micro lens.
 Magnifying Glass[/caption]
Step Two:
Twist the Paper Clip into a wire.(You’d better select a flexible wire.)
[caption id="attachment_3902" align="alignnone" width="300"]
Magnifying Glass[/caption]
Step Two:
Twist the Paper Clip into a wire.(You’d better select a flexible wire.)
[caption id="attachment_3902" align="alignnone" width="300"] Twist the Paper Clip into a wire 1[/caption]
[caption id="attachment_3903" align="alignnone" width="300"]
Twist the Paper Clip into a wire 1[/caption]
[caption id="attachment_3903" align="alignnone" width="300"]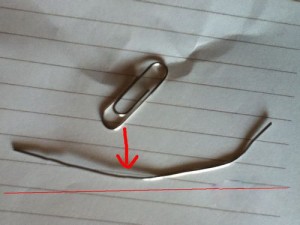 You’d better select a flexible wire[/caption]
Step Three:
Select a pen that its diameter should be smaller than the magnifying glass.
[caption id="attachment_3904" align="alignnone" width="300"]
You’d better select a flexible wire[/caption]
Step Three:
Select a pen that its diameter should be smaller than the magnifying glass.
[caption id="attachment_3904" align="alignnone" width="300"]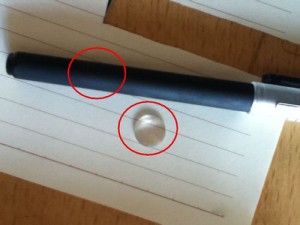 Select a pen[/caption]
Step Four:
Tie the paper clip around the pen, and then make it as the instruction of the following picture. Take careful and avoid to be pricked by the needle.
[caption id="attachment_3905" align="alignnone" width="300"]
Select a pen[/caption]
Step Four:
Tie the paper clip around the pen, and then make it as the instruction of the following picture. Take careful and avoid to be pricked by the needle.
[caption id="attachment_3905" align="alignnone" width="300"]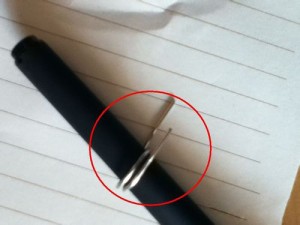 Tie the paper clip around the pen[/caption]
[caption id="attachment_3906" align="alignnone" width="300"]
Tie the paper clip around the pen[/caption]
[caption id="attachment_3906" align="alignnone" width="300"]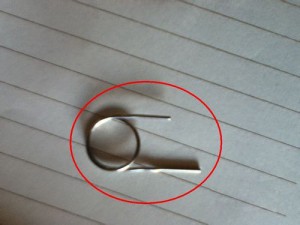 Take careful and avoid to be pricked by the needle[/caption]
Step Five:
Clamp the magnifying glass with the paper clip tightly. Please don’t scratch the glass, and make sure adjust the glass to a suitable position.
[caption id="attachment_3907" align="alignnone" width="300"]
Take careful and avoid to be pricked by the needle[/caption]
Step Five:
Clamp the magnifying glass with the paper clip tightly. Please don’t scratch the glass, and make sure adjust the glass to a suitable position.
[caption id="attachment_3907" align="alignnone" width="300"]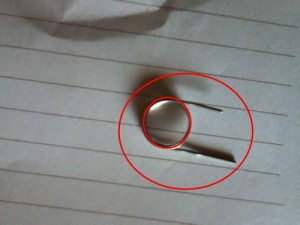 Clamp the magnifying glass with the paper clip tightly[/caption]
Step Six:
This step shows two ways of fixing the glasses to the camera. You could use the tape to stick the “foots” of the glasses, and then fix the glasses to the camera.
[caption id="attachment_3910" align="alignnone" width="300"]
Clamp the magnifying glass with the paper clip tightly[/caption]
Step Six:
This step shows two ways of fixing the glasses to the camera. You could use the tape to stick the “foots” of the glasses, and then fix the glasses to the camera.
[caption id="attachment_3910" align="alignnone" width="300"] Use the tape to stick the “foots” of the glasses[/caption]
Step Seven:
You can also use the rubber band to fix the “foots”. Finally, make the magnifying glass parallel the camera’s related position.
[caption id="attachment_3911" align="alignnone" width="300"]
Use the tape to stick the “foots” of the glasses[/caption]
Step Seven:
You can also use the rubber band to fix the “foots”. Finally, make the magnifying glass parallel the camera’s related position.
[caption id="attachment_3911" align="alignnone" width="300"] Use the rubber band to fix the “foots”[/caption]
The following are three comparison pictures. The first picture was taken under the DIY micro lens. The second picture was made without the DIY micro lens. The last one was taken by a phone camera with the set focus function but still didn’t use the DIY micro lens. See how powerful the Micro Lens is. Hurry up to DIY the Camera Micro Lens and enjoy it.
[caption id="attachment_3914" align="alignnone" width="300"]
Use the rubber band to fix the “foots”[/caption]
The following are three comparison pictures. The first picture was taken under the DIY micro lens. The second picture was made without the DIY micro lens. The last one was taken by a phone camera with the set focus function but still didn’t use the DIY micro lens. See how powerful the Micro Lens is. Hurry up to DIY the Camera Micro Lens and enjoy it.
[caption id="attachment_3914" align="alignnone" width="300"] This picture was taken under the DIY micro lens[/caption]
[caption id="attachment_3927" align="alignnone" width="300"]
This picture was taken under the DIY micro lens[/caption]
[caption id="attachment_3927" align="alignnone" width="300"] This picture was made without the DIY micro lens[/caption]
[caption id="attachment_3932" align="alignnone" width="300"]
This picture was made without the DIY micro lens[/caption]
[caption id="attachment_3932" align="alignnone" width="300"]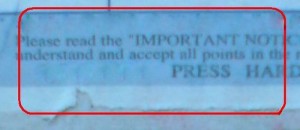 This one was taken by a phone camera with the set focus function[/caption]
Tools:
1. A small Magnifying Glass.
2. Rubber Band.
3. Paper Clip and A Pen.
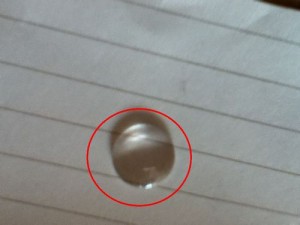
Step One:Have a small magnifying glass prepared. (You could get the magnifying glass from the old glasses.)
[caption id="attachment_3900" align="alignnone" width="300"]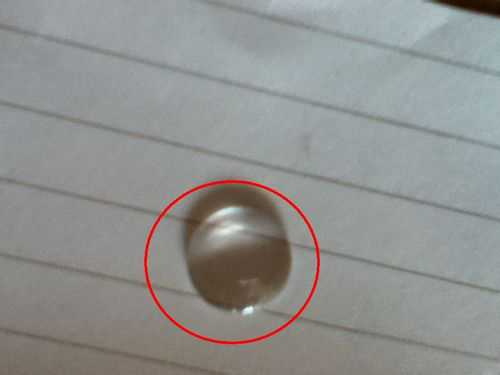 Magnifying Glass[/caption]
Step Two:
Twist the Paper Clip into a wire.(You’d better select a flexible wire.)
[caption id="attachment_3902" align="alignnone" width="300"]
Magnifying Glass[/caption]
Step Two:
Twist the Paper Clip into a wire.(You’d better select a flexible wire.)
[caption id="attachment_3902" align="alignnone" width="300"]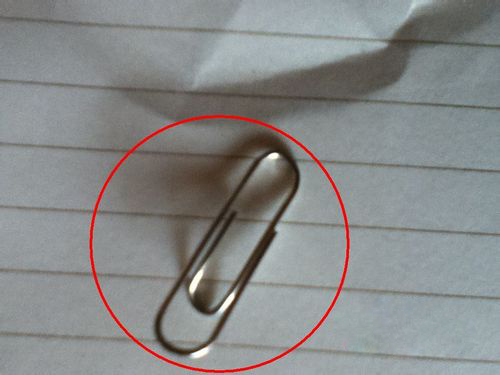 Twist the Paper Clip into a wire 1[/caption]
[caption id="attachment_3903" align="alignnone" width="300"]
Twist the Paper Clip into a wire 1[/caption]
[caption id="attachment_3903" align="alignnone" width="300"]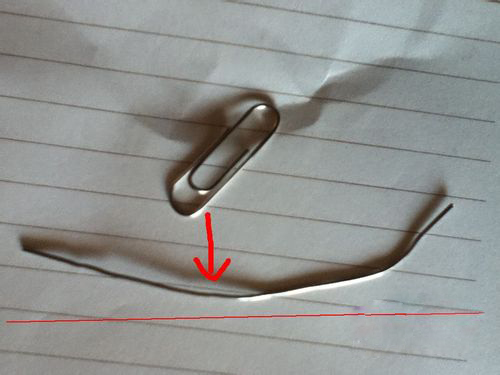 You’d better select a flexible wire[/caption]
Step Three:
Select a pen that its diameter should be smaller than the magnifying glass.
[caption id="attachment_3904" align="alignnone" width="300"]
You’d better select a flexible wire[/caption]
Step Three:
Select a pen that its diameter should be smaller than the magnifying glass.
[caption id="attachment_3904" align="alignnone" width="300"]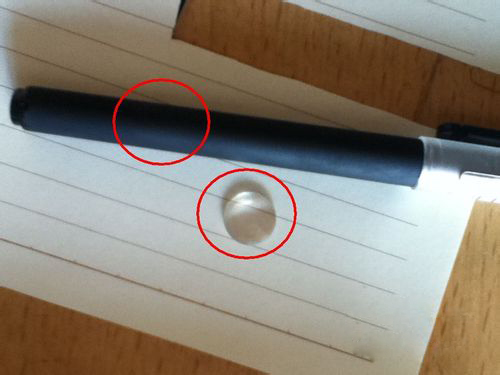 Select a pen[/caption]
Step Four:
Tie the paper clip around the pen, and then make it as the instruction of the following picture. Take careful and avoid to be pricked by the needle.
[caption id="attachment_3905" align="alignnone" width="300"]
Select a pen[/caption]
Step Four:
Tie the paper clip around the pen, and then make it as the instruction of the following picture. Take careful and avoid to be pricked by the needle.
[caption id="attachment_3905" align="alignnone" width="300"] Tie the paper clip around the pen[/caption]
[caption id="attachment_3906" align="alignnone" width="300"]
Tie the paper clip around the pen[/caption]
[caption id="attachment_3906" align="alignnone" width="300"] Take careful and avoid to be pricked by the needle[/caption]
Step Five:
Clamp the magnifying glass with the paper clip tightly. Please don’t scratch the glass, and make sure adjust the glass to a suitable position.
[caption id="attachment_3907" align="alignnone" width="300"]
Take careful and avoid to be pricked by the needle[/caption]
Step Five:
Clamp the magnifying glass with the paper clip tightly. Please don’t scratch the glass, and make sure adjust the glass to a suitable position.
[caption id="attachment_3907" align="alignnone" width="300"]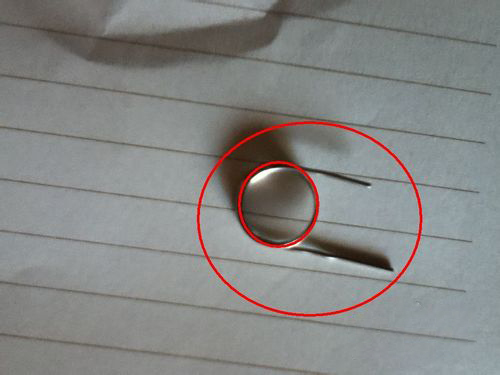 Clamp the magnifying glass with the paper clip tightly[/caption]
Step Six:
This step shows two ways of fixing the glasses to the camera. You could use the tape to stick the “foots” of the glasses, and then fix the glasses to the camera.
[caption id="attachment_3910" align="alignnone" width="300"]
Clamp the magnifying glass with the paper clip tightly[/caption]
Step Six:
This step shows two ways of fixing the glasses to the camera. You could use the tape to stick the “foots” of the glasses, and then fix the glasses to the camera.
[caption id="attachment_3910" align="alignnone" width="300"]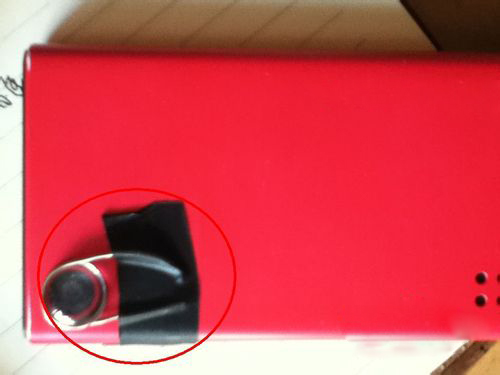 Use the tape to stick the “foots” of the glasses[/caption]
Step Seven:
You can also use the rubber band to fix the “foots”. Finally, make the magnifying glass parallel the camera’s related position.
[caption id="attachment_3911" align="alignnone" width="300"]
Use the tape to stick the “foots” of the glasses[/caption]
Step Seven:
You can also use the rubber band to fix the “foots”. Finally, make the magnifying glass parallel the camera’s related position.
[caption id="attachment_3911" align="alignnone" width="300"]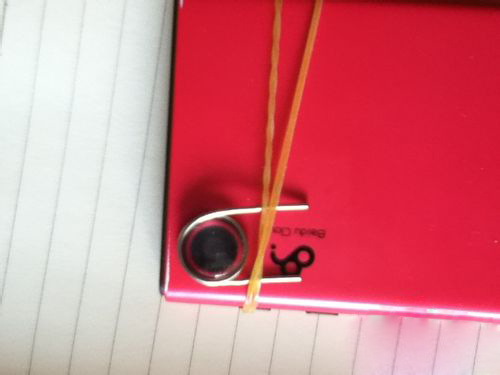 Use the rubber band to fix the “foots”[/caption]
The following are three comparison pictures. The first picture was taken under the DIY micro lens. The second picture was made without the DIY micro lens. The last one was taken by a phone camera with the set focus function but still didn’t use the DIY micro lens. See how powerful the Micro Lens is. Hurry up to DIY the Camera Micro Lens and enjoy it.
[caption id="attachment_3914" align="alignnone" width="300"]
Use the rubber band to fix the “foots”[/caption]
The following are three comparison pictures. The first picture was taken under the DIY micro lens. The second picture was made without the DIY micro lens. The last one was taken by a phone camera with the set focus function but still didn’t use the DIY micro lens. See how powerful the Micro Lens is. Hurry up to DIY the Camera Micro Lens and enjoy it.
[caption id="attachment_3914" align="alignnone" width="300"] This picture was taken under the DIY micro lens[/caption]
[caption id="attachment_3927" align="alignnone" width="300"]
This picture was taken under the DIY micro lens[/caption]
[caption id="attachment_3927" align="alignnone" width="300"] This picture was made without the DIY micro lens[/caption]
[caption id="attachment_3932" align="alignnone" width="300"]
This picture was made without the DIY micro lens[/caption]
[caption id="attachment_3932" align="alignnone" width="300"] This one was taken by a phone camera with the set focus function[/caption]
Share:


