3 Steps for iPhone 11 Back Rear Camera Replacement
BY kaye | October 22nd, 2019 | 0 | 2
Tools required:
- Types of screwdriver – pentalobe, Y-type, Phillips
- Screen opening tool – hard plastic plectrum, suction cup, ultra-thin sheet, spudger
- Other tools – tweezers, hot air blowing gun
Step 1: The iPhone 11 Teardown and separate the display screen
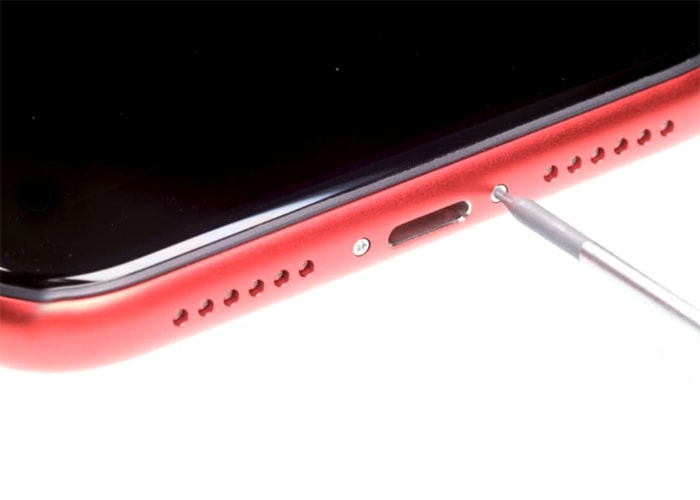
1.1 Power off the phone, remove the two pentalobe screws on the bottom.
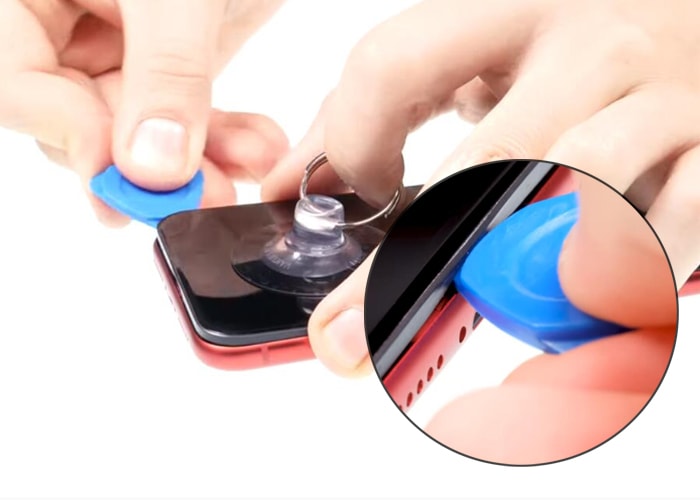
1.2 Hot gun bowing the screen around the edge to soften the frame glue, use a suction cup and hard plastic plectrum to separate the screen, use an ultra-thin sheet as well, remember don’t insert the sheet too deep in case of damaging the internal parts.
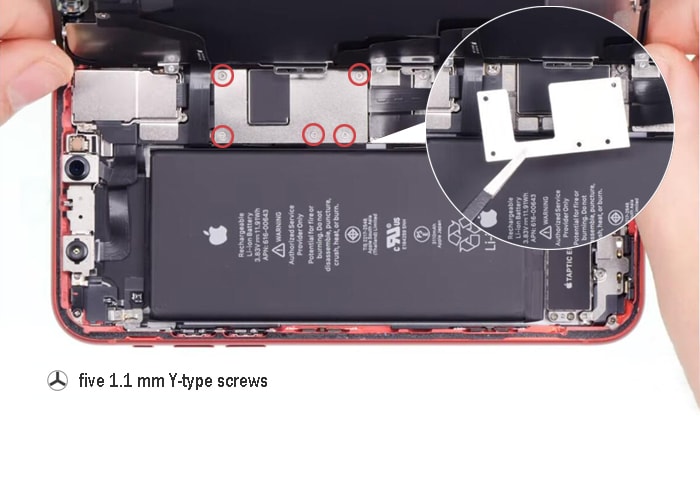
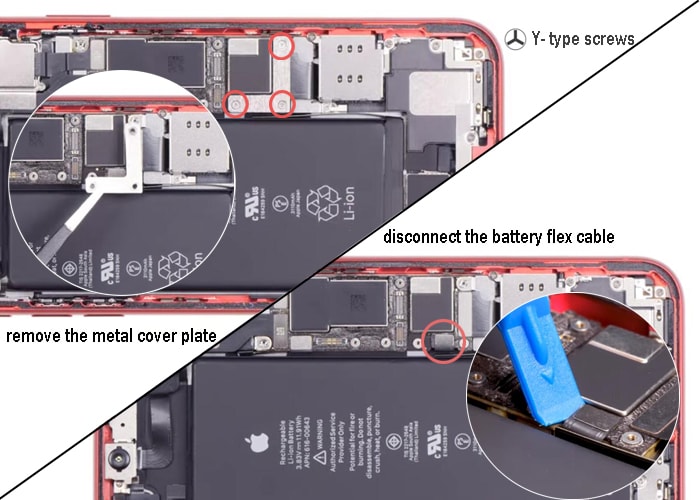
1.3 Use a stable object to hold the screen after it is completely separated, loosen the five Y-type screws and remove the metal cover plate on the screen flex cables with tweezers.
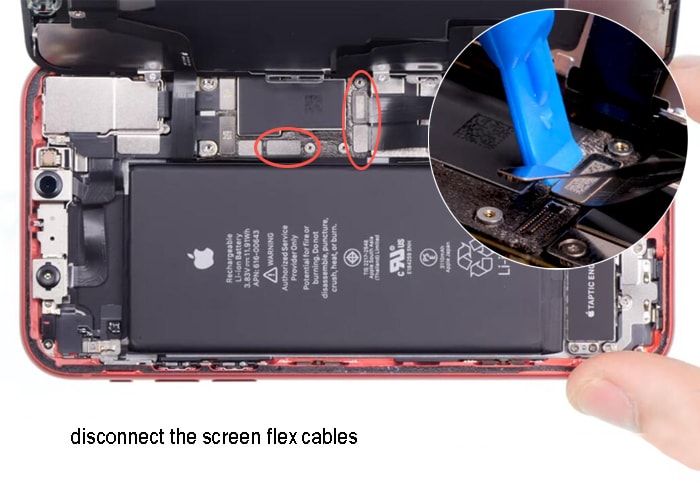
1.4 Disconnect the screen flex cables with a spudger, remove the screen away after it is entirely disconnected.
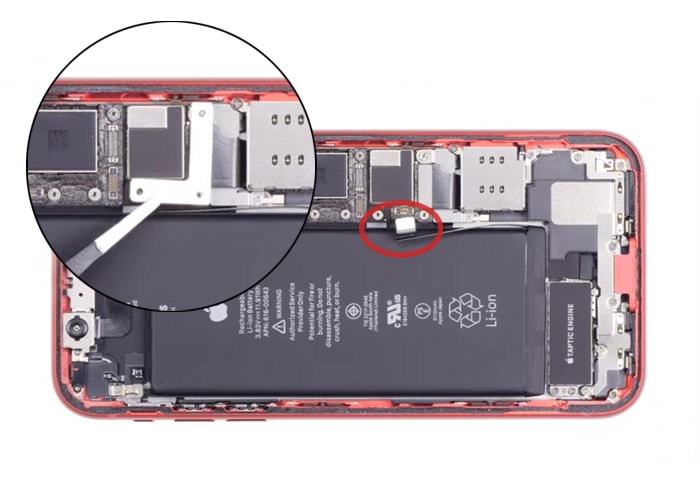
1.5 Loosen the three Y-type screws and remove the small metal bracket on the battery flex cable with tweezers. Disconnect the battery flex.
Step 2: Take out the original rear camera and replace the new one
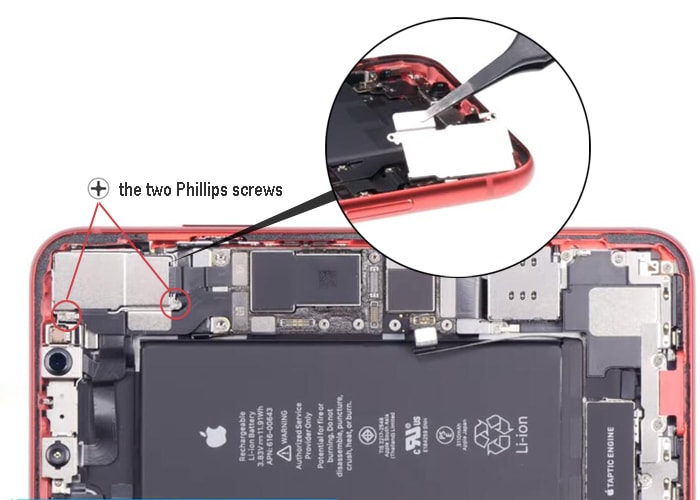
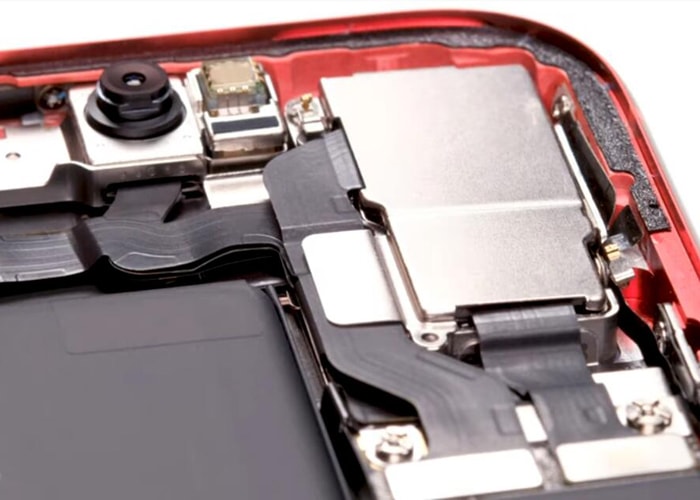
2.1 Loosen the two Phillips screws and remove the cover plate which is for fixing the rear cameras
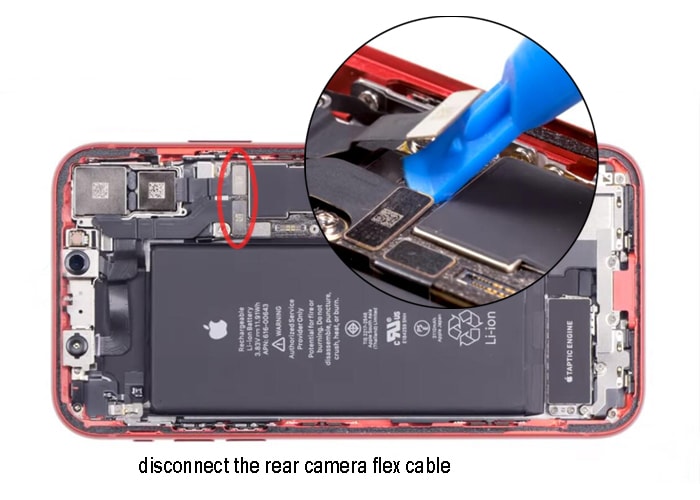
2.2 Disconnect the camera flex cables with a spudger
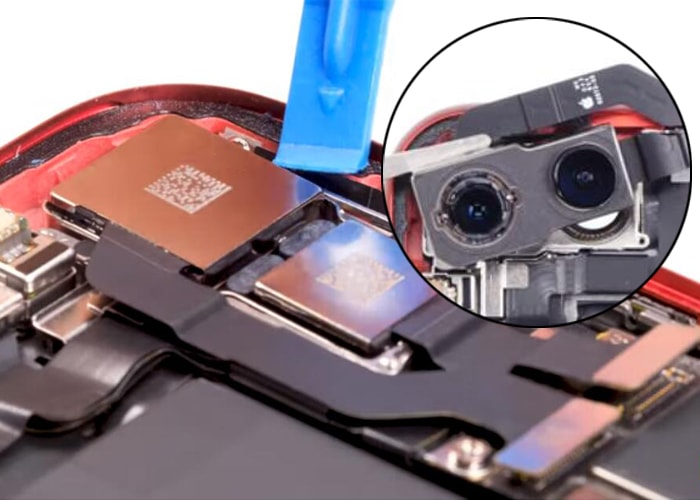
2.3 Pry up the rear camera slowly with a spudger and take it out with tweezers
2.4 Place the new cameras in the place as the original one used to be, make sure there is no dust, dirt or fingerprint on the lens
2.5 Connect the camera flex cables, place the cover plate back and screw back the screws
2.6 Connect the battery flex back, place the small cover plate back and screw back the three Y-type screws
Step 3: Reassemble the screen and seal up the frame
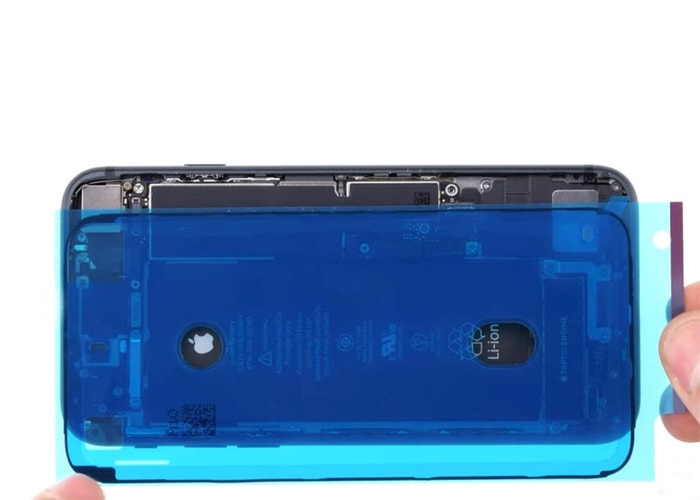
3.1 Clean up the black adhesive with tweezers on the frame edge, attach a new fame adhesive sticker and make sure it sticks on each corner all around
3.2 Connect the screen flex cables back
3.3 Reattach the metal cover plate back and tighten the five Y-type screws for fixing the flex cables
3.4 Turn on the iPhone and test the back rear camera and the screen as well, make sure it is working all right, if not, check the position of the connectors or the flex cables
3.5 Install the screen back and gently press each corner, make sure no gaps between the frame and the display
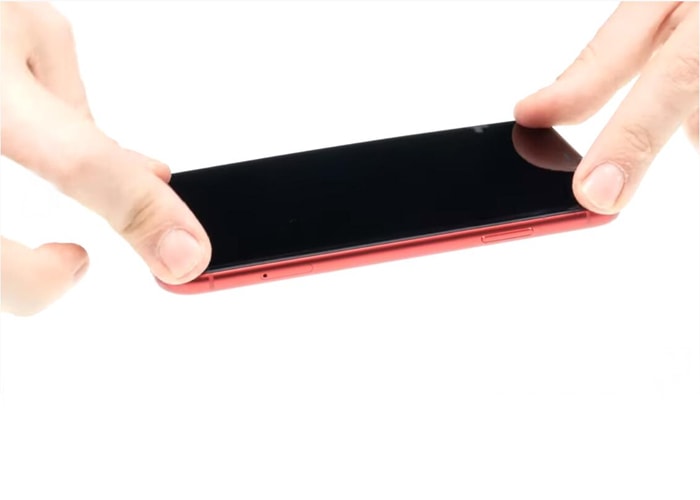
3.6 Tighten the two pentalobe screws back on the bottom, all process is done.
Noted: The whole process is under the hands of someone professional on smartphone repair. If you are not confident about yourself, we suggest you go to the Apple authorized service center or a repair shop. To be mentioned, your iPhone 11 will be not 100% waterproof after teardown, you’d better consider it before you take it to repair.
You may also be looking for:
For iPhone 11 back rear camera replacement
For iPhone 11 LCD screen and digitizer assembly replacement
For iPhone 11 frame adhesive sticker replacement
Disclaimer:
All contents above originated from YouTube video. If it infringes the copyright of the author's, kindly advise us and we shall delete it as soon as possible. Thanks for understanding.
RECOMMENDED PARTS
POPULAR ARTICLE
- How to Teardown iPhone 11 for Display Screen Replacement
- How to Fix Your iPhone Microphone Not Working Problem
- How to Replace iPhone XR Front Face Camera?
- How to Replace iPhone XR LCD Digitizer Screen?
- iPhone X Water Damage Repair Guide (Still Work in 2019)
- How Much Does It Cost To Replace An iPhone XS Display?
- iPhone X Explosion: 7 Small But Important Things To Note
- 7 Ways To Fix Your iPad Not Charging In 2018
- iPhone 7 Screen Replacement | iPhone 7 Repair
- Which Parts of iPhone X and iPhone XS Are Exchangeable?
- iPhone X, XS, XS Max, and XR Battery Comparison
- How To Fix iPhone XS/XS Max, And XR Bluetooth Connection Issue
- Apple Will Fix the iPhone 8/8 Plus/X Auto Brightness Issue in iOS 12
- iPhone got exploded too?! How to protect your phone from battery explosion
- HTC 10 DIY Teardown for screen, charging port, battery replacement
- 6 Quick Tips To Distinguish Between Real And Fake iPhone SE
- Analysis on: Are China made LCDs for iPhone 5S Compatible with iPhone SE?
- How to Replace the Galaxy S7, S7 Edge Battery Replacement
- How to Disassemble the Galaxy S7 LCD Assembly to Replace Screen, Charging Port and Home Button
- How to Repair Samsung Galaxy S7 Edge Cracked Screen
- How to Tear Down/Disassemble the Galaxy S7 for Screen Replacement
- How to Fix Phone Gets Hot and Battery Drains Fast
- Xperia Z5 Premium USB Charging Port Replacement Tutorial
- How to Replace Your Broken Sony Xperia Z5 Premium Screen Step by Step Guide
- 15 Tips to Improve Your Galaxy Note 5’s Battery Life
- How To Replace A Cracked Motorola Droid Turbo 2 Screen
- How To Fix iPhone 6S Auto Shutdown When It Still Has Battery?
- How To Replace A HTC One A9 Cracked Screen
- How to Distinguish the Fake Apple Earpod from the Real One
- How to Replace the LG V10 Screen in 5 Steps
- How To Solder/Replace A Samsung Galaxy or iPhone Charging Port
- The Cost of Repairing a Cracked Galaxy S6, S6 Edge Screen
- How To Fix Cracked Xperia Z5 For Screen Replacement
- What’s Need to Be Prepared As a Startup Cell Phone Repair Shop
- *Update* The Root of Differences among Copy iPhone LCDs: Structure
- Important Info: Pay Attention To Defective Recycled iPhone LCDs
- How to Replace Galaxy Note 5, S6 Edge Plus Battery
- Are The Flood of New High Copy iPhone LCD Screens as Good as The OEM Ones?
- iPhone 6+ and iPhone 6S+ Screen Comparison Report
- How to Recover Photos and Data with Broken Screens
- How To Identify Different LG G4 Model Numbers
- How to Fix Cracked iPhone 6S for Screen Replacement
- Cost of Repairing a Damaged Screen on the LG G4
- How To Fix LG G4 Digitizer Touch Screen Issue
- As a Newbie, What You Should Know About Jailbreaking
- How To Tear Down/Disassemble Galaxy S6 Edge Plus For Screen Replacement
- 90% Of People Don’t Know These Cellphone Battery Information
- Insider Tips to Save Your Water-damaged Device
- How to Set Up ETrade Supply’s Adhesive Dispenser Robot
- Top 10 iPhone 6 Problems and Solutions
- How To Fix Vertical Lines On An iPhone Screen After Replacement
- How to Replace Sony Xperia Z3+ Screen/Screen Replacement Guide
- How To Disassemble/Tear Down Sony Xperia Z3+
- How to Assemble Small Parts on iPhone 6 LCD Screen Assembly
- Reasons Behind & Solutions for iPhone 6 Frame and LCD Separation Issues
- How to Replace The LG G4 Charging Port
- How to Replace the Cracking LG G4 Screen in 10 Minutes
- How To Replace An Oneplus One Cracked Screen
- iPhone 5 LCD Screen Assembly Small Parts List
- How to Replace the HTC One M9 Charging Port
- How to Replace HTC M9 LCD Screen Assembly
- Top 5 Most Common iPhone 6 Issues You May Come Across
- How To Tear Down The Samsung Galaxy S6 In 10 Steps
- The Cost Of Repairing A Cracked Nexus 6 Screen
- How To Repair A Nexus 6 Cracked Screen
- How To Disassemble Nexus 6 In 10 Steps
- The Cost Of Repairing A Broken iPhone 6 Screen
- Five Minutes Work to Replace Your iPhone 6 Plus Broken Screen
- How to Repair a Cracked Samsung Galaxy S5 Screen