

 Loading...
![]()


- Compatible With: SM-N910, SM-N910A, SM-N910V, SM-N910P, SM-N910R4, SM-N910T, SM-N910F, SM-N910H
-
For Samsung Galaxy Note 4 SM-N910/N910A/N910V/N910P/N910T/N910F/N910H/N910R4 LCD screen and Digitizer Assembly Replacement - White - With Logo - Grade S+
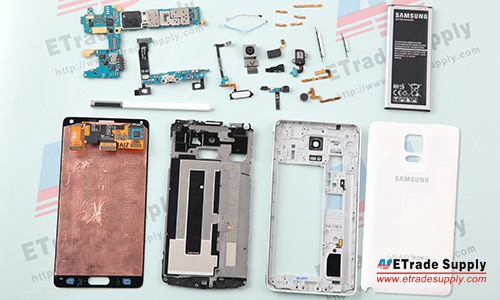
This item includes the following components:
1. LCD Screen;
2. Digitizer Touch Screen;
3. Stylus Sensor Film.
Notice: Please test the functionality of this item before installation.
Specifications:
Screen Size: 5.7 inches
Color: White
Display Type: Super AMOLED capacitive touchscreen, 16M colors
Resolution: 1440 x 2560 pixels, 515 ppi pixel density
Protection: Corning Gorilla Glass 4
Compatibility: Samsung Galaxy Note 4 Series
Features:
This Samsung Galaxy Note 4 LCD screen assembly includes the LCD display, digitizer touch screen and front glass already attached.
This Samsung Galaxy Note 4 LCD Assembly is white and black. Please choose the right color before ordering.
This Samsung SM-N910F LCD assembly is branded with Samsung logo on the top.
This Galaxy Note 4 LCD and Digitizer assembly is brand new and original. And each item of ETS goes through strictly inspection before shipping out.
This replacement screen assembly is compatible with all Samsung Galaxy Note 4 Series. Please do not confuse it with other version.
How to Install / Tips:
The flex cable are very sensitive and are easily damaged. Handle carefully.
Special tools are required for disassembling or reassembling the Samsung SM-N910F LCD and Digitizer Touch Screen Assembly.
The installation of any new part should be done by a qualified person. ETS is not responsible for any damage caused during installation.
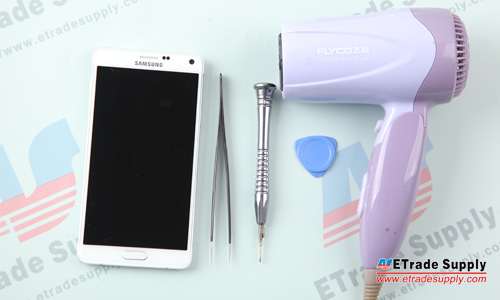
This is the Samsung Galaxy Note 4 Disassembly tutorial guide:
Tools Needed:
1. Hairdryer/Heat Gun;4. Tweezers.
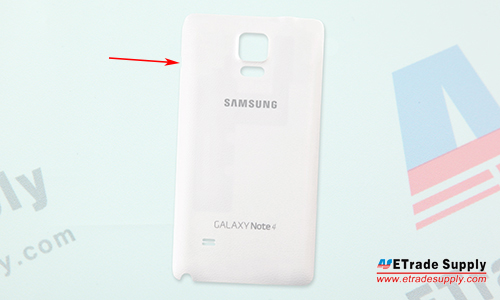
1. Remove the Galaxy Note 4 Battery Door.
Power off the device;
Pull out the S Pen stylus;
Pull the battery door out through the small gap between the power button and the battery door.
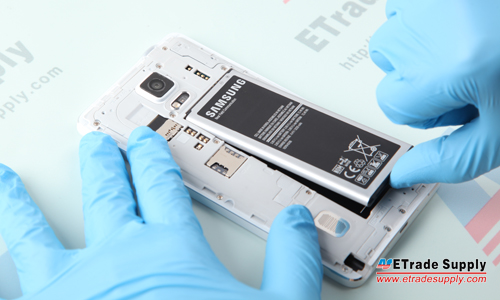
2. Remove the Galaxy Note 4 Battery.
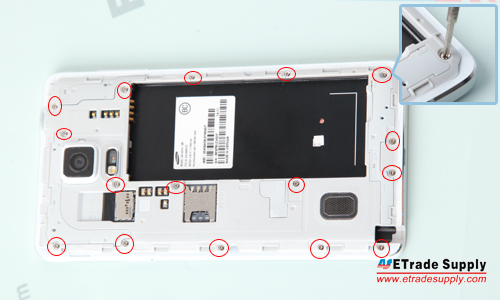
3. Remove the Galaxy Note 4 Rear Housing.
Undo the 16 screws in the rear housing;
Insert the case opening tool to take off the rear housing.
(Notice: The loudspeaker assembly is located in the rear housing and difficult to remove.)
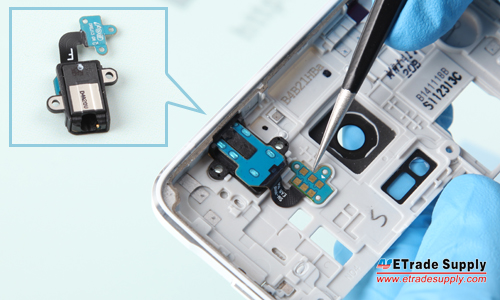
4. Remove the Galaxy Note 4 Rear Housing Small Parts.
Remove the Earphone Jack.
Remove the Power Button and Volume Button.
(Notice: The loudspeaker assembly is located in the rear housing and difficult to remove.)
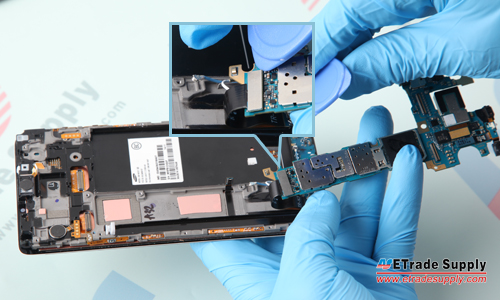
5. Remove the Galaxy Note 4 Motherboard.
Pry up the 4 connectors;
Undo the screw;
Remove the upper portion of main board and pry up the connector.
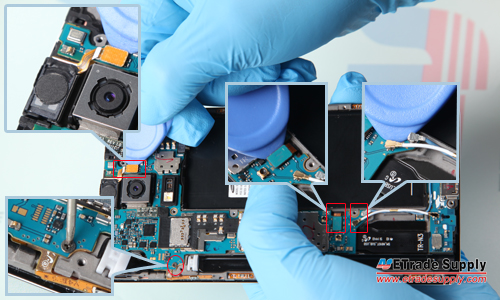
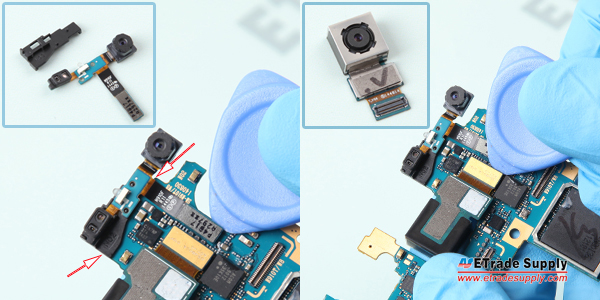
6. Remove the Galaxy Note Cameras.
Pry up the front facing camera connector;
Pry up the front camera retaining bracket;
Pry up the connector to remove the back facing camera.
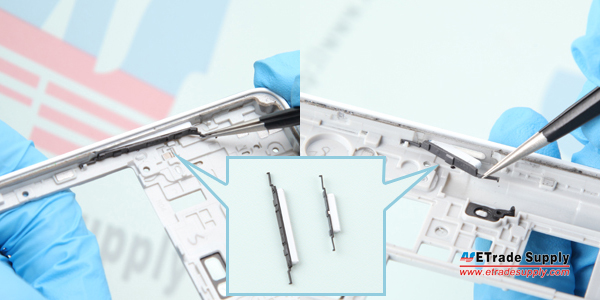
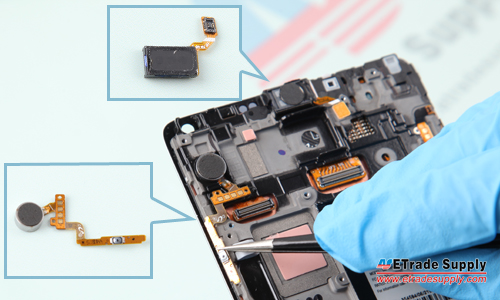
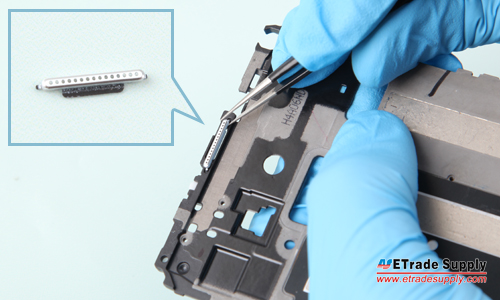
7 Remove the Galaxy Note 4 Small Parts.
Remove the vibrating motor with power button flex;
Remove the ear speaker with flex;
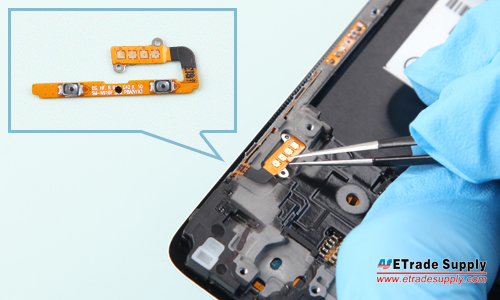
Remove the volume button flex;
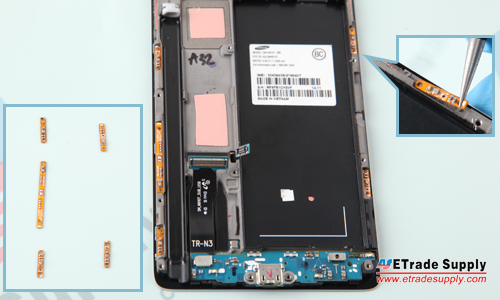
Remove the 5 antenna chips.
(Notice: The 5 signal chips are different in shape, be careful not to place them in the wrong position when reassembling.)
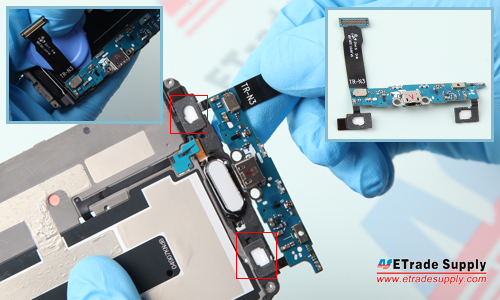
8. Remove the Galaxy Note 4 Charging Port Assembly.
Pry up the 2 connectors;
Undo the screw;
Pry up the charging port assembly and then pry up the two connectors.

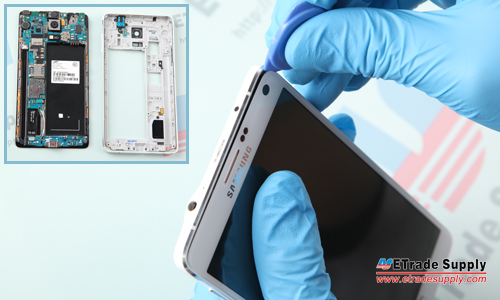
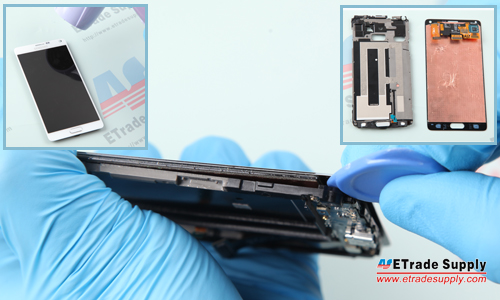
9. Remove the Galaxy Note 4 Middle Plate.
Heat up the LCD and Digitizer assembly for 2 minutes to soften the adhesive;
Insert the case opening tool to remove the middle plate.
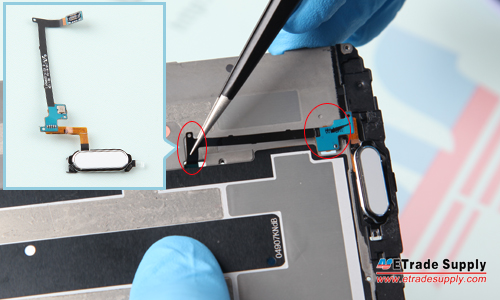
10. Remove the Galaxy Note 4 Middle Plate Small Parts.
Remove the Ear Speaker Mesh Cover;
Pry up the connector and pull out the home button flex ribbon.
The Galaxy Note 4 disassembly is now completed.
-
(3)5 StarsReviewed by Benjam** Smi**Rating
The package arrived quickly and the display looks wonderful, phone works fine after screen replacement, no issues at all.
Reviewed by Den** Drouk**Ratingawesome parts, I will buy more for my shops.

-
Customer also bought
 (Wifi Version) - Grade S+")
-1.jpg "For Apple iPad 2 Digitizer Adhesive Replacement (4 pcs/set) (Wifi Plus 3G Version) - Grade S+")


-
(Posted on 02/23/16)great parts, no touch issue, also good customer service