


How to Fix a Cracked iPhone 5C Screen
BY alina | October 11th, 2013 | 4 | 0
The smartphone screen is always easy to damage when you drop the device. The iPhone 5C screen is no exception. If you crack the iPhone 5C screen because of personal factors, Apple’s warranty may not cover it, which means it will be not cheap to fix it in the Apple store. Fortunately, it’s not extremely tough to replace the damaged iPhone 5C screen yourself. You can follow our iPhone 5C cracked screen repair tutorial step by step to fix the screen on your device. Please be noted the DIY repair will void your iPhone 5C warranty. 
Tools Needed to Fix a Cracked iPhone 5C Screen:
Pentalobe Screwdrivers
Small Phillip Screwdrivers
Metal Spudger Opening Tool
New iPhone 5C Replacement Screen
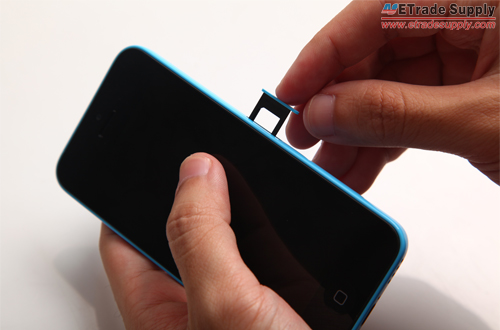
Step 1
Turn off the iPhone 5C and use eject pin to take out the SIM card tray.

Step 2
Undo 2 bottom screws next to the dock connector with Pentalobe screwdrivers.

Step 3
Lift up the LCD screen assembly with the help of the spudger tool.

Step 4
Use small Phillip screwdrivers to release 4 screws to remove the metal plate used to cover the LCD assembly connectors.

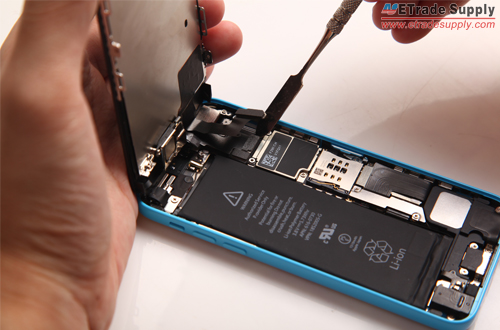
Step 5
Release 3 connectors to separate the LCD display assembly from the iPhone 5C rear housing with spudger tool. Then the LCD assembly is free.

Step 6
Release 2 screws on the metal shield to remove the ear speaker.

Step 7
Remove the sensor cable with the front facing camera.

Step 8
Undo 2 screws on the metal shield covering the home button to remove the home button. (If the new iPhone 5C LCD assembly you get comes with the home button, you don't have to do this step.)

Step 9
Release 6 screws on the LCD heat shield to remove it.

Step 10
Get a new iPhone 5C replacement screen and install the LCD heat shield to the new screen, and then fasten it with 6 screws.


Step 11
Put back the sensor cable with front camera back and the ear speaker with its metal shield to the LCD display assembly.

Step 12
Install the home button and the metal shield, and secure it with 2 screws.

Step 13
Buckle 3 connectors to the motherboard and fasten the metal shield with 4 screws.


Step 14
Press down the iPhone 5C LCD assembly make sure all the clips are in place.

Step 15
Install 2 bottom screws to fasten the LCD assembly and rear housing.

Step 16
Insert the SIM card tray and power the device on to make sure it works as normal.


 IOS 17.4 official version pushed to block battery vulnerability
  Is the Chinese-made rear case for the iPhone 15 series going on the market?
  New products coming:USB to MFI Lightning Cable
  Big BUG of iPhone 15
  Successfully submitted!
i replaced the screen and I have lines going across the screen and home button is not working?
Hi Jason, check if the connection between flex and logic board is correct and tight. BTW, we have another post explaining how to fix vertical line problem after iPhone reassembly, here we go: http://www.etradesupply.com/blog/how-to-fix-vertical-lines-on-an-iphone-screen-after-replacement/
I just followed all the steps. Took me a total of about forty five minutes and my daughters iPhone 5c works like a charm. She dropped it on the ground a shattered the screen after about four months of use. Worked for about three weeks then the led made screen go black, could still hear but no screen to see functions. Now she’s happy again.
Did all the steps and it was quite a bit of work. several hours.
Now that I powered the screen, I am not getting the apple logo.
Do you have any suggestions?
thank you